• Home
  • Suggest A Craft
  • DIY Newsletter

Craft Gossip

The largest independent craft review site since 2007

  • About CraftGossip
  • Our Network
    • Bath & Body Crafts
    • Candle Making Ideas
    • Crochet Ideas
    • Cross Stitch
    • Edible Crafts
    • Felting Patterns
    • Glass Art
    • Home & Garden Ideas
    • Indie Crafts
    • Jewelry Making
    • Kids Crafts
    • Knitting Patterns
    • Lesson Plans
    • Needlework
    • Party Ideas
    • Polymer Clay
    • Quilting Ideas
    • Recycled Crafts
    • Scrapbooking
    • Sewing Patterns
    • Card Making
    • DIY Weddings
    • Not Craft Ideas
  • Giveaways
  • Roundups
  • Store
  • Search

Winter Spice Wax Tarts

November 30, 2016 by Shellie Wilson

6a00e008d395a8883401b7c7f482f1970b-800wi

As the holiday season approaches, many people are looking for ways to create a cozy and festive atmosphere in their homes. One simple and effective way to do this is by filling your house with the delightful smells of Christmas. And what better way to achieve this than by making your own wax melts?

Wax melts are small, scented pieces of wax that are melted in a warmer to release their fragrance. They are a great alternative to traditional candles, as they do not emit any soot or smoke, and can last for several hours. Plus, they are easy to make at home with just a few ingredients.

To make your own wax melts, you will need some wax, fragrance oil, and a mold. You can use any type of wax, but soy wax is a popular choice as it is eco-friendly and has a low melting point. Fragrance oils come in a variety of scents, from traditional Christmas scents like cinnamon and peppermint to more unique scents like gingerbread and pine. You can also add in some festive colors using natural dyes or mica powders.

Once you have your ingredients, simply melt the wax in a double boiler, add in the fragrance and color, and pour the mixture into your molds. You can use silicone molds, muffin tins, or even ice cube trays. Allow the wax to cool and harden before removing the melts from the molds.

To use your wax melts, simply place one or two in a wax warmer and enjoy the lovely aroma that fills your home. You can also place them in small open jars or dishes around the house as potpourri. Just be sure to keep them out of reach of children and pets, as they may mistake them for candy.

With just a few simple steps, you can easily create your own wax melts and enjoy the warm and inviting smells of Christmas in your home. So why not give it a try and see how easy it is to make your own festive wax melts?
Christmas Wax Melts 


Read These Next

  • 20 DIY Christmas Candles To Make Your House Smell Amazing
  • 10 Ways To Dress up Store Bought Candles For Gifts
«
»

Have you read?

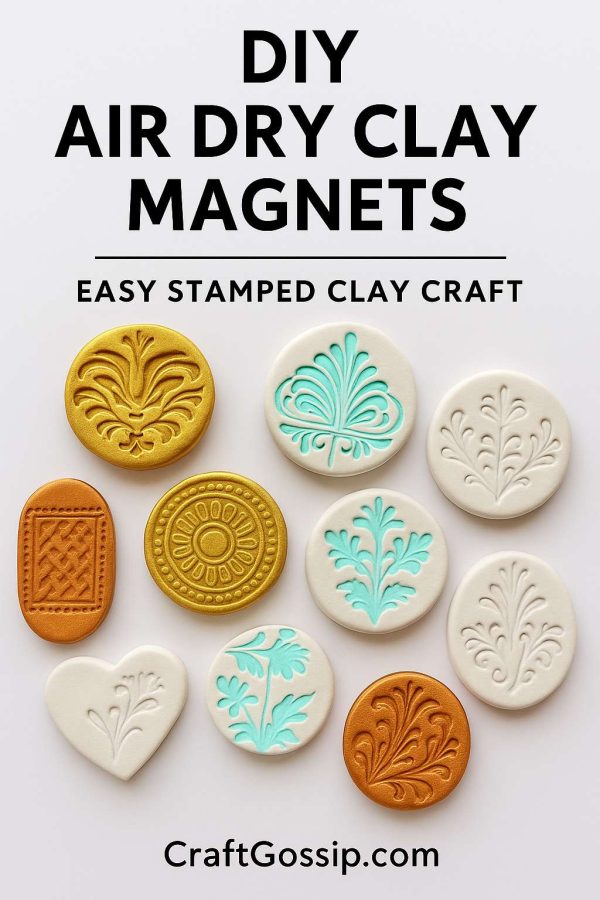
DIY Air Dry Clay Magnets – Easy Stamped Clay Craft

There’s something wonderfully nostalgic about clay crafts, isn’t there? The cool, smooth texture in your hands, the way it slowly transforms with just a little pressure and imagination—it’s both soothing and creative. Today, we’re making DIY air dry clay magnets that are stamped, painted, and perfect for adding a handmade touch to your fridge or craft room.

This project is simple, relaxing, and looks far more “designer” than it really is. Think of it as pottery without the kiln—no fancy equipment needed!


Supplies You’ll Need

  • Air dry clay (white works best for stamping)

  • Rubber stamps or textured items (lace, doilies, leaves, even buttons!)

  • Acrylic paint or ink pads

  • Rolling pin (or just grab a glass bottle)

  • Circle cookie cutter (or jar lid)

  • Magnets (strong flat-backed ones work best)

  • Strong craft glue or hot glue gun

  • Sealer (optional: Mod Podge or matte varnish)

Step-by-Step Tutorial

Step 1 – Roll Out Your Clay

Start with a small ball of clay and roll it out to about ¼ inch thick. Not too thin, or it’ll crack while drying, and not too chunky, or your magnets will be too heavy.

Step 2 – Stamp and Texture

Press your chosen rubber stamp or textured object firmly into the clay. Don’t worry about perfection—slight variations give that handmade charm.

Tip: If you’re using an ink pad, you can ink the stamp before pressing to add instant color to the impression.

Step 3 – Cut Out Shapes

Use a cookie cutter, jar lid, or knife to cut neat circles (or any shape you like—hearts, squares, even freeform ovals).

Step 4 – Smooth Edges

Gently smooth the edges with damp fingers or a bit of water. This gives a polished finish.

Step 5 – Dry

Place your pieces on baking paper and allow them to dry for 24–48 hours. Flip halfway through to prevent curling.

Step 6 – Paint or Highlight

Once dry, you can leave them natural or lightly brush paint over the raised designs to highlight the texture. Metallics (gold, silver, copper) look stunning, but even soft pastels give a pretty effect.

Step 7 – Seal (Optional)

If you want extra durability, brush on a thin coat of Mod Podge or varnish.

Step 8 – Attach Magnets

Finally, glue a magnet to the back of each piece. Let the glue cure fully before sticking them on your fridge.

Variations to Try

  • Rustic farmhouse look: Use lace or burlap for stamping and paint with a whitewash effect.

  • Modern boho: Try geometric stamps and metallic paint accents.

  • Seasonal magnets: Use themed stamps (snowflakes, flowers, leaves) for year-round sets.

  • Kids’ art version: Let the kids press buttons, Lego bricks, or small toys into the clay for fun patterns.

These don’t just work as magnets—you can glue them onto gift tags, turn them into brooches, or even make them into pendants for necklaces. Once you start, you’ll be stamping everything in sight (don’t say I didn’t warn you!).

Handmade doesn’t have to be complicated or expensive. These DIY air dry clay magnets prove just that—simple materials, a little creativity, and you’ve got a set of unique, functional mini artworks. Perfect for gifting, decorating, or just adding a bit of joy to the everyday.


RSS More Articles

  • DIY Air Dry Clay Magnets – Easy Stamped Clay Craft
  • Etsy Spotlight – The Quilted Jacket You’ll Want to Make and Wear All Year
  • 6 FREE Disney Villains Silhouettes Die Cuts
  • Transforming an IKEA Shelf into a Rustic Farmhouse Beauty
  • Enchanted Coast Wrap – Crochet Pattern
  • On Point Pincushion Tutorial
  • Pantry Makeover- The power of Billy Bookcases and Stenciled Floors
  • Leaf Learning Activities for Kids
  • 2 Hour Crochet Sippers Pattern – Fast Rectangle Crochet Slippers – Cozy Feet in a Flash
  • The Easiest 2-Ingredient Cupcake Hack (Plus 10 Delicious Variations!)

Pick Your Blog

  • Sewing
  • Knitting
  • Quilting
  • Crochet
  • Home & Garden
  • Recycled Crafts
  • Scrapbooking
  • Card Making
  • Polymer Clay
  • Cross-Stitch
  • Edible Crafts
  • Felting
  • Glass Art
  • Indie Crafts
  • Kids Crafts
  • Jewelry Making
  • Lesson Plans
  • Needlework
  • Bath & Body
  • Party Ideas
  • Candle Making
  • DIY Weddings
  • Not Craft
  • Free Craft Projects

Copyright © 2025 · CraftGossip | Start Here | Contact Us | Link to Us | Your Editors | Privacy and affiliate policy