• Home
  • Suggest A DIY
  • DIY Newsletter

Craft Gossip

Independent craft blog since 2007

  • About CraftGossip
  • Our Network
    • Bath & Body Crafts
    • Candle Making Ideas
    • Crochet Ideas
    • Cross Stitch
    • Edible Crafts
    • Felting Patterns
    • Glass Art
    • Home & Garden Ideas
    • Indie Crafts
    • Jewelry Making
    • Kids Crafts
    • Knitting Patterns
    • Lesson Plans
    • Needlework
    • Party Ideas
    • Polymer Clay
    • Quilting Ideas
    • Recycled Crafts
    • Scrapbooking
    • Sewing Patterns
    • Card Making
    • DIY Weddings
    • Not Craft Ideas
  • Giveaways
  • Roundups
  • Store
  • Search

Want To Join The Team?

February 7, 2012 by Shellie Wilson

We have two positions available for CraftGossip.com Editors.

We receive 100s of applications and to be sure you are applying correctly please read everything  below. We want to be sure we’re  not being inundated with incomplete applicants. To help make applying run smoother we are asking you to please read and make sure your initial application contains all the details below.

If we are interested in taking the interview further we will contact you by the 15th of February.

We are looking for someone who can start blogging by the 1st of March.


1: Indie Crafts Editor

This position is most suited to someone obsessed with Indie Craft Artists and the movement associated with it. You will be required to seek out up to date information about events, crafting trends and online craft stores.

You will need to find an average of 10+ hours a week to fulfill a 5 post minimum (weekly).

This position is a revenue share based income. Based on the blogs current traffic this position is paid around $175 per month with plenty of room for traffic improvement which will increase the income.

The applicant must be confident with blogging (specifically wordpress).

We prefer that the applicant be located in the USA and have access to postal services.


2: Candle Making Editor

This position is most suited to someone who loves candlemaking.  You will be required to seek out up to date information about candle making trends, techniques and supplies.

You will need to find an average of 10+ hours a week to fulfill a 5 post minimum (weekly).

This position is a revenue share based income. Based on the blogs current traffic this position is paid around $100 per month with plenty of room for traffic improvement which will increase the income.

The applicant must be confident with blogging (specifically wordpress).

We prefer that the applicant be located in the USA and have access to postal services.


How to Apply – (Remember you must meet the requirements above also)

E-mail the following to [email protected]

Your Crafting Experience –

Your Location –

Your Age –

Your Current Employment Status –


«
»

Comments

  1. wendy says

    February 8, 2012 at 8:22 am

    I was a little disappointed that you’re only interested in US editors. I feel there is great room to improve this blog with UK-specific and Australian-specific editors.

  2. Cate says

    February 8, 2012 at 11:47 am

    I’m equally disappointed, it would be great to increase readership from the southern hemisphere, not to mention of course, Europe. Surely this is logical if revenue is based upon traffic?

  3. Alexis Brown says

    February 8, 2012 at 5:50 pm

    Really love your decorations and would really like to join this team to show what I really like to do in life.

  4. Siaron says

    February 10, 2012 at 5:21 am

    I fully agree with the comments made about a non-USA based editor. There are so many amazing crafters around the world that there should be an outlet for more news and views from elsewhere. Also, it appears that more and more of your giveaways are for US-based commentators only which is a great shame. I love this site and it has provided me with huge amounts of inspiration in all the crafts that I do. However, I am UK-based and would like to see more traffic, comments and posts coming from Europe and beyond.

  5. Shellie says

    February 10, 2012 at 4:19 pm

    Don’t worry Ladies we will be covering the UK with it’s very own Editor soon 🙂

Have you read?

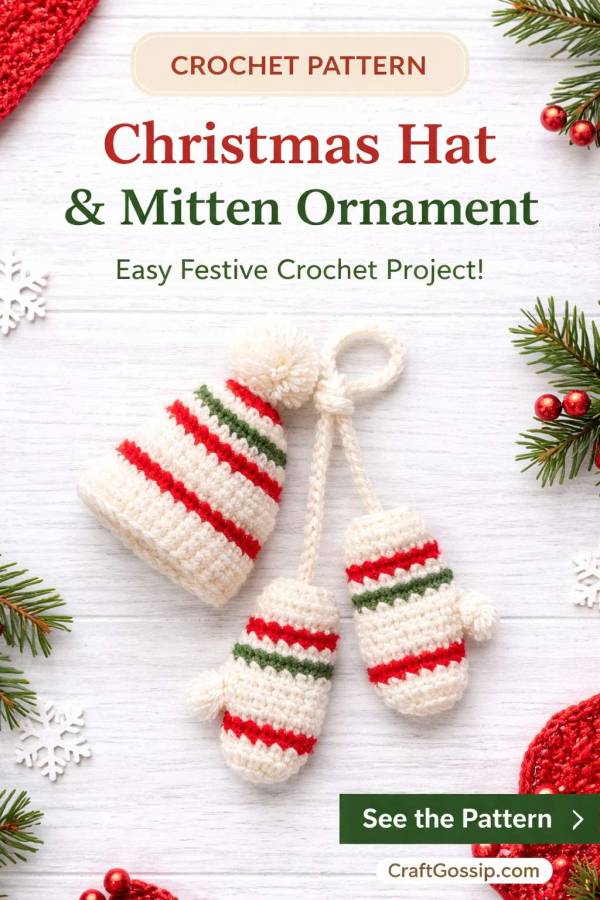
Crochet Christmas Hat and Mitten Ornament

This tiny crochet Christmas hat and mitten set is such a sweet little holiday make. It works up in festive stripes and looks lovely as a tree ornament, package topper, stocking decoration, or tucked onto a wreath. It’s also one of those fun small projects that uses up leftover yarn, which is always satisfying around Christmas.

Materials

  • Red Heart Super Sport or 3 ply sport yarn in Christmas colours such as: 
    • Blue 
    • White 
    • Green 
  • Size 1 steel crochet hook 
  • Yarn needle for finishing 

Finished Size

  • Hat: approximately 1½ inches long 
  • Mitten: approximately 2 inches long 

Abbreviations

  • ch = chain 
  • sc = single crochet 
  • sl st = slip stitch 
  • st = stitch 
  • sts = stitches 
  • tog = together 
  • rpt = repeat 
  • rnd = round 
  • lps = loops 

Pattern Notes

  • Unless otherwise stated, work in the back loops only. 
  • Join rounds with a slip stitch. 
  • The mitten is worked from the cuff upward. 
  • The hat is worked from the cuff upward. 
  • For a more traditional Christmas look, try red, white, and green. 

Christmas Mitten Ornament

Cuff

With mitten colour, ch 6.

Row 1: Sc in 2nd ch from hook and in each of the remaining 4 ch. Turn.
(5 sc)

Rows 2–12: Ch 1, sc in each st across. Turn.

Row 13: Hold the first and last rows together, matching stitches. Working through both thicknesses, ch 1, sl st in each st across to form the cuff. Do not turn.

Hand

Rnd 14: Working in the ends of the cuff rows, ch 1, (sc in next row end, 2 sc in next row end) around. Join with sl st in first sc.
(18 sts)

Rnd 15: Ch 1, sc in each st around. Join. Fasten off.

Rnd 16: Join stripe colour with sc in first st, sc in each st around. Join. Fasten off.

Rnd 17: With mitten colour, repeat Round 16.

Rnd 18: Join stripe colour with sc in first st, sc in next 10 sts, 2 sc in next st, leaving last 6 sts unworked. Join. Fasten off.
(13 sts)

Rnds 19–21: Repeat Rounds 17 and 16 alternately, ending with Round 17.

Rnd 22: Working in both loops, ch 1, sc in each st around. Join.

Rnd 23: Working in both loops, ch 1, sc in first 2 sts, sc next 2 sts tog, (sc in each of next 2 sts, sc next 2 sts tog) 2 times, sc in last st. Join.
Leave an 8 inch tail and fasten off.

Thread the yarn tail through the stitches of Round 23, pull to gather, and secure.

Thumb

Working in both loops, join mitten colour with sc in the first unworked st of Round 17.

Thumb Round 1: Sc in next 4 sts, 2 sc in last st. Join with sl st in first sc.
(7 sc)

Thumb Rounds 2–3: Ch 1, sc in each st around. Join.

At the end of the final round, leave an 8 inch tail and fasten off. Thread yarn through the stitches, pull to gather, and secure.

Christmas Hat Ornament

Cuff

With hat colour, ch 4.

Row 1: Sc in 2nd ch from hook and in each of the last 2 ch. Turn.
(3 sc)

Rows 2–32: Working in back loops only, ch 1, sc in each st across. Turn.

Row 33: Repeat Row 13 of the mitten pattern to join the cuff into a ring.

Hat Body

Rnd 34: Working in the ends of rows around the cuff, ch 1, sc in each row around. Join with sl st in first sc.
(32 sts)

Rnd 35: Working in back loops only, ch 1, sc in each st around. Join.

Rnds 36–38: Ch 1, sc in each st around. Join. Fasten off at the end of Round 38.

Rnds 39–44: Working in back loops only, repeat Rounds 16 and 17 of the mitten alternately for festive striping.

Rnd 45: Ch 1, sc in first 2 sts, sc next 2 sts tog, (sc in next 2 sts, sc next 2 sts tog) around. Join.
(18 sts)

Rnd 46: Repeat Round 45.
(12 sts)

Rnd 47: Ch 1, sc in first st, sc next 2 sts tog, (sc in next st, sc next 2 sts tog) around. Join.
Leave an 8 inch tail and fasten off.

Thread yarn through remaining stitches, pull to gather, and secure. Turn cuff up.

Tie

With mitten colour, ch 20. Fasten off.

Sew one end of the tie to the mitten cuff and the other end to the centre top of the hat on the wrong side.

Hanger

With mitten colour, ch 18. Fasten off.

Tack both ends of the hanger to the centre top of the hat on the right side.

This tiny Christmas set is adorable worked in classic holiday shades, and it would be very cute hanging on the tree beside handmade stockings and mini crochet candy canes.

RSS feed: More Articles More Articles

  • Christmas Stick and Stitch Embroidery Pattern – Etsy Review
  • A Nostalgic Christmas Pudding Knitting Pattern for Your Handmade Decorations
  • Quilt As You Go Tutorial (Beginner-Friendly Step-by-Step Guide)
  • Etsy Feature – Bread Pan Pottery Template
  • 10 Bucket Hat Knitting Patterns for a Fun Handmade Wardrobe
  • 10 Free Hot Water Bottle Cover Knitting Patterns for Cosy Nights
  • How to Make a Thanksgiving Family Recipe Scrapbook
  • 10 Triangle Scarf Knitting Patterns for Cosy Layers and Handmade Gifts
  • Free Christmas Pudding Cross Stitch Gift Tag Pattern With DMC Colour Key
  • 10 Thanksgiving Math Printables for Kids: Counting, Addition and Fun Number Puzzles

Pick Your Blog

  • Sewing
  • Knitting
  • Quilting
  • Crochet
  • Home & Garden
  • Recycled Crafts
  • Scrapbooking
  • Card Making
  • Polymer Clay
  • Cross-Stitch
  • Edible Crafts
  • Felting
  • Glass Art
  • Indie Crafts
  • Kids Crafts
  • Jewelry Making
  • Lesson Plans
  • Needlework
  • Bath & Body
  • Party Ideas
  • Candle Making
  • DIY Weddings
  • Not Craft
  • Free Craft Projects

Copyright © 2026 · CraftGossip | Start Here | Contact Us | Link to Us | Your Editors | Privacy and affiliate policy