• Home
  • Suggest A Craft
  • DIY Newsletter

Craft Gossip

The largest independent craft review site since 2007

  • About CraftGossip
  • Our Network
    • Bath & Body Crafts
    • Candle Making Ideas
    • Crochet Ideas
    • Cross Stitch
    • Edible Crafts
    • Felting Patterns
    • Glass Art
    • Home & Garden Ideas
    • Indie Crafts
    • Jewelry Making
    • Kids Crafts
    • Knitting Patterns
    • Lesson Plans
    • Needlework
    • Party Ideas
    • Polymer Clay
    • Quilting Ideas
    • Recycled Crafts
    • Scrapbooking
    • Sewing Patterns
    • Card Making
    • DIY Weddings
    • Not Craft Ideas
  • Giveaways
  • Roundups
  • Store
  • Search

The art of Furoshiki – Using cloth to wrap packages

October 16, 2009 by Minnie

furoshiki  - wrapping gifts in cloth
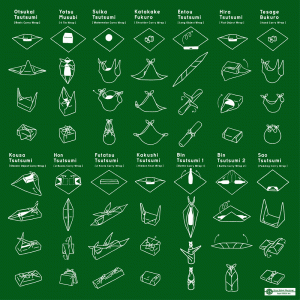
I found this great visual explanation on how to use cloth to wrap gifts on a Japanese government website. You can use any square or rectangular cloth.

Furoshiki (???, furoshiki) are a type of traditional Japanese wrapping cloth that were frequently used to transport clothes, gifts, or other goods. Although possibly dating back as far as the Nara period, the name, meaning “bath spread”, derives from the Edo period practice of using them to bundle clothes while at the sent? (public baths;public furo). Before becoming associated with public baths, furoshiki was known as hirazutsumi (??), or flat folded bundle. Eventually, the furoshiki’s usage extended to serve as a means for merchants to transport their wares or to protect and decorate a gift.

Last weekend I was in a craft store and there was a display of gorgeous wrapping papers. I love a fancily wrapped gift. However, as we all know, it creates an absurd amount of waste for just a moment or two of beauty.

I’m about to make one using some soft cotton and some flannel. Basically I am going to make a small blanket and also wrap a gift in it. Two gifts in one and nothing is wasted!

Share This

Read These Next

  • How To Add Rose Petals and Other Botanicals to Bath Bombs
  • DIY Rainbow Bath Bombs
«
»

Have you read?

How to Make Your Own Taco Seasoning (Better Than the Packet!)

If you’ve ever found yourself halfway through cooking taco mince only to realize you’re out of those little seasoning packets—welcome to the club. That’s exactly how I started making my own taco seasoning years ago, and honestly? I’ve never looked back.

I remember rummaging through the pantry one Tuesday night (always taco night at our place), holding up an empty sachet like it might magically refill itself. The kids were already setting the table, the mince was sizzling in the pan, and I had no plan B. So I grabbed my spices, crossed my fingers, and threw something together. And guess what? It was better than the packet.

These days, I keep a jar of this homemade taco mix ready to go. It’s full of real flavour, no weird fillers, and you can tweak it however you like. My daughter likes hers mild, my son wants “spicy but not too spicy,” and I just like knowing exactly what’s going in our dinner. Plus, it smells amazing while it cooks—kind of like you’ve got your life together, even if the laundry’s still sitting unfolded on the couch.

This recipe has become one of those little kitchen wins that makes life feel easier and just a bit more delicious. It’s quick to make, easy to store, and once you try it, I’m pretty sure you’ll never go back to the store-bought stuff either.

 Ingredients (makes about 1/3 cup):

  • 2 tbsp chili powder (mild or hot, your call)

  • 1 tbsp ground cumin

  • 1 tsp paprika (smoked or sweet)

  • 1 tsp garlic powder

  • 1 tsp onion powder

  • ½ tsp dried oregano

  • ½ tsp salt

  • ¼ tsp black pepper

  • Optional: ¼ tsp cayenne pepper for extra heat

 To Use:

Use 2 tablespoons per 500g (1 lb) of ground beef, chicken, lentils, or veggie mince. Add a splash of water while cooking to help it coat evenly.

 Shellie’s Tips:

  • Store in a small jar or repurposed spice tin. Add a label and it makes a cute DIY gift!

  • You can double or triple the batch—perfect for meal prepping or busy weeknights.

  • Want it low-sodium? Just skip the salt and season to taste while cooking.

 Why Make It Yourself?

  • No fillers, no anticaking agents—just spice cupboard staples.

  • You control the flavour and spice level.

  • Kids love it, and it’s easy enough for them to mix (great rainy-day pantry activity!).

Here are some more Taco recipes on our blog. 

A Taco Bar Is the Perfect Stress-Free Party Food Solution [Party Ideas]

Breakfast Scramble Soft Tacos

Crock Pot Chicken Taco Bowl


RSS More Articles

  • How to Make Your Own Taco Seasoning (Better Than the Packet!)
  • Amazon Deal Roundup – CraftGossip Picks!
  • Chats on Needlework by Emily Leigh Lowes – A Vintage Stitcher’s Treasure Trove
  • Designer Spotlight: Haunted Frames
  • Press Bubble Animals Crochet Kit with keychain
  • Build Big Memories on a Budget: DIY Cubby House Using Recycled Pallets
  • 12 Handmade Stamped Card Ideas Featuring Bears
  • How To Sew a Banner from felted wool sweaters
  • A Sweet Skater Dress to Knit
  • Printable Animal Flash Cards

Pick Your Blog

  • Sewing
  • Knitting
  • Quilting
  • Crochet
  • Home & Garden
  • Recycled Crafts
  • Scrapbooking
  • Card Making
  • Polymer Clay
  • Cross-Stitch
  • Edible Crafts
  • Felting
  • Glass Art
  • Indie Crafts
  • Kids Crafts
  • Jewelry Making
  • Lesson Plans
  • Needlework
  • Bath & Body
  • Party Ideas
  • Candle Making
  • DIY Weddings
  • Not Craft
  • Free Craft Projects

Copyright © 2025 · CraftGossip | Start Here | Contact Us | Link to Us | Your Editors | Privacy and affiliate policy