• Home
  • Suggest A Craft
  • DIY Newsletter

Craft Gossip

Independent craft blog since 2007

  • About CraftGossip
  • Our Network
    • Bath & Body Crafts
    • Candle Making Ideas
    • Crochet Ideas
    • Cross Stitch
    • Edible Crafts
    • Felting Patterns
    • Glass Art
    • Home & Garden Ideas
    • Indie Crafts
    • Jewelry Making
    • Kids Crafts
    • Knitting Patterns
    • Lesson Plans
    • Needlework
    • Party Ideas
    • Polymer Clay
    • Quilting Ideas
    • Recycled Crafts
    • Scrapbooking
    • Sewing Patterns
    • Card Making
    • DIY Weddings
    • Not Craft Ideas
  • Giveaways
  • Roundups
  • Store
  • Search

Striped Rolled Beeswax Pillar

August 7, 2008 by SandraW

For this project, you need three beeswax sheets in total but you will have enough left over to make a couple smaller candles.

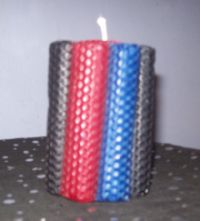
Of course my kids took off with my tape measure so this wasn’t precise but it was fun. First you cut a sheet in half lengthwise and roll it around a cotton wick.

Next, cut the remaining half in half again the opposite way and roll the two pieces up without a wick to make the first stripes.

Continue cutting the other sheets until you have seven stripes in total to cover your small pillar. Beeswax is sticky so it doesn’t take much to stick the sheets together. If they’re not soft enough, warm them up a bit with a blow dryer.

I got this idea from a wonderful project book called Beeswax & Wicks by Jackie Stephens & Linda Lloyd. They used four sheets with smaller stripes. It’s a very nice effect but I only had three.

You can buy ready-made beeswax sheets for making rolled candles here and check out our youtube video.

Read These Next

  • 11 Ways To Transform A Dollar Tree Candle
  • 10 Ways To Dress up Store Bought Candles For Gifts
«
»

Have you read?

Transform Ordinary Candles into Stunning DIY Masterpieces with Image Transfers

Looking to add a personal and creative touch to your candle decor? These DIY Image Transfer Candles are the perfect way to turn simple candles into unique, eye-catching pieces! With just a few basic supplies, you can transfer your favorite images or designs onto candles, creating personalized home accents or even thoughtful gifts.

This craft is super easy and allows you to customize candles to match your style, whether you’re going for a rustic vibe, elegant charm, or festive flair. Plus, it’s a fantastic way to make your own custom candles for holidays, birthdays, or special occasions.

Ready to give your candles a makeover? href=”https://maplewoodroad.com/diy-image-transfer-candles/” target=”_new” rel=”noopener” data-start=”766″ data-end=”856″>Check out the full tutorial here! and learn how to create beautiful, personalized candles that will light up any room!

RSS More Articles

  • Transform Ordinary Candles into Stunning DIY Masterpieces with Image Transfers
  • Etsy Spotlight: Floppy Teddy Bear Sewing Pattern
  • FREE Floral Alphabet Font
  • How to Make a Half-Square Triangle Surprise Quilt – Free Quilting Tutorial
  • Spooky Crochet Skull Scarf – Free Pattern
  • Clay Studio Series – YouTube Video Review: DIY Stoneware Plates
  • This DIY Board Game Table Made Me Want to Dust Off My Cricut
  • Clay Studio Series – YouTube Video Review: What type of clay should I use?
  • Cross Stitch the National Parks in Tiny Form
  • DMC Punch Needle Wall Hanging – A Bold and Modern Statement Stitch

Pick Your Blog

  • Sewing
  • Knitting
  • Quilting
  • Crochet
  • Home & Garden
  • Recycled Crafts
  • Scrapbooking
  • Card Making
  • Polymer Clay
  • Cross-Stitch
  • Edible Crafts
  • Felting
  • Glass Art
  • Indie Crafts
  • Kids Crafts
  • Jewelry Making
  • Lesson Plans
  • Needlework
  • Bath & Body
  • Party Ideas
  • Candle Making
  • DIY Weddings
  • Not Craft
  • Free Craft Projects

Copyright © 2025 · CraftGossip | Start Here | Contact Us | Link to Us | Your Editors | Privacy and affiliate policy