
• Home
  • Suggest A DIY
  • DIY Newsletter

Craft Gossip

Independent craft blog since 2007

  • About CraftGossip
  • Our Network
    • Bath & Body Crafts
    • Candle Making Ideas
    • Crochet Ideas
    • Cross Stitch
    • Edible Crafts
    • Felting Patterns
    • Glass Art
    • Home & Garden Ideas
    • Indie Crafts
    • Jewelry Making
    • Kids Crafts
    • Knitting Patterns
    • Lesson Plans
    • Needlework
    • Party Ideas
    • Polymer Clay
    • Quilting Ideas
    • Recycled Crafts
    • Scrapbooking
    • Sewing Patterns
    • Card Making
    • DIY Weddings
    • Not Craft Ideas
  • Giveaways
  • Roundups
  • Store
  • Search

Staples Review on PC Purchase Experience

March 2, 2011 by Vikram Goyal

staples reviewRecently, I (Kristen Stephens – Lesson Plans Editor) had the exciting opportunity to purchase a new computer from Staples in place of my eight year old Dell PC.

The first step for me was to look online, and see what types of computers Staples offered and which one would work for my family. I chose the HP TouchSmart 10-1020 All-in One Desktop PC which I thought would be very user friendly for the various ages in my family since it has a touch screen. From the Staples website, I could see there was a great ‘in-store only’ offer on this computer. I checked  to see if it was in stock at my local Staples and I was off to the store.

As I entered Staples, I went directly to the computer section, and started to look for the computer I wanted so I could give it a test drive.  I found the HP and began to explore the different features. After about two minutes, I had an HP representative come up to me and ask if I had been helped. He called over the Staples Tech person, and she was showing me some features. After seeing how the computer worked, I told her I would like to purchase it, and had her confirm the price that I found online.

At the checkout counter, the GM began to help me write up the work order to transfer my files from my old computer’s HD to the new one. At home, we also have an external hard drive which I was interested in transferring data from as well. I brought both HD’s in, and the manager didn’t think it was a problem to transfer all files to the new computer, that the space would be sufficient.

My last step was to purchase the computer.  I also purchased an anti-virus software that was on sale. I was very pleased with the final price for the computer and the service I received from the staff at Staples. Upon getting ready to  leave, I asked the GM when I could pick up the computer with my hard drives, and he told me that the technician came in at 2pm. He said it just depended on how long it took for all the files to transfer onto the new computer.

Overall, my experience was a good one, and once I receive my new computer, I’ll be able to give Windows7 a try!
«
»

Comments

  1. Tiffany says

    March 2, 2011 at 3:35 pm

    That’s a good computer! I worked at staples for 2 years before my husband and I relocated to where there wasn’t a staples (frown). I was the department manager of all the electronics stuff (computers, printers, etc). I’m not trying to be nosy, but please, please, tell me you bought the protection plan for the touch screen computer. If you haven’t…you should! I would honestly go as far as getting the accidental plan. You may not ever need it, but the two years I worked and sold them the extended protection plan is a must! You’ll thoroughly enjoy the computer you got…it’s awesome! Plus, you can use a mouse if you decide not to touch the screen all the time! 🙂

  2. Elsa says

    March 31, 2011 at 11:30 am

    I purchased an HP Pavilion Slimline PC 3 weeks ago. It died on me this past Tuesday. I was told to contact HP customer service and that was very aggravating! I never got the help from them so I called the store and was told to bring it in the next day (yesterday). Their 2 IT tech. employees are totally awesome and very empathic. After checking everything out I was told that it had a defective hard drive. They are replacing it and updating Windows 7 for me. Thanks Staples for hiring such wonderful employees.

    I did get the 3 year service plan and I never expected to be using it. I would definitely take out a service plan again when buying a new one.

Have you read?

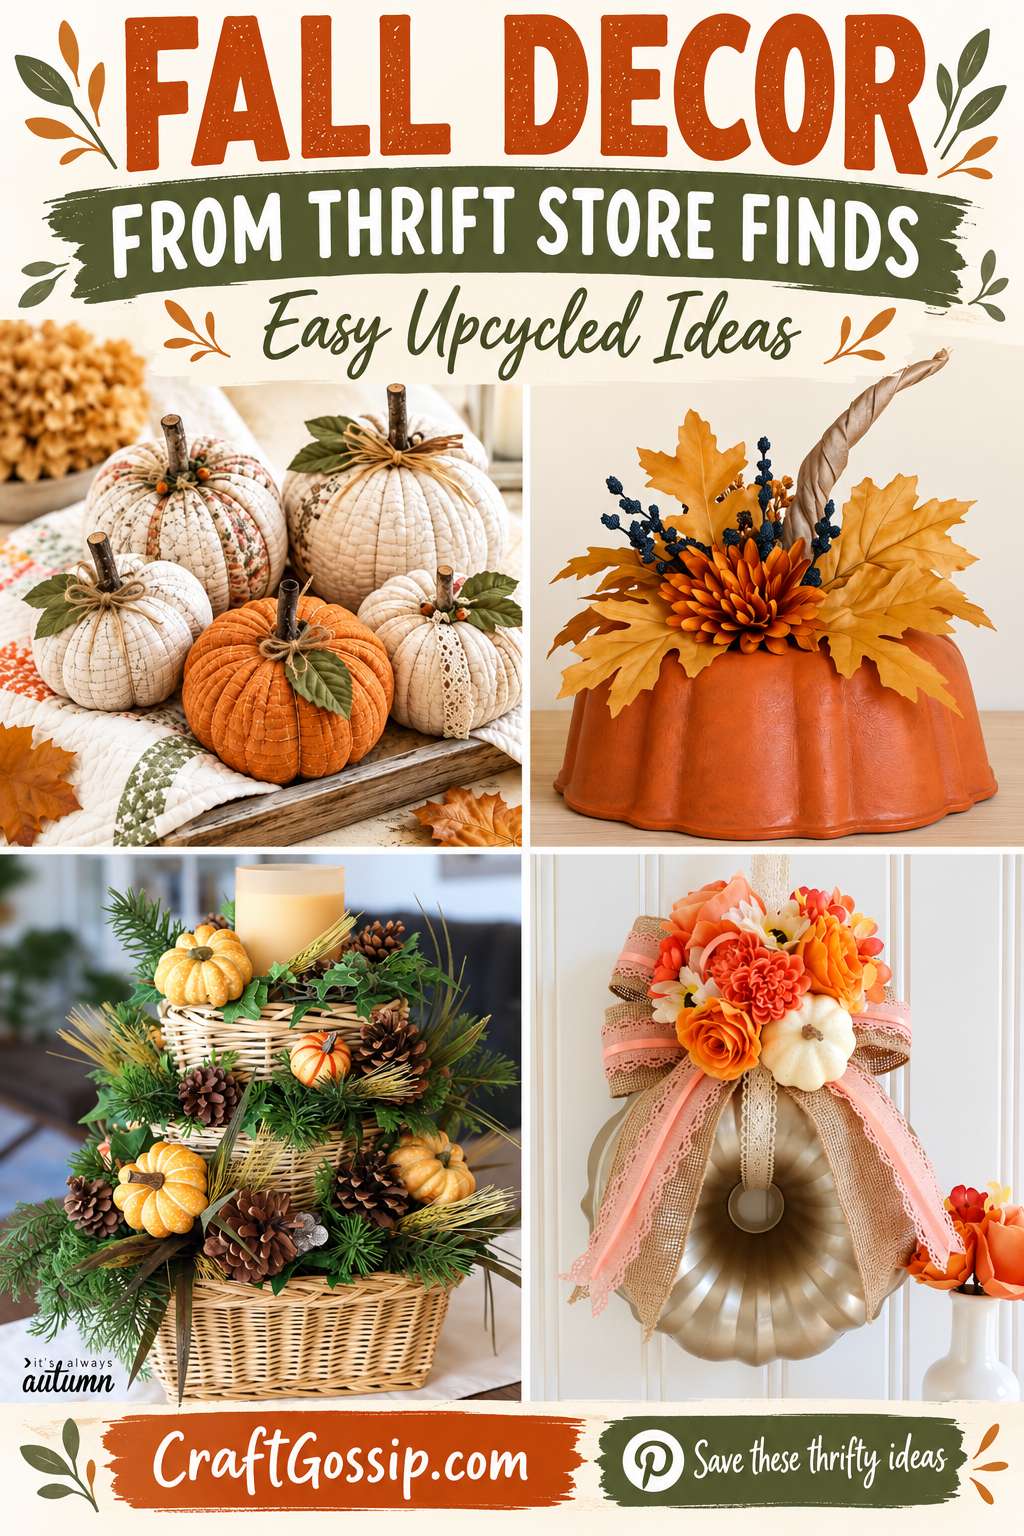
12 Fall Decorations You Can Make from Thrift Store Finds

There’s a particular kind of satisfaction in picking up something from the thrift store that everyone else has walked past and thinking, “That would make a lovely pumpkin.” An old baking pan, a tired knitted jumper, a basket with a slightly questionable bow attached—suddenly they all have possibilities. Of course, this is also how you end up explaining why there are three cake tins in the craft room when nobody is baking.

Fall decorating lends itself beautifully to secondhand finds. Worn wood, textured knitwear, faded quilts and woven baskets already have that cosy, collected look we spend ages trying to recreate with brand-new supplies. A little paint, a few stitches or some leftover autumn florals can be enough to give them a completely different purpose.

These fall decorations made from thrifted items include soft fabric pumpkins, unusual wreaths and easy table arrangements. Some involve simple sewing, while others need little more than paint and glue. Before buying anything, have a rummage through your cupboards—you might already own the perfect starting point.

What to Look for at the Thrift Store

Head beyond the seasonal decorations shelf. The kitchenware, linen and basket sections are often where the best recycled craft supplies are hiding.

Look for interesting shapes, sturdy materials and useful textures: fluted baking pans, wooden frames, chunky knitwear, quilted bedding and shallow serving bowls. Choose damaged or worn textiles with usable sections for cutting projects, and leave beautiful, intact vintage quilts to be enjoyed as quilts.

Wash fabric finds before using them, remove grease from kitchenware and check baskets for loose weaving. A little preparation makes the actual crafting much more enjoyable.

DIY Thrift Store Glass Bowl Pumpkins With a Rustic Finish

Those patterned glass bowls hiding on the thrift-store shelves make surprisingly lovely pumpkins when paired rim to rim. This CraftGossip tutorial uses orange paint inside the bowls, letting the pressed-glass patterns shine through, then finishes the pumpkin with a twig stem and a bow made from rescued fabric. It’s an approachable project for beginners comfortable painting glass, with drying and curing time doing most of the waiting-room work. I especially like this one for a vintage-style autumn display—the textured glass and softly frayed bow give it plenty of character.

Thrifted Quilt Pumpkins

An old quilt brings instant texture to these stuffed pumpkins, without requiring you to piece a single patchwork block. The tutorial uses fabric rectangles, a sewn side seam and gathered ends, followed by thread shaping to create the pumpkin sections. It’s an approachable project for someone comfortable with basic machine and hand sewing, and particularly useful for salvaging sound sections from damaged bedding. Cream quilting would look lovely in a wooden bowl, while faded patchwork gives each pumpkin its own personality.

DIY Bundt Cake Pan Pumpkin

Those ridges in a Bundt pan do most of the pumpkin-shaping work for you, which is exactly the sort of shortcut I appreciate. This CraftGossip project combines an orange finish, rustic surface texture and faux fall flowers to transform a thrifted pan into a seasonal decoration. There’s no sewing involved, making it a good choice for beginners who enjoy painting and arranging embellishments. Look for a pan with pronounced fluting, then use it as the centrepiece of a small autumn display.

Sweater Pumpkins Made from Old Sleeves

A jumper sleeve is already a fabric tube, so you can skip constructing one and get straight to the satisfying part. This tutorial uses hand gathering, stuffing and a wrapped fabric stem to make soft pumpkins from old knitwear. It suits beginners happy to try a little hand stitching, with no sewing machine required. Choose several complementary colours and let the different knitted textures make the display interesting.

No-Sew Sweater and Flannel Covered Pumpkins

If you prefer glue to a needle and thread, this version wraps sweater or flannel fabric around ready-made foam pumpkins. The firm base provides the shape, while the recycled textile gives it a much cosier finish. It’s a useful beginner project for refreshing faux pumpkins you already own, with thrifted knitwear supplying the makeover material. A cable-knit pumpkin beside a plaid one would make a lovely little shelf arrangement without needing much else.

Bundt Pan Fall Wreath

Here’s another reason to investigate the baking aisle: a Bundt pan can become a wreath as well as a tabletop pumpkin. This tutorial decorates the pan with paint, florals and ribbon for an unusual autumn door decoration. The straightforward assembly makes it accessible to beginners, although choosing a secure hanger matters when working with a metal base. I like this option for anyone who wants a fall wreath with a bit more character than the usual grapevine circle.

Stacked Basket Fall Centrepiece

Three secondhand baskets become a tiered arrangement filled with greenery, pinecones and seasonal accents. The clever part is using the baskets to build height, rather than buying a large decorative stand. This is best for a beginner who enjoys floral arranging and has room for a more substantial centrepiece on a buffet or entry table. The autumn pieces can also be exchanged for winter accents, giving those thrifted baskets another season of use.

Painted Thrift Store Basket Fall Arrangement

A painted basket filled with blue flowers, white sunflowers and greenery offers a softer approach to fall decorating. The tutorial shows how a pale paint finish and layered floral stems can completely change an inexpensive secondhand basket. It’s an inviting project for first-time arrangers because you can build up the greenery and flowers gradually. Choose this one if your home suits creams and blues better than a full parade of orange pumpkins.

Mercury Glass Pumpkin Makeover

A thrifted glass pumpkin gets an aged, silvery finish using mirror-effect spray paint and a lightly misted surface. The mottled effect gives the glass a vintage appearance that would work beautifully among warm wood and autumn foliage. This suits a confident beginner willing to follow the paint instructions and take time over preparation. Keep the finished piece for decoration, with painted surfaces away from food.

Rustic Brown Paper Bag Pumpkins

This makeover combines two satisfying rescues: unwanted faux pumpkins and saved brown paper bags or packaging paper. Crumpled paper strips are glued over the pumpkin base, creating a deeply textured, rustic finish. The technique is beginner-friendly, although covering the surface takes some patience and a generous supply of glue sticks. It’s especially appealing when you like the shape of a thrifted pumpkin but its colour is doing absolutely nothing for your decorating plans.

Primitive Pumpkin Cutting Boards

Small wooden cutting boards become rustic jack-o’-lantern decorations with layered paint, simple faces and distressed edges. The original project uses clearance boards, but the tutorial also suggests old or thrifted cutting boards as alternatives. Basic painting and sanding make this an achievable beginner craft, especially if you enjoy a primitive Halloween look. Display the finished boards on a kitchen shelf or mantel, and retire them from food preparation once decorated.

Farmhouse Pumpkin Art from a Thrifted Picture Frame

An unwanted wooden picture frame becomes the foundation for layered pumpkin art using textured backing and a placemat. Paint, decoupage and rustic embellishments give the finished piece more depth than a flat seasonal print. This is a good fit for makers who enjoy mixed-media crafts and don’t mind working through several drying stages. Check your scrap supplies before shopping, because leftover paper, ribbon and small trimmings could help make the project your own.

Easy Fall Centrepiece in a Vintage Glass Bowl

Sometimes a lovely secondhand find simply needs thoughtful styling. This arrangement starts with a thrifted glass bowl and adds autumn leaves, small pumpkins and decorative details, including book-page scrolls. It’s the most approachable option here for someone who wants a seasonal display without sewing or painting the main vessel. A shallow bowl keeps the arrangement manageable, and you can unpack it after fall and use the bowl again.

Making Your Thrifted Fall Decorations Work Together

You don’t need to make every project to create a lovely autumn corner. Start with one piece that catches your eye, then repeat a colour or texture elsewhere. A quilted pumpkin, a woven basket and an old wooden tray can look wonderfully coordinated without matching perfectly.

Try cream, rust and warm brown for a traditional autumn feel, or soften things with muted green and faded blue. Leave some space around your handmade pieces so you can actually see the details—that lovely quilting or beautifully worn basket deserves a moment.

The nicest thing about decorating with thrifted items is that your finished display will have its own character. Your basket might be a different shape, your jumper might have an unusual stitch pattern, and your baking pan might produce a slightly wonky pumpkin. Those little differences are part of the charm.

And before you head out thrifting, take a quick photograph of the supplies you already have. It’s much easier to choose useful finds when you remember there’s half a bag of stuffing and enough faux foliage at home to decorate a small woodland.

RSS feed: More Articles More Articles

  • Free Animal Person Embroidery Design Review
  • DIY Halloween Sock Pumpkins: Easy Fuzzy Pumpkins With Ghosts, Stripes and Witch Hats
  • Free Felting Tutorial Friday: Felt Into Autumn with Heidi Feathers
  • Knit a Classic Aran Cardigan with this Free Knitting Pattern
  • Printable Letter Books for Preschoolers
  • How to Make an Interactive Halloween Mini Scrapbook Album
  • 10 Ice Cubes That Instantly Elevate Champagne
  • Setting Up a Beginner Craft Space? A Practical Shopping List
  • Thrift Store Upcycling: Rustic Pumpkin Decorations From Glass Bowls
  • Mini Pumpkins and Jack o’Lanterns to Cross Stitch

Pick Your Blog

  • Sewing
  • Knitting
  • Quilting
  • Crochet
  • Home & Garden
  • Recycled Crafts
  • Scrapbooking
  • Card Making
  • Polymer Clay
  • Cross-Stitch
  • Edible Crafts
  • Felting
  • Glass Art
  • Indie Crafts
  • Kids Crafts
  • Jewelry Making
  • Lesson Plans
  • Needlework
  • Bath & Body
  • Party Ideas
  • Candle Making
  • DIY Weddings
  • Not Craft
  • Free Craft Projects

Copyright © 2026 · CraftGossip | Start Here | Contact Us | Link to Us | Your Editors | Privacy and affiliate policy