• Home
  • Suggest A DIY
  • DIY Newsletter

Craft Gossip

Independent craft blog since 2007

  • About CraftGossip
  • Our Network
    • Bath & Body Crafts
    • Candle Making Ideas
    • Crochet Ideas
    • Cross Stitch
    • Edible Crafts
    • Felting Patterns
    • Glass Art
    • Home & Garden Ideas
    • Indie Crafts
    • Jewelry Making
    • Kids Crafts
    • Knitting Patterns
    • Lesson Plans
    • Needlework
    • Party Ideas
    • Polymer Clay
    • Quilting Ideas
    • Recycled Crafts
    • Scrapbooking
    • Sewing Patterns
    • Card Making
    • DIY Weddings
    • Not Craft Ideas
  • Giveaways
  • Roundups
  • Store
  • Search

Free Photo-editing Sessions at Photoshop & You Pop-up in San Francisco with Linda Sattgast

July 27, 2011 by Vikram Goyal

Linda Sattgast

Digital scrapbooker extraordinaire Linda Sattgast is hosting 2 FREE sessions on getting photos into tip-top shape with Photoshop Elements. Linda will be a featured guest speaker at the Photoshop & You pop-up location in San Francisco. The Photoshop & You experience (http://www.photoshop.com/events/550sutter) is a place for the public to explore the world of digital imaging with leading photographers, renowned teachers, industry influencers and Photoshop team members. The calendar of activities (http://www.photoshop.com/events/550sutter/calendar) is jam-packed with FREE workshops, professional portraits, “how-to” sessions, photowalks and parties! Sign up for these activities online.

WHO: Linda Sattgast, Scrapbooking Expert and Founder/Owner of ScrappersGuide.com

WHEN:

  • Wednesday, July 27, 2:00 PM – 3:00 PM (http://psstore-presentation-0727-14-2c75.eventbrite.com/)
  • Wednesday, July 27, 3:30 PM – 4:30 PM (http://psstore-presentation-0727-15-af38.eventbrite.com/)
  • Thursday, July 28, 12:00 PM – 1:00 PM (http://psstore-presentation-0728-12-86ea.eventbrite.com/)
  • Thursday, July 28, 1:30 PM – 2:30 PM (http://psstore-presentation-0728-13-8360.eventbrite.com/)

WHERE: Meet at the PHOTOSHOP & YOU pop-up location

ADDRESS: 550 Sutter Street, San Francisco, CA 94102 (between Powell Street and Mason Street)

To celebrate, we are hosting a giveaway of Photoshop Elements 9 bundler giveaway.
«
»

Comments

  1. terriavidreader says

    July 27, 2011 at 5:23 pm

    I’d love to win this, as it’s too far to attend!

  2. Tracy says

    July 27, 2011 at 6:22 pm

    I’d love to win! My pictures could be so much better with this software!

  3. Colleen says

    July 27, 2011 at 7:38 pm

    I am a teacher and would love to have the newest edition of the software. My software is 7 years old. We love to make movies, and edit pictures

  4. LisaT says

    July 28, 2011 at 3:26 am

    would love to win this bundle because I need all the help I can get when it comes to my photographs!

  5. Joanne says

    July 28, 2011 at 4:40 am

    I love photoshop Elements and my old computer was very, very slow handling the program so I bought a new computer and my version of elements is not compatible with windows 7. I would really like the newest version.

  6. Leslie may says

    July 28, 2011 at 5:13 am

    I would love to win the photoshop package! I have been taking photos for some charity events lately and would like to create a beautifully edited scrapbook (compliments of craft gossip and adobe) I also takes lots of family photos!

  7. Sarah says

    July 28, 2011 at 5:30 am

    Because I never win anything. It’s my turn.

  8. VAlerie Silverthorne says

    July 28, 2011 at 5:33 am

    I’ve been slowly trying to teach myself Photoshop using the free downloaded bits…would love to have the whole thing!

  9. Sheila Elmore says

    July 28, 2011 at 5:47 am

    I would love to win this. I am very new to scrapbooking and am also retired and living on a fixed income and cannot afford to purchase photoshop.

  10. Hetty A. says

    July 28, 2011 at 5:53 am

    Ihope I will the winner this time. My sons leave for college in about two weeks and I am going to edit our family pictures etc. Would love to have the help of photoshop!

  11. Casey R says

    July 28, 2011 at 7:22 am

    I would absolutely love my life if I could manipulate the photos on the screen the way I see them in my head. Seriously, I know I could make some amazing images and projects with this bundle. The reason I should win is because I appreciate what you do and I’m always sharing the word about craftgossip. It truly is amazing to open an email and have all the crafting inspiration I need at my finger tips.

    Thank you for this opportunity.

  12. Joan says

    July 28, 2011 at 7:38 am

    I do not take many pictures, because I really don’t know what to do to make them more useful. This would help. Joan

  13. Sara beck says

    July 28, 2011 at 7:46 am

    I would love to win. I am an avid digital scrapbooker and my free copy from college was lost when my computer got a virus. I’m also getting married and a new elementary art teacher. I would love this to help design my wedding suite and can’t afford to buy it on my tiny salary.

  14. Barbara says

    July 28, 2011 at 11:01 am

    I keep hearing how great PhotoShop software is but am stuck with the dinky program that came with my computer, and family and friends tell me its almost useless.
    Thanks for considering me as the winner.
    B

  15. becky jeffress says

    July 28, 2011 at 11:19 am

    Unbelievable!! Would love this, Photoshop is fantastic!!!!!

  16. Belinda Spiwak says

    July 28, 2011 at 2:39 pm

    This sounds like a great workshop/session. Wish it was online/virtual so I could attend. Sounds like it would be very useful.
    Belinda

  17. Mary Reed says

    July 28, 2011 at 2:46 pm

    I have been an avid photographer since I was a little kid. I’m now 45, disabled with MS, and use photography as a way to express myself and do cool things for my family (in my quilting, as gifts, special picture sessions, etc.)–I’m the “go-to gal” behind the lens. I have a copy of Photoshop–that’s about 20 years old (yes, it’s close to being an original). I don’t travel much–so the seminar is out of the question, but a brand-spankin’ new copy of PS would be FAB-U-LOUS!!!!! (Not to mention–I absolutely love CRAFTGOSSIP! What a wonderful thing to see in my Inbox!!!!

  18. Joan says

    July 28, 2011 at 2:51 pm

    I should win this software because I need help with my photos…lots of help!

  19. Melisa says

    July 28, 2011 at 3:16 pm

    I have a much older version of PE…would love the latest bundle with all the bells and whistles. Thanks for the giveaway opportunity!

  20. Christina says

    July 28, 2011 at 7:04 pm

    Would love to win this. I’ve always wanted Photoshop, but can’t afford it. I have to use free software out there and it’s just not the same!

  21. Chris says

    July 28, 2011 at 7:31 pm

    I’m a grandmother of seven of the most beautiful grandchildren you have ever seen, with lots of pictures. I need a brag book that will make my friends drool over.

  22. Paula says

    July 28, 2011 at 9:22 pm

    I would love to win this! I am really getting into photography, and feel I could take it that much farther if I had Adobe Photoshop. I have been using the free downloads, teaching myself how to do it, but to have the entire program without worrying it was going to expire would be so wonderful! I love nature, old things, and things that occur when Mother Nature works her magic, and am always getting weird looks when I take pictures of things most people just walk by every day. I want to help people see the beauty of things right in front of their eyes. Thank you!

  23. Susan says

    July 28, 2011 at 11:10 pm

    Thanks for the chance to win!

  24. Fran DeWitte says

    July 28, 2011 at 11:21 pm

    To win would be a springboard to doing advertising for the jewelry I make.

  25. Peggy Oestreich says

    July 29, 2011 at 3:33 pm

    I would love to win this Phoshop by Adobe! My pictures would turn out so much better.

  26. Julie Wilson says

    July 31, 2011 at 7:44 am

    I like to scrapbook and would love to win Photoshop to help with the pictures.

  27. Robyn says

    August 1, 2011 at 6:14 pm

    I know I would be able to do so many creative things with this software! Mixed media especially

Have you read?

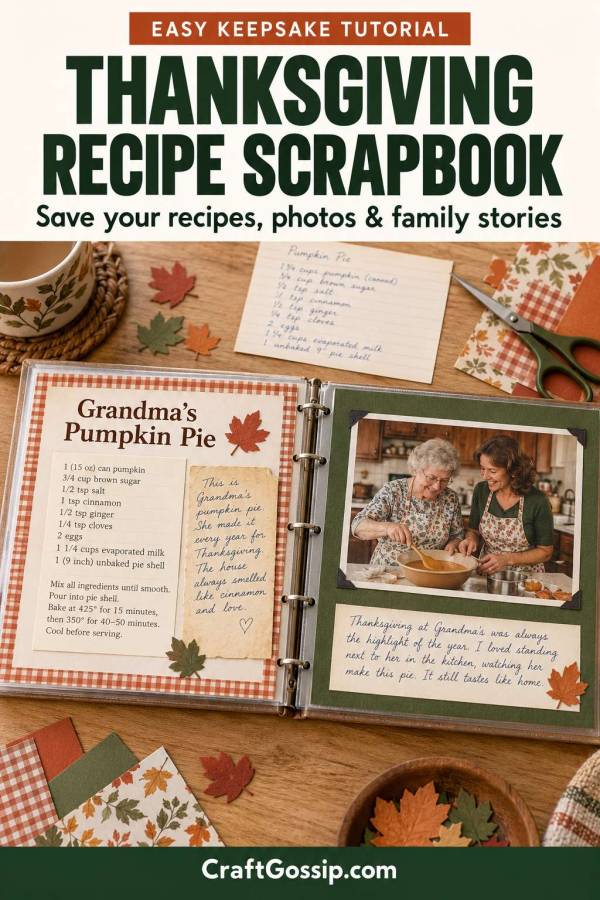
How to Make a Thanksgiving Family Recipe Scrapbook

T

here’s usually one dish that has to appear on the Thanksgiving table. Someone might suggest changing things up, but leave out that particular recipe and suddenly everyone has opinions.

Perhaps it’s a stuffing recipe written on a faded index card, a pie someone makes without measuring, or a casserole that has been appearing at family gatherings longer than anyone can remember.

Those recipes deserve a home alongside the people and stories that make them special.

A Thanksgiving family recipe scrapbook combines favourite dishes, handwritten recipe copies, cooking photographs and family memories in one keepsake album. You can make it for yourself, give it to an adult child, or gradually build a collection to share with the grandchildren.

And you can start with just three recipes. There’s no need to document the entire family menu before you’re allowed to call it a scrapbook.

Choose a Simple Album You Can Add To

For this project, I suggest an 8×8-inch scrapbook album with removable page protectors. It gives you enough room for readable recipes while keeping the finished book manageable.

Check that the protectors accommodate actual 8×8-inch inserts. Album cover measurements and usable page measurements aren’t always the same.

A ring-bound album makes it easy to add recipes, rearrange sections and replace a page later. Choose one with room for expansion, especially if you plan to include pockets or layered decorations.

Our older recipe scrapbooking project on CraftBits explores the idea of turning collected recipes into a decorated keepsake. Here, we’re giving the album a Thanksgiving focus and adding the family stories that make each dish worth remembering.


What You’ll Need

  • An 8×8-inch scrapbook album and compatible page protectors
  • Acid-free cardstock for page bases
  • Two or three coordinating patterned papers
  • Printed recipe copies
  • Copies of handwritten recipe cards, if available
  • Printed photographs of family members, food or holiday preparations
  • Photo-safe adhesive or photo corners
  • Scissors or a paper trimmer
  • A ruler and pencil
  • A journaling pen

Optional extras include alphabet stickers, paper labels, small leaf embellishments, ribbon and adhesive suitable for attaching paper pockets.

Cream, rust, olive green and warm brown make a lovely Thanksgiving palette. Gingham and woodgrain papers work well, too. Start by checking your stash before buying a collection that contains six pumpkins you love and twelve papers you’re afraid to cut.

If you’re shopping on Amazon for page protectors or adhesives, check the product specifications for photo-safe materials and compatibility with your album.

1. Gather Three Meaningful Family Recipes

Choose a small starting collection. A useful combination is:

  • One main dish or substantial side
  • One recipe associated with a particular family member
  • One dessert everyone looks forward to

Ask relatives to send photographs of their recipe cards or write out their versions. If someone cooks by instinct, arrange a time to watch them make the dish and record the quantities together.

Include the details a new cook would need: ingredient amounts, oven temperature, approximate cooking time, pan size and serving yield, where known.

Keep the original recipe wording in a scanned copy, then add clearly labelled notes explaining family adjustments. If a measurement or instruction is uncertain, mark it as needing confirmation rather than guessing.

2. Copy the Handwriting and Keep the Originals Safe

Handwriting adds something a typed recipe cannot. The little corrections, underlined ingredients and notes squeezed into the margin are part of the recipe’s history.

Scan or photograph both sides of a handwritten card before creating your page. Print a copy for the scrapbook and store the original separately.

For a clear phone photograph:

  1. Place the card flat in even daylight.
  2. Hold the phone parallel to it.
  3. Check that your shadow isn’t covering the writing.
  4. Photograph the reverse if it contains notes.
  5. Crop the image and check that the smallest writing is readable.

Avoid permanently gluing or laminating an irreplaceable original. A printed copy lets you enjoy its appearance without repeatedly handling the actual card.

3. Plan One Two-Page Spread for Each Recipe

Use the same basic arrangement throughout the album:

Left page: Recipe title, readable recipe and a short note about its source.

Right page: Photograph, family story and an optional pocket for extra notes.

That repeated structure makes the album easier to create and easier to use. Change the patterned paper or embellishments between recipes while keeping their main positions consistent.

If arranging a page feels intimidating, our guide to making a basic scrapbook page explains how photographs, layers and journaling work together.

4. Make a Readable Recipe Page

Here’s a simple arrangement for an 8×8-inch page:

  • Cut one cardstock base to 8×8 inches.
  • Cut one patterned-paper panel to 7½×7½ inches.
  • Centre the panel on the base, leaving a ¼-inch border.
  • Prepare a recipe panel measuring approximately 6½ inches wide by 6 inches high.
  • Position it centrally, leaving space above for the title.

Keep the recipe panel plain or very lightly patterned. Dark text on a pale background is much easier to read than writing printed over decorative paper.

Print a draft at actual size before attaching anything. Around 12–14-point type is a useful starting point, but the final test is whether you can comfortably read it.

If the recipe doesn’t fit, give it another page. Smaller lettering is a poor trade for keeping everything on one sheet.

For a handwritten recipe copy, use the available space to show it at a readable size. Add a separate typed version when the original handwriting is difficult to follow.

5. Add a Photograph and the Story Behind the Dish

For the facing page, start with another 8×8-inch cardstock base.

A simple arrangement uses:

  • One landscape 6×4-inch photograph
  • One cardstock photo mat measuring 6¼×4¼ inches
  • One journaling panel measuring approximately 6¼×2¼ inches

Centre the photo mat near the top, leaving about ½ inch above it. Position the journaling panel below, with a small gap between them.

This fits comfortably on the page and leaves a little room for flat embellishments.

Choose a photograph that adds to the recipe’s story. It might show the cook, someone helping, the finished dish or the family gathered at the table.

Then write a few sentences explaining why this recipe belongs in your album.

You could record who usually makes it, how long it has been part of the meal, or the year someone accidentally doubled an ingredient and created a new family favourite.

Add names and an approximate date where possible. Future readers may recognise the pie long before they recognise everyone standing behind it.

6. Make an Optional Pocket for Extra Notes

A pocket is useful for a copied recipe card, a longer story or handwritten comments from relatives.

For a simple pocket:

  1. Cut a piece of patterned paper 6½ inches wide by 3½ inches high.
  2. Score ½ inch in from both short sides and one long side.
  3. Trim away the two small corner squares where the score lines intersect.
  4. Fold the three flaps towards the back.
  5. Apply adhesive to the backs of the flaps.
  6. Attach the pocket to a page, leaving the top open.

The finished pocket front measures approximately 5½×3 inches. A 5×3-inch insert will sit inside with its top edge exposed because of the bottom flap. Test the fit before decorating.

Use the pocket on a separate page or adapt your photo arrangement to make room. If it sits inside a page protector, you may need to remove the scrapbook page to reach the insert.

Keep the insert flat and lightweight so the album closes comfortably.

7. Add Thanksgiving Details Without Crowding the Recipe

Choose a few repeated decorative elements:

  • A narrow gingham strip
  • Small paper leaves
  • A simple recipe-name label
  • A little pumpkin beside the journaling
  • A consistent colour for photo mats

Keep thick decorations away from recipe text and photographs. They can make pages harder to slide into protectors and add bulk surprisingly quickly.

If you’d like more ideas for autumn colours and family storytelling, browse our thankful and grateful scrapbook layouts.

You can make a beautiful album using plain cardstock and a handful of paper scraps. Consistent colours and readable pages will do more for the finished book than a large pile of embellishments.

8. Create an Opening Page and Simple Contents List

Give your scrapbook a title that suits your family:

  • Our Thanksgiving Table
  • Recipes We Gather Around
  • Made with Love, Served with Stories
  • Family Favourites and Thanksgiving Memories

Under the title, add a short explanation of the project. For example:

“This album brings together the recipes we make, the people who taught us and the moments we want to remember.”

Include the year you started it and your name as the compiler.

A contents page can list the recipe names and page numbers. Leave room for additions, or create a replaceable contents sheet you can update later.

Questions to Ask Relatives About Their Recipes

A few gentle questions can uncover details that never made it onto the recipe card:

  • Who first taught you to make this?
  • When did it become part of our Thanksgiving meal?
  • Have you changed any ingredients?
  • Was there a special bowl, pan or serving dish you always used?
  • Who asks for this recipe most often?
  • What should a first-time cook know?
  • Is there a funny story connected with it?
  • What do you want the next generation to remember?

Write down their own words where you can. A small personal comment can bring a page to life.

Make It a Family Project

You can prepare the album before Thanksgiving and leave spaces for this year’s photographs.

Ask each household to contribute one recipe and one memory. Give younger family members a small card to draw their favourite dish or write a sentence about what they enjoy eating.

For relatives who live elsewhere, request a photograph of them cooking or serving their contribution. They can still be part of the album even when they aren’t at the same table.

If you’re making copies as gifts, scan the completed pages before placing them in protectors. Keep the digital files organised by recipe name so they’re easier to find and share.

A Few Mistakes Worth Avoiding

Decorating before checking the recipe: Confirm the text and measurements before building the page around them.

Making the writing too small: Use another page whenever readability starts to suffer.

Leaving out the cook’s name: Record who shared the recipe and what you know about its history.

Mixing updates into the original without explanation: Label changes so readers can distinguish the handwritten version from later adaptations.

Trying to finish every family recipe at once: Complete three spreads first. An album with room to grow is a perfectly good result.

Keep a Working Copy for the Kitchen

Even with page protectors, a keepsake album is best kept away from hot pans, spills and splattering food.

Print a separate working copy of a recipe when you’re cooking. You can scribble on that version, record adjustments and transfer useful notes into the album afterwards.

Save your scans and typed recipes somewhere you can find them again, too. The digital copies make it easier to replace a damaged page or share a recipe when someone calls asking how much butter Grandma actually meant.

You can begin this project with one recipe card and one photograph. Add the person’s name, explain why the dish matters and leave room for the next story.

The scrapbook will grow as your family keeps gathering, cooking and remembering. And perhaps, years from now, someone will make that familiar dish with your notes beside them.

RSS feed: More Articles More Articles

  • 10 Triangle Scarf Knitting Patterns for Cosy Layers and Handmade Gifts
  • Free Christmas Pudding Cross Stitch Gift Tag Pattern With DMC Colour Key
  • Crochet Eyelet Jacket Crochet Pattern That Feels Polished but Totally Wearable
  • 10 Thanksgiving Math Printables for Kids: Counting, Addition and Fun Number Puzzles
  • Inexpensive Homemade Food Gifts That Mean More Than Another Christmas Present
  • Selected Yarns Advertised at $2, $4 and $6
  • Thanksgiving Scrapbook Layout Ideas for Family Photos and Grateful Memories
  • 12 Christmas Cross Stitch Patterns That Fit in Small Hoops
  • How to Make a Wet Felted Nuno Scarf – by Muffs Merino
  • Best Handmade Bracelets To Sell At Craft Markets

Pick Your Blog

  • Sewing
  • Knitting
  • Quilting
  • Crochet
  • Home & Garden
  • Recycled Crafts
  • Scrapbooking
  • Card Making
  • Polymer Clay
  • Cross-Stitch
  • Edible Crafts
  • Felting
  • Glass Art
  • Indie Crafts
  • Kids Crafts
  • Jewelry Making
  • Lesson Plans
  • Needlework
  • Bath & Body
  • Party Ideas
  • Candle Making
  • DIY Weddings
  • Not Craft
  • Free Craft Projects

Copyright © 2026 · CraftGossip | Start Here | Contact Us | Link to Us | Your Editors | Privacy and affiliate policy