• Home
  • Suggest A DIY
  • DIY Newsletter

Craft Gossip

Independent craft blog since 2007

  • About CraftGossip
  • Our Network
    • Bath & Body Crafts
    • Candle Making Ideas
    • Crochet Ideas
    • Cross Stitch
    • Edible Crafts
    • Felting Patterns
    • Glass Art
    • Home & Garden Ideas
    • Indie Crafts
    • Jewelry Making
    • Kids Crafts
    • Knitting Patterns
    • Lesson Plans
    • Needlework
    • Party Ideas
    • Polymer Clay
    • Quilting Ideas
    • Recycled Crafts
    • Scrapbooking
    • Sewing Patterns
    • Card Making
    • DIY Weddings
    • Not Craft Ideas
  • Giveaways
  • Roundups
  • Store
  • Search

Crochet Shorts for Men

December 21, 2014 by Vikram Goyal

Wow, just wow! Etsy brings out the best and umm.. the worse in crafters 🙂

If these crochet festival pants take your fancy, then you can certainly order them. Made from 100% recycled materials:

a vintage afghan blanket crocheted in the 70s-80s, and finished with a drawstring waist. Great for the Playa, Northern Soul nights, Disco parties, or just wearing every day! These one-of-a-kind pants can easily be worn by a man or a woman, great for Burning Man, after the slopes, or for morning yoga in the winter.

If that describes you, then head on over to the Etsy Shop.

Want to make your own? Check out these Crochet granny short patterns on Etsy and this fun ripple design pair of shorts for men.

These shorts make a great fun handmade gift for someone and are very popular for festival clothing too. You will be surprised by how many of the young folk would love to wear these. If you are using them for swimming then consider a cotton yarn. I just love how fun these shorts are!
«
»

Comments

  1. Donna B. says

    December 23, 2014 at 5:14 pm

    Worst, not worse

  2. weeble says

    December 23, 2014 at 7:34 pm

    Need a tight knit to wear for golfing

  3. me says

    December 27, 2014 at 3:07 pm

    To bad there’s not a pattern, be nice to share them, o well enjoy your money, it’s wrong, share why don’t Ya.

  4. cindy p says

    December 28, 2014 at 11:49 am

    I need the pattern for the yellow and brown pair. It will make a good joke!

  5. johnross1965 says

    December 29, 2014 at 11:02 am

    Not the best use of patterns and colors…Makes men look like they cut up their favorite old lady crocheted quilts and made them into garments. Insulting to the patterns and use of the colors.

  6. Rhodes says

    December 29, 2014 at 3:08 pm

    Hmmmmm…. Eewwwwwwwwww

  7. Rebecca Glesener Davis says

    January 1, 2015 at 3:29 pm

    God has given up on us.

  8. Dale says

    January 3, 2015 at 1:42 pm

    Paraphrasing Jerry Leadbetter, “I can say, that on the right occasion, this would be the perfect thing to wear.”
    Margo Leadbetter asks, “And what occasion would that be, Jerry?”

  9. Bevdogg says

    January 4, 2015 at 9:46 pm

    Hardly an insult to the pattern, I can clearly see these were made for hippies, no need to be a negative Nancy.

  10. Sandra says

    January 7, 2015 at 5:53 pm

    Someone wanna fill me in on what a “Burning Man” is? Lol…I just can’t stop laughing. And I will never be able to un-see this. This is worse than seeing a man in a Speedo. 😀

  11. lillianlasher says

    January 7, 2015 at 8:09 pm

    *gasp* That DOES describe me!!!! But I’d rather have it in a skirt.

  12. Angie says

    January 8, 2015 at 9:51 pm

    Think I will go with EWWWWW….. also!

  13. Matthew James Arrowsmith says

    January 9, 2015 at 7:45 pm

    There is no God – and this proves it. 🙂

  14. Susan Holme says

    January 11, 2015 at 5:57 am

    If anyone would like me to make some of these, let me know! [email protected]

  15. Michael Popkins says

    January 11, 2015 at 11:30 am

    Hahaha! I would so wear them. Just to be goofy!

  16. Bob says

    January 11, 2015 at 11:42 am

    Double Ewwwwwwwwwww X, Y and Z!

  17. Margaret says

    January 12, 2015 at 9:29 am

    The granny squares WOULD provide nice ventilation!

  18. kbm says

    January 12, 2015 at 3:06 pm

    Obviously no one here is a Burner or festival goer. Maybe it isn’t your style, but you could at least respect the creative expression.

  19. Crabbyrn says

    January 14, 2015 at 7:20 am

    these would be perfect for Burning Man

  20. PlainJane says

    January 15, 2015 at 10:57 am

    These are marvelous. Perfect Valentine’s Day gift. 🙂

  21. Debi says

    January 15, 2015 at 5:38 pm

    I LOVE them! I haven’t picked up a crochet hook in years and this may just be the inspiration I need to get back into it. No joke.

  22. Beverly Cotton Bochenek says

    January 15, 2015 at 10:51 pm

    And to think the yarn could have been used to make tea cozies…

  23. me says

    January 16, 2015 at 2:28 pm

    I want a pair.

  24. ang says

    January 17, 2015 at 3:42 pm

    Hippies would love probably. Different strokes for different folks .

  25. randy says

    January 18, 2015 at 11:07 am

    Hmm can make a matching beer can hat to go with it.

  26. Eva T says

    January 21, 2015 at 5:16 pm

    well they are certainly selling which is more than I can say for the items in my Etsy shop lol …not my style

  27. Debbie T says

    January 22, 2015 at 8:29 am

    I have crocheted blankets in these patterns in the 60’s/70’s. In retrospect, however, I think the designs and color combos weren’t the best even back then…. In men’s shorts, definitely better ways to bring out your granny side like maybe using granny’s old drapes….

  28. Emma says

    January 22, 2015 at 8:17 pm

    Long live Regretsy!

  29. Jill says

    February 1, 2015 at 11:49 am

    Not sure about Shorts for men, but I liked the idea of skirts for women.

Have you read?

Calendrier de l’Avent Scrapbooking: Make a Christmas Envelope Calendar

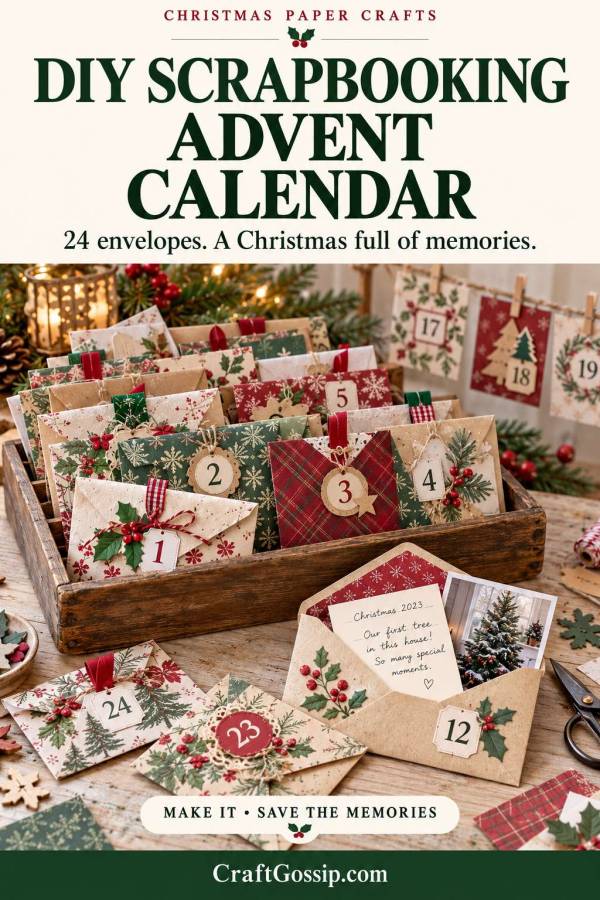
There is something rather lovely about counting down to Christmas with little paper envelopes, especially when you can decorate them with supplies you already own. Those leftover Christmas papers, half-used sticker sheets and ribbon offcuts finally get their moment. Apparently, we weren’t hoarding them. We were preparing.

If you’ve been searching for calendrier de l’avent scrapbooking, the French phrase translates roughly to “scrapbooking Advent calendar.” For this project, we’re making a handmade Christmas countdown with 24 decorated envelopes, each holding a small activity, message or memory prompt.

The nicest part? Once an envelope has been opened, you can tuck a photograph or handwritten memory inside. By Christmas Eve, your countdown has become a little collection of December moments, ready to turn into a Christmas scrapbook.

No cutting machine, elaborate box construction or enormous supply order required.

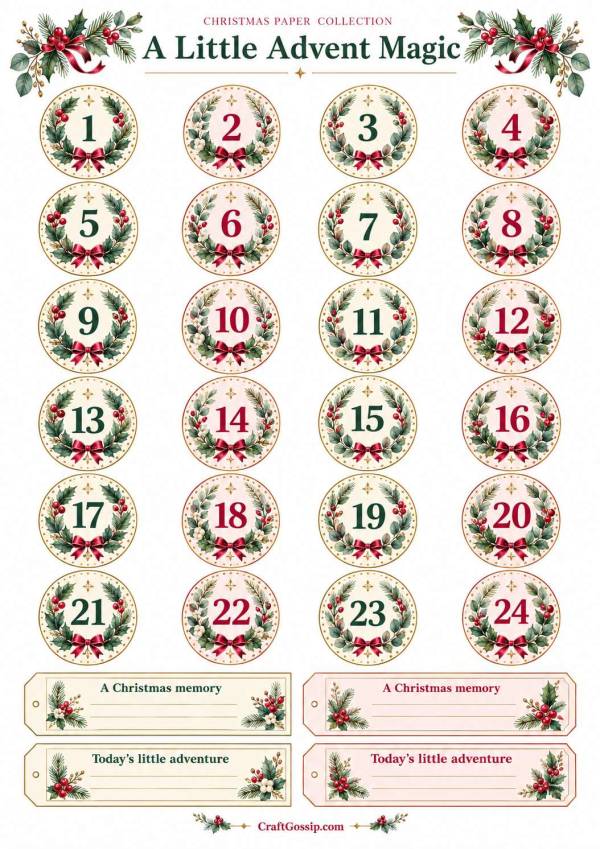
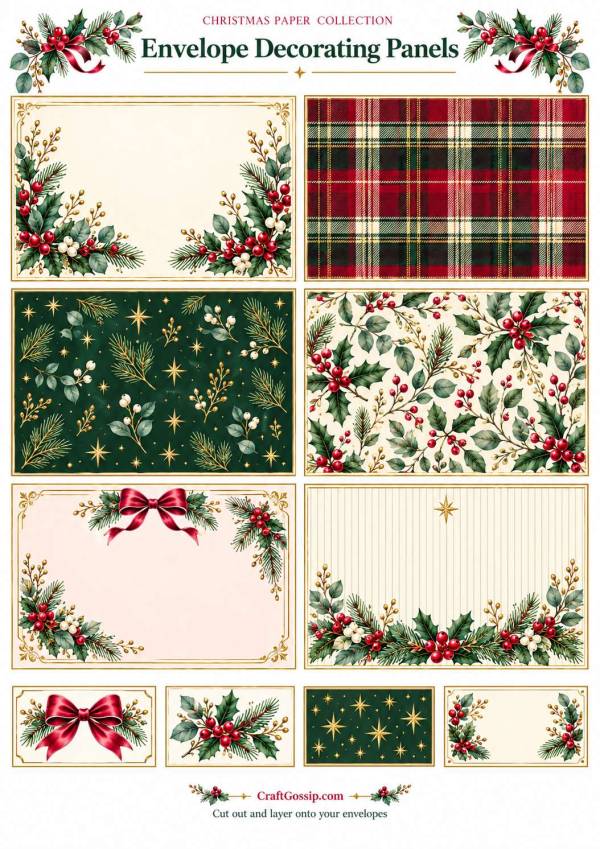
Free Printables – christmas-advent-calendar-printable-pack

What Is a Scrapbooking Advent Calendar?

A scrapbooking Advent calendar uses paper-crafting supplies to create or decorate numbered envelopes, pockets, bags or boxes. Open one each day from December 1 to December 24, with an optional extra for Christmas Day.

You may also see the phrase used for craft-supply Advent calendars, where each compartment contains a surprise such as stamps, dies or embellishments. Those are lovely gifts for paper crafters, but this tutorial is for making your own calendar.

We’re using envelopes because they are easy to decorate, simple to display and useful afterwards. They also keep the project manageable if December already has rather too many things on its to-do list.

Skill level: Beginner
Calendar size: 24 envelopes, with an optional 25th
Best for: Written activities, photographs, journaling cards and flat paper surprises

Supplies for a DIY Scrapbooking Advent Calendar

Gather your supplies before choosing a colour scheme. You might discover you already have almost everything.

  • 24 envelopes, approximately 4 × 6 inches or larger
  • Christmas scrapbook paper and coordinating scraps
  • Plain cardstock for activity cards and number labels
  • Number stickers, stamps or a marker
  • Double-sided craft tape or a glue stick
  • Scissors or a paper trimmer
  • Ruler and pencil
  • Washi tape, ribbon scraps and flat embellishments
  • A basket, shallow box or tray for displaying the envelopes
  • Optional twine and miniature pegs for a hanging display
  • Optional photo-safe adhesive and an album for preserving the finished envelopes

If you need basics, Amazon is a practical place to look for envelope packs, paper trimmers and double-sided craft tape. Check your stash first, though. A new paper collection is tempting, but this project is particularly good for using those smaller pieces we insist are “still useful.”

Choose the envelopes before cutting anything else. Sizes vary, so measure the usable space inside one envelope and test an insert before making the remaining 23.

How to Make a Calendrier de l’Avent Scrapbooking Project

1. Choose a Small, Coordinated Colour Palette

Pick three main colours and repeat them across the calendar.

Try cranberry red, cream and kraft for a traditional Christmas look, or sage green, blush and ivory for something softer. Navy, white and silver work beautifully with snowflakes and winter-themed papers.

You don’t need 24 matching designs. Repeating a few colours and one style of number label will help different papers feel like they belong together.

For more dimensional inspiration, our gingerbread house Advent calendar decorated with scrapbook supplies shows how patterned paper can transform a calendar base.

2. Decorate the Envelope Fronts

Cut a patterned-paper panel slightly smaller than each envelope front, leaving a narrow border around the edge.

Attach the panel with double-sided tape or a thin, even layer of glue. Keep adhesive away from the envelope opening and avoid covering the flap fold.

Add one simple detail to each front:

  • A strip of contrasting paper
  • A stamped Christmas image
  • A small paper tree
  • A ribbon tab
  • A cluster of punched stars
  • A piece of a saved Christmas card

Keep most decorations flat if you plan to preserve the envelopes in an album. Twenty-four bulky bows can turn a sweet little keepsake into something that refuses to close.

3. Add Numbers from 1 to 24

Place each number where it will be easy to see when the envelopes are displayed.

A plain cardstock circle behind the number helps it stand out against busy patterned paper. If you’re using a basket, place numbers towards the top so they remain visible.

Lay out all 24 envelopes before continuing. Check for missing numbers and duplicates now, while correcting them is still a quick job.

4. Make the Activity and Memory Cards

Cut one cardstock insert for each envelope. For a 4 × 6-inch envelope, start with a 3½ × 5½-inch card and test the fit. Trim it further if necessary.

Write a small Christmas activity or memory prompt on the front. Leave the back blank for a few words about what happened that day.

This is where the project becomes more than a countdown. An instruction to play a favourite Christmas song might become a note about someone singing in the kitchen. A suggestion to look at old photographs might bring back a family story worth recording.

5. Fill and Close the Envelopes

Slide one activity card into each envelope. You can also add a flat paper surprise, such as a bookmark, sticker sheet or small photograph.

Close each flap with a removable washi-tape tab, testing it on a spare envelope first. Some tapes can lift paper fibres, particularly from delicate or coated envelopes.

Avoid permanently sealing the flaps if you want to reuse the calendar or keep the envelopes intact.

6. Display Your Christmas Countdown

The simplest option is to stand the envelopes upright in a basket or shallow box, with the numbers showing.

For a hanging version, peg lightweight envelopes onto securely supported twine. Keep heavier gifts elsewhere and put a clue inside the relevant envelope.

If you need room for larger surprises, our brown paper bag Advent calendar tutorial offers a roomy alternative that you can decorate with the same scrapbook papers and numbered labels.

24 Advent Calendar Fillers for Memory Keeping

You don’t need to buy 24 gifts. Small activities and thoughtful notes can make this handmade countdown feel much more personal.

Use these prompts as written, or rearrange them around your family’s plans.

  1. Write down one thing you’re looking forward to this Christmas.
  2. Photograph a favourite Christmas decoration.
  3. Make a paper gift tag from your scraps.
  4. Play a Christmas song and record why you chose it.
  5. Write a card to someone you haven’t seen recently.
  6. Enjoy a favourite drink and describe your perfect December afternoon.
  7. Look through old Christmas photographs.
  8. Record a family Christmas saying or joke.
  9. Make a paper snowflake.
  10. Write down a Christmas baking memory.
  11. Photograph a handmade ornament.
  12. Call someone and ask about their childhood Christmases.
  13. Wrap one gift with a handmade tag.
  14. Take a photograph of your craft table.
  15. Write about a Christmas tradition you want to keep.
  16. Leave someone a kind handwritten note.
  17. Save a small piece of wrapping paper for your scrapbook.
  18. Make a bookmark from leftover cardstock.
  19. Write down three small things you’re grateful for.
  20. Photograph Christmas lights or decorations.
  21. Record a favourite festive film and who you watched it with.
  22. Add a handwritten recipe or the name of a family favourite.
  23. Write a message to your future self.
  24. Record one moment from this December you want to remember.

Choose prompts that suit the person opening the calendar. A grandchild might enjoy drawing a decoration, while a friend may prefer a little daily journaling ritual.

Turn Your Envelope Advent Calendar into a Christmas Scrapbook

After opening each envelope, add a short note to the reverse of the activity card. Tuck in a small photograph or paper keepsake if you have one.

You don’t need a photograph every day. A sentence, a child’s drawing or a handwritten recipe can be just as meaningful.

After Christmas, arrange the envelopes in date order and attach them to album pages with their openings accessible. Check the album size before mounting anything, and allow extra space for filled envelopes.

For photographs and keepsakes you want to preserve, use photo-safe materials and avoid placing them directly against unknown inks, glitter or reused packaging.

You can also keep the envelopes in a decorated box. There is no rule saying every December memory must become a finished album by New Year’s Day.

Easy Scrapbooking Advent Calendar Variations

Make a Craft-Supply Swap Calendar

Create a calendar for a paper-crafting friend using little bundles of die-cuts, ribbon, stamped images, tags and stickers.

Use bags or boxes for anything bulky, and choose pieces that suit their crafting style. Twenty-four thoughtful little selections will be more useful than a jumble of things you were trying to clear out.

Create a Tea and Journaling Calendar

Pair a commercially sealed tea sachet with a daily writing prompt. Check that each sachet fits comfortably inside your envelopes before decorating the full set.

This makes a lovely handmade gift for someone who would enjoy a quiet few minutes during the Christmas rush.

Try a Reusable Magnetic Calendar

Prefer a display you can refill each year? Our magnetic Advent calendar tutorial uses scrapbook paper and a metal tray as the starting point.

It’s another way to bring favourite Christmas papers out of the drawer and into your seasonal decorating.

Make a Calendar with the Grandchildren

Let children decorate some envelopes while you prepare the numbers and inserts. Include simple activities such as drawing a Christmas tree, making a card or asking a grandparent about a favourite childhood gift.

The slightly wonky stars may end up being your favourite part.

Common Mistakes to Avoid

Making every envelope completely different: Repeat a colour, label shape or paper motif to keep the finished display cohesive.

Decorating before deciding what goes inside: Choose the fillers first so the envelopes are large enough.

Using too much wet glue: Thin envelopes can wrinkle. Double-sided tape is often easier for attaching decorative panels.

Putting numbers where they disappear: Test one envelope in your basket or display before numbering the entire set.

Making daily prompts too demanding: A five-minute activity is much easier to enjoy than another obligation in a busy month.

Forgetting the keepsake plan: If you want an album afterwards, keep the flaps accessible and embellishments fairly flat.

Can You Reuse a Scrapbooking Advent Calendar?

Yes. If you open the envelopes carefully and keep the contents lightweight, you can refill them the following year.

Choose between reusing the decorated envelopes as a family countdown or preserving this year’s set as a memory collection. Both are lovely options.

For me, the appeal of a calendrier de l’avent scrapbooking project is that it makes room for the little things: a favourite song, a handwritten note, an old family story and a few paper scraps finally put to work.

Start with a handful of envelopes and a colour palette you love. You can make something personal and beautiful without buying an entirely new craft cupboard.

RSS feed: More Articles More Articles

  • 10 Elephant Cross Stitch Patterns for Sweet Gifts and Beautiful Wall Art
  • Calendrier de l’Avent Scrapbooking: Make a Christmas Envelope Calendar
  • Free Christmas Postage Stamp Digital Stamps (Vintage, Modern and Religious Printables)
  • 10 Cosy Leg Warmer Knitting Patterns for Warm Legs and a Little Retro Charm
  • DIY Vanilla Sugar Cookie Body Scrub – A Christmas Holiday Sweet Treat for Your Skin
  • Christmas on a Budget – 10 Christmas Gifts You Can Sew Using Scrap Fabric
  • Christmas Tree Pot Holder Free Crochet Pattern
  • Christmas on a Budget – How to Decorate for Christmas Without Buying More Decorations
  • How to Make a Basket of Kittens Fall Card
  • Cross Stitch Patterns for Trucks with Christmas Trees

Pick Your Blog

  • Sewing
  • Knitting
  • Quilting
  • Crochet
  • Home & Garden
  • Recycled Crafts
  • Scrapbooking
  • Card Making
  • Polymer Clay
  • Cross-Stitch
  • Edible Crafts
  • Felting
  • Glass Art
  • Indie Crafts
  • Kids Crafts
  • Jewelry Making
  • Lesson Plans
  • Needlework
  • Bath & Body
  • Party Ideas
  • Candle Making
  • DIY Weddings
  • Not Craft
  • Free Craft Projects

Copyright © 2026 · CraftGossip | Start Here | Contact Us | Link to Us | Your Editors | Privacy and affiliate policy