• Home
  • Suggest A Craft
  • DIY Newsletter

Craft Gossip

The largest independent craft review site since 2007

  • About CraftGossip
  • Our Network
    • Bath & Body Crafts
    • Candle Making Ideas
    • Crochet Ideas
    • Cross Stitch
    • Edible Crafts
    • Felting Patterns
    • Glass Art
    • Home & Garden Ideas
    • Indie Crafts
    • Jewelry Making
    • Kids Crafts
    • Knitting Patterns
    • Lesson Plans
    • Needlework
    • Party Ideas
    • Polymer Clay
    • Quilting Ideas
    • Recycled Crafts
    • Scrapbooking
    • Sewing Patterns
    • Card Making
    • DIY Weddings
    • Not Craft Ideas
  • Giveaways
  • Roundups
  • Store
  • Search

Your Guide to Knitting Decreases

March 9, 2023 by Sarah White

Last week I shared a little bit about knitting increases, so it makes sense we’d continue our learning with a look at knitting decreases.

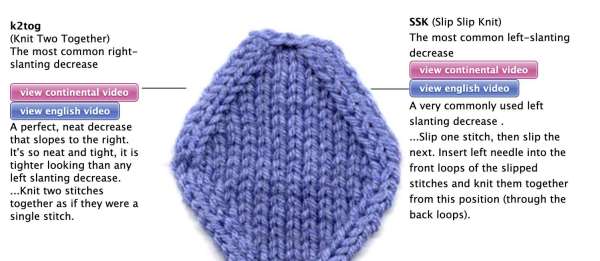
I feel like there are fewer options for decreases in knitting than there are increases, but it may just be that there are a few that are used really commonly. Most of the time you will use either knit two together or slip, slip, knit. K2tog is usually the decrease most people learn first, and when you want to be a little fancier and start using mirrored increases you can add in ssk. (For reference, knit two togethers slant to the right, while slip, slip, knits slant to the left.)

I have always loved this visual guide to knitting decreases from Knitting Help, which shows you what all the different decreases look like and how you can pair different decreases that lean different ways. For example you can also pair a knit 2 together with a slip, slip, purl instead of a slip, slip, knit, which makes a tighter looking decrease than a ssk.

The page linked above has written instructions for each decrease, as well as links to videos if you need them. it only covers single decreases, which are the most common kinds of decreases, but sometimes you want to decrease more than one stitch at a time.

In that case you will want to use what’s known as a double decrease. The most common of these is known as the centered double decrease, which is a great design element when you don’t want a decrease that leans. (It’s done by slipping a stitch, knitting two together, then passing the slipped stitch over the stitch you just worked.)

But there are other options, as this post from Tonia Knits explores. It describes 10 different ways to make double decreases. Between these two pages you’ll probably have every decrease you could ever need in your knitting career!

[Photo: Knitting Help.]

Learn Basic Decreases to Shape Your Knitting

Your Quick Reference Guide to Common Increases and Decreases

Make Prettier Decreases with This Tip

Read These Next

  • How to Do Invisible Decrease In Crochet Stitches
  • Eco-Craft Fun: 25+ Sustainable Activities to Teach…
«
»

Have you read?

Recycled Paper Cylinder Face Art – A Colorful Win for All Ages

I recently stumbled across this super creative project on Instructables – “Face With Recycled Paper Cylinders” – and I had to share it with you all because it’s just the kind of craft that checks all my favorite boxes: recycled materials, hands-on creativity, and fun for literally any age.

The idea is simple but genius—roll strips of recycled paper (think junk mail, old magazines, leftover printer paper) into cylinders, then arrange and glue them to form a unique abstract face. You can make it funky, realistic, Picasso-inspired—whatever your mood or style dictates!

What I really love is the blend of eco-conscious crafting with true artistic expression. This isn’t just another kids’ project—it’s something you could easily do with a group of little ones, a classroom full of teens, or even as an adult art therapy or weekend wind-down activity. It’s super relaxing and surprisingly satisfying seeing all those paper rolls come together to form something new and expressive.

The tutorial itself is easy to follow, with plenty of visuals to guide you along the way. You don’t need any fancy materials—just glue, paper, scissors, and a board or piece of cardboard to serve as your canvas.

I also appreciate how this project leaves so much room for personalization. Want to make it into a full face? Go for it. Prefer to focus on a single eye or mouth? Totally works. You can even play with color schemes by choosing papers with a certain palette, or painting over them once they’re rolled.

In short: this is a total keeper for anyone who loves crafting with purpose. It’s the kind of project that sparks creativity while gently reinforcing the idea that beautiful things can come from what we usually throw away.

Highly recommend giving it a go—solo or with a group. And if you try it, tag me or drop a pic—I’d love to see your recycled masterpiece!

RSS More Articles

  • Cozy Up Your Holidays with This Stunning Christmas Blanket!
  • 5 Must-Know Secrets to Turning Your Suburban Home into a Profitable, Sustainable Homestead
  • Recycled Paper Cylinder Face Art – A Colorful Win for All Ages
  • 12 FREE Summer Digital Stamps to Download
  • Today Only: 50% Off When You Spend $50 at Crochet.com!
  • Today only 50% OFF When You Spend $50 at KnitPicks.com
  • Kids and Adults Will Love this Paper Version of Tetris
  • Knit a Hat with a Flock of Chickens
  • That Time a Thrift Store Employee Shamed Me – And Your Honest Responses
  • DMC American Camping Embroidery Pattern – A Nostalgic Outdoor Stitch for Summer Lovers

Pick Your Blog

  • Sewing
  • Knitting
  • Quilting
  • Crochet
  • Home & Garden
  • Recycled Crafts
  • Scrapbooking
  • Card Making
  • Polymer Clay
  • Cross-Stitch
  • Edible Crafts
  • Felting
  • Glass Art
  • Indie Crafts
  • Kids Crafts
  • Jewelry Making
  • Lesson Plans
  • Needlework
  • Bath & Body
  • Party Ideas
  • Candle Making
  • DIY Weddings
  • Not Craft
  • Free Craft Projects

Copyright © 2025 · CraftGossip | Start Here | Contact Us | Link to Us | Your Editors | Privacy and affiliate policy