• Home
  • Suggest A Craft
  • DIY Newsletter

Craft Gossip

The largest independent craft review site since 2007

  • About CraftGossip
  • Our Network
    • Bath & Body Crafts
    • Candle Making Ideas
    • Crochet Ideas
    • Cross Stitch
    • Edible Crafts
    • Felting Patterns
    • Glass Art
    • Home & Garden Ideas
    • Indie Crafts
    • Jewelry Making
    • Kids Crafts
    • Knitting Patterns
    • Lesson Plans
    • Needlework
    • Party Ideas
    • Polymer Clay
    • Quilting Ideas
    • Recycled Crafts
    • Scrapbooking
    • Sewing Patterns
    • Card Making
    • DIY Weddings
    • Not Craft Ideas
  • Giveaways
  • Roundups
  • Store
  • Search

Video Tutorial – 15 Minute Placemat Tutorial

May 17, 2023 by Shellie Wilson

As you know, in quilting, mitred corners are a technique used to create neat and tidy corners when attaching binding to a quilt. The process involves folding and tucking the corners in a way that creates a diagonal seam that aligns with the edges of the quilt.

Generally, you would follow these steps to create them:

  1. Begin by preparing the binding strips. Fold and press the binding strip in half lengthwise, wrong sides together.
  2. Start attaching the binding to one side of the quilt, leaving a tail of around 6-8 inches loose at the beginning.
  3. Sew the binding to the quilt with a ¼ inch seam allowance, stopping about ¼ inch away from the first corner.
  4. Fold the binding strip up, away from the quilt, creating a 45-degree angle with the raw edges aligned with the next edge of the quilt.
  5. Hold the angle in place and fold the binding strip back down, aligning the raw edges with the next edge of the quilt. The folded edge should be in line with the top edge of the quilt.
  6. Continue sewing the binding along the next edge, starting at the top and leaving a 6-8 inch tail at the end.
  7. Repeat steps 3-6 for the remaining corners, folding and tucking the binding at each corner to create a mitred corner.
  8. Once all the corners are mitred, trim the excess binding, leaving a small overlap of about ¼ inch.
  9. Fold the binding over the edge of the quilt, encasing the raw edges, and hand stitch or machine stitch the binding in place.

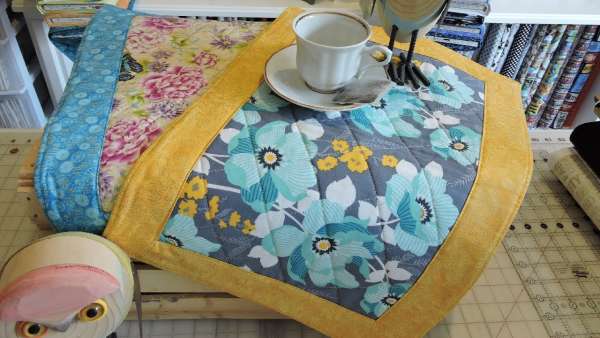
Today’s video is a placemat tutorial for miter corners on your quilted placemat. This tutorial is easy to follow and guide you as you learn the basics of Mire corners for your quilting projects.


Read These Next

  • Quick and Crafty: Discover Over 80 10-Minute Sewing…
  • 11 Half Square Triangle Quilt Patterns
«
»

Have you read?

Flower Cross Stitch Kits

If you’re eager to explore the world of embroidery, the  Embroidery Kit for Beginners is the perfect starting point. With an impressive rating and a variety of designs to choose from, this kit has everything you need to kickstart your embroidery journey.

Let’s dive into what makes this kit so great. It comes with three patterned embroidery fabrics, each adorned with a beautiful floral design. Alongside these fabrics, you’ll find an embroidery hoop to keep your fabric taut, three colored embroidery threads, and a generous supply of nine embroidery needles. Plus, the kit includes a comprehensive embroidery book, guiding you through 28 different stitches – perfect for beginners looking to expand their skills.

One of the standout features of this kit is its ease of use. The embroidery book provides clear, easy-to-follow instructions in English, covering everything from handling embroidery thread to framing the finished product. Each embroidery pattern is printed directly onto the fabric, making it simple to follow along and practice your stitches.

Additionally, the kit includes practice fabrics specifically designed for beginners. Composed of a blend of linen and cotton, these fabrics are thick enough to support your stitches while still being easy to work with. Plus, each embroidery thread is divided into six strands, giving you plenty of options for customization.

Free charts: Cross-stitch

RSS More Articles

  • Etsy Spotlight – Girls A-Line Dress Sewing Pattern
  • Flower Cross Stitch Kits
  • 4 FREE Mother’s Day Scrapbook Titles
  • Duality Blanket Crochet Kit – Beginner Crochet Blanket kit
  • How to Build Your Own Stylish Patio Cooler – A Perfect Summer DIY
  • Free Sewing Pattern – Sew A Flattering and Versatile Tiered Skirt Pattern
  • Spring Outdoor Activities for Kids
  • Time Flies — And Sometimes It Has Wings Made of Vintage Paper and Buttons
  • 7 Unexpected Ways to Customize The Lowink Blanket (Beyond the Kit!
  • Graduation Pop Up Card Tutorial

Copyright © 2025 · CraftGossip | Start Here | Contact Us | Link to Us | Your Editors | Privacy and affiliate policy