• Home
  • Suggest A DIY
  • DIY Newsletter

Craft Gossip

Independent craft blog since 2007

  • About CraftGossip
  • Our Network
    • Bath & Body Crafts
    • Candle Making Ideas
    • Crochet Ideas
    • Cross Stitch
    • Edible Crafts
    • Felting Patterns
    • Glass Art
    • Home & Garden Ideas
    • Indie Crafts
    • Jewelry Making
    • Kids Crafts
    • Knitting Patterns
    • Lesson Plans
    • Needlework
    • Party Ideas
    • Polymer Clay
    • Quilting Ideas
    • Recycled Crafts
    • Scrapbooking
    • Sewing Patterns
    • Card Making
    • DIY Weddings
    • Not Craft Ideas
  • Giveaways
  • Roundups
  • Store
  • Search

Tutorial: White Space Layout

October 9, 2009 by Francine Clouden

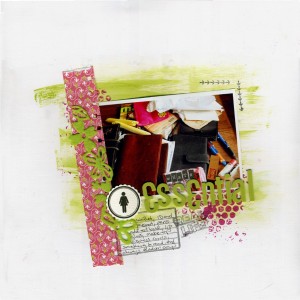
whats essential

White space is also known as negative space, and is that part of a layout that isn’t “filled up” with elements. It doesn’t need to be white, just empty, but I chose to use white card stock for my background. White space is an effective design element because it allows the eyes to rest, and also helps to emphasize the elements that are there, thus pulling the viewer in.
You will need:

1 photo
12×12 Card stock
Patterned paper
felt or other trim
acrylic paint in two colours
journaling stamp
Phrase stamp
decorative stamp
circle label
letter stickers (small and large)
decorative border punch or scissors
Bubble wrap

1. Paint a roughly square shape in the center of the card stock. This doesn’t have to be precise, simple swipe the brush several times across the card stock

2. Brush some of the second colour of paint across a piece of bubble wrap and press into the top left and bottom right corners of the painted square

3. Stick photo approximately in center of painted area

4. Cut a strip of patterned paper about 1.5″ wide by 7″ long and tear a bit off each end. Use the punch or scissors to make a border along one long side. Add to left, slightly on top of photo

5. Stamp journaling spot to bottom left of photo, slightly on top of the paper strip

6. Add felt trim and circle label as shown

7. Add title with letter stickers

8. Stamp phrase stamp below title, overlapping journaling spot

9. Use decorative stamp to make a photo corner above the top right edge of photo

10. Add journaling and voila!

Note: This tutorial was originally posted on my tutorial blog Tuesday To-Do
«
»

Have you read?

Easy Lacing Cards to Make for Kids

Lacing is a great fine motor activity, and most kids go through a phase where they enjoy working with lacing cards. It helps promote focus and is a great quiet activity for kids to do in the car or to fill time in the classroom. And of course knowing how to lace is the beginning of knowing how to sew, which is great for all kids to learn (more on teaching kids to sew here). 

There are lots of ways to make your own lacing cards. This one is just a pin but it’s easy to make lacing cards with any shape a child is into using cardboard and a nail to poke the holes. This could be fun for letter and number recognition or spelling the child’s name.  Or try this version from Hey Azka, which uses a hole punch to make bigger holes so you can lace with shoe laces. 

You can also just do lacing cards with paper, but it’s a great idea to print them on card stock and/or laminate them to make them sturdier for little hands. Homeschool Share has a set of alphabet lacing cards, which are free with email signup. Deceptively Educational has a set of number lacing cards with numbers 0 to 10. 

Picklebums has some basic shape lacing cards, too.

Living Life and Learning has a bunch of cute printable lacing cards, including back to school designs, shoes kids can lace and learn to tie and ocean themed lacing cards. She also has tips for making your own lacing cards.

A Rose Tinted World made their lacing cards with craft foam, which makes them a little more durable than paper and you can cut it more easily than cardboard. They used a die cutting machine but you can also cut shapes by hand. 

I also love the cat and mouse cards from Seam Whisperer. They also have some spring themed designs. So cute!

If you want to make lacing cards that are more open ended, check out this tutorial form Pretty Life Girls to make lacing cards that are more like geo boards. Theirs are made with wood but you can also do this with cardboard, craft foam or card stock. 

RSS More Articles

  • Book Review Wednesday: 3D Beaded Animal Crafts for Kids
  • Book Review: Simple Sashiko – 20 Easy Projects to Create & Inspire
  • Easy Lacing Cards to Make for Kids
  • 12 Nature Inspired Scrapbook Layout Designs
  • Book Review: The Knitting Book
  • DIY Little Ghoul Balls For Halloween Tiered Tray Decor
  • Free Halloween Crochet Projects You Can Finish in a Weekend
  • Cross Stitch Sheep Projects
  • Create Your Own Cozy Review: A Practical Guide to Slow Living and a More Intentional Home
  • 5 Easy Homemade Mayonnaise Recipes- Know Exactly What’s in Your Food

Pick Your Blog

  • Sewing
  • Knitting
  • Quilting
  • Crochet
  • Home & Garden
  • Recycled Crafts
  • Scrapbooking
  • Card Making
  • Polymer Clay
  • Cross-Stitch
  • Edible Crafts
  • Felting
  • Glass Art
  • Indie Crafts
  • Kids Crafts
  • Jewelry Making
  • Lesson Plans
  • Needlework
  • Bath & Body
  • Party Ideas
  • Candle Making
  • DIY Weddings
  • Not Craft
  • Free Craft Projects

Copyright © 2026 · CraftGossip | Start Here | Contact Us | Link to Us | Your Editors | Privacy and affiliate policy