• Home
  • Suggest A Craft
  • DIY Newsletter

Craft Gossip

The largest independent craft review site since 2007

  • About CraftGossip
  • Our Network
    • Bath & Body Crafts
    • Candle Making Ideas
    • Crochet Ideas
    • Cross Stitch
    • Edible Crafts
    • Felting Patterns
    • Glass Art
    • Home & Garden Ideas
    • Indie Crafts
    • Jewelry Making
    • Kids Crafts
    • Knitting Patterns
    • Lesson Plans
    • Needlework
    • Party Ideas
    • Polymer Clay
    • Quilting Ideas
    • Recycled Crafts
    • Scrapbooking
    • Sewing Patterns
    • Card Making
    • DIY Weddings
    • Not Craft Ideas
  • Giveaways
  • Roundups
  • Store
  • Search

Tutorial: Turning a thin strap inside out

July 4, 2009 by Anne Weaver

turningastrap
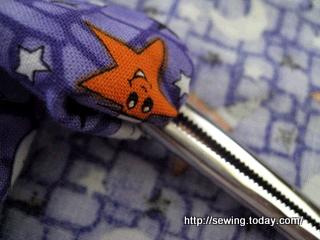
I don’t know how many times I’ve been rockin’ along on a quick sewing project, only to discover that I have to turn a really long strap inside out.  On this step alone, my productivity grinds to a halt.  Christine Sews shows how she very quickly turns  thin strap inside out using a pair of hemostats.  See how she does it.

[photo from Christine Sews]

Technorati Tags: sewing, tutorial, strap, inside, turn, hemostat

Read These Next

  • Clean Your Home in Minutes: Quick and Easy Cleaning…
  • 20+ Handmade Holiday Gift Tags using Stamps and Dies
«
»

Have you read?

Make Your Cross Stitch into an Iron On Patch

A while back I made a little rainbow cross stitch pattern and I wasn’t sure what I wanted to do with it, so I turned it into a patch. My idea was that it could be used on a jacket or backpack, or you could add a pin to the back and wear it temporarily on a shirt or elsewhere. 

But what if you want to make your design more permanent? Is it possible to turn a piece of cross stitch into an iron-on design?

It turns out yes, it is, and Sirious Stitches has done it so I didn’t have to try to figure it out on my own. 

The way they did it was by using HeatnBond, an iron-on adhesive that attaches fabrics without sewing. There was still sewing involved to finish the edges of the cross stitch fabric and make it look like a purchased patch. The post shows how to do this by hand or with your sewing machine. (I just did blanket stitch edging on mine, which doesn’t look like a “real” patch but is also a lot faster.)

Once you have the patch prepared it’s a pretty easy matter of using the fusible adhesive to the back of the patch so you can then iron it onto whatever jacket, pair of jeans, bag or whatever else you might want to add it to. 

I guess I’m a little paranoid about the washability of cross stitch projects, though you could hand wash anything with an iron-on cross stitch patch as you might need to with a purchased iron-on patch, anyway. But this does look really cool and is a great option if you know you want to permanently add a cross stitch patch to a garment of bag. 

Get the full tutorial over at Sirious Stitches. Would you add an iron-on cross stitch patch to something? I’d love to hear what you would use this technique for!

[Photo: Sirious Stitches]

RSS More Articles

  • Make Your Cross Stitch into an Iron On Patch
  • How to Make a Trendy Capybara Card
  • DIY Valentine Shabby Chic Bookmarks: A Creative and Heartfelt Gift Idea
  • Stitch Stars: Taylor: Over 20 unofficial embroidery patterns for stitchy superfans
  • Bee Themed Mini Scrapbook Album
  • Fun Tank Top Knitting Patterns
  • Books to Get Ready for Back to School
  • Just Feel Festive Shawl crochet pattern by QuirkyMondayCrafts
  • Cozy Up Your Holidays with This Stunning Christmas Blanket!
  • 5 Must-Know Secrets to Turning Your Suburban Home into a Profitable, Sustainable Homestead

Pick Your Blog

  • Sewing
  • Knitting
  • Quilting
  • Crochet
  • Home & Garden
  • Recycled Crafts
  • Scrapbooking
  • Card Making
  • Polymer Clay
  • Cross-Stitch
  • Edible Crafts
  • Felting
  • Glass Art
  • Indie Crafts
  • Kids Crafts
  • Jewelry Making
  • Lesson Plans
  • Needlework
  • Bath & Body
  • Party Ideas
  • Candle Making
  • DIY Weddings
  • Not Craft
  • Free Craft Projects

Copyright © 2025 · CraftGossip | Start Here | Contact Us | Link to Us | Your Editors | Privacy and affiliate policy