 Head over to Craftzine to find out how to make this tunic swimsuit coverup from an old t-shirt. Go to the tutorial.
Technorati Tags: sewing, tutorial, refashion, t-shirt, tee, tunic, cover, swimsuit
The largest independent craft review site since 2007

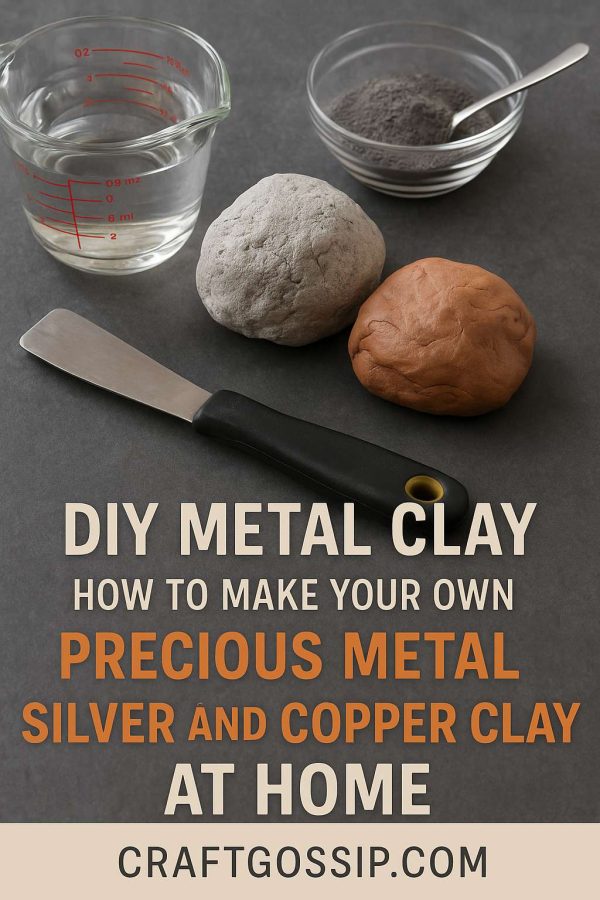
If you’ve ever dreamed of turning powder into precious jewelry with your own two hands, metal clay is pure magic. Imagine taking fine silver or copper powder, mixing it with a binder, shaping it like clay, and then—poof!—after firing, you’re left with solid metal jewelry.
While you can buy ready-made packs of silver clay, they’re pricey. The good news? You can make your own at home, and it’s easier than you think. In this guide, I’ll walk you through how to make homemade silver and copper clay, tips for success, firing methods, and a handful of inspiring project ideas.
Metal clay is a mix of fine metal powder (silver, copper, bronze, even gold), an organic binder, and water. It looks and feels like soft pottery clay, but once it’s dried and fired, the binder burns away and you’re left with solid metal.
Think of it as sculpting in clay with a shiny, wearable reward at the end. Unlike traditional silversmithing, there’s no sawing, soldering, or hammering required—just shape, dry, and fire.
Here’s your basic shopping list for DIY metal clay:
Safety gear: Wear a mask when working with fine powders and gloves if you have sensitive skin.
A good starting ratio is 90% metal powder and 10% binder by weight. If your clay feels crumbly later, you can adjust by adding more binder.
Combine your powder and binder thoroughly. Sift if needed to break up clumps.
Using a dropper or spoon, drizzle in distilled water while stirring. The mixture should come together into a soft dough.
On a non-stick surface, knead the mixture like bread dough until smooth. Press a small ball flat—if it cracks, add more water. If it sticks, dust with a touch more binder.
Wrap the clay in cling film and place in an airtight container. Refrigerate if storing for more than a day. Homemade clay dries out faster than store-bought.
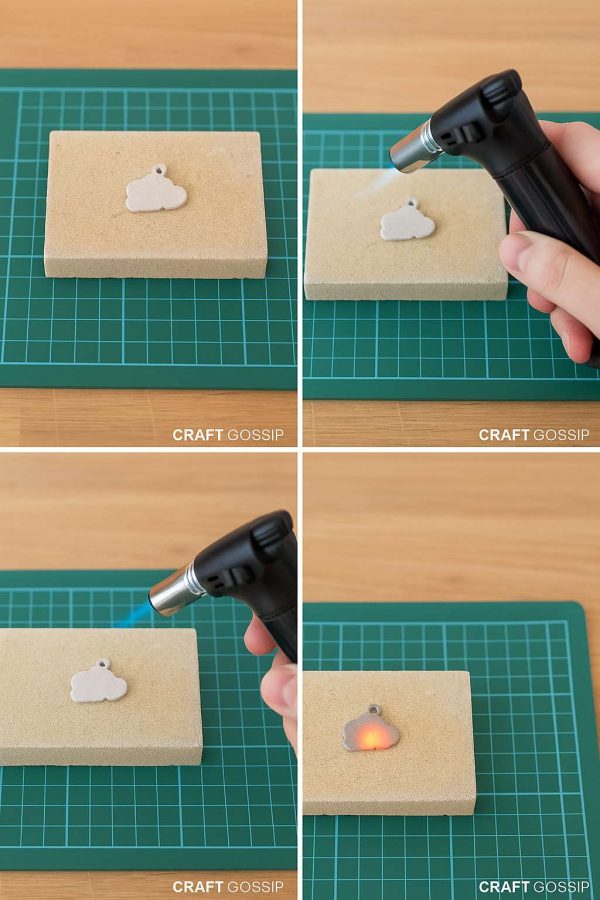
This is where the magic happens—your clay becomes solid metal.
Tip: Always fire a test strip first to check shrinkage and strength.
After firing, your pieces will look matte and a bit dull. That’s normal! To bring out the shine:
Optional: Add patinas (like liver of sulfur) to bring out textures and shadows.
Here are a few creative starter projects:
Making your own silver or copper clay at home is part science experiment, part craft therapy. It saves money, gives you full control over your materials, and opens up a whole new world of jewelry making. Once you get the hang of it, you’ll find yourself experimenting with textures, firing techniques, and even combining metals for unique results.
Metal clay is one of those crafts that bridges the gap between ancient tradition and modern DIY. So grab your powders, roll up your sleeves, and let a little alchemy happen right at your kitchen table.