• Home
  • Suggest A DIY
  • DIY Newsletter

Craft Gossip

Independent craft blog since 2007

  • About CraftGossip
  • Our Network
    • Bath & Body Crafts
    • Candle Making Ideas
    • Crochet Ideas
    • Cross Stitch
    • Edible Crafts
    • Felting Patterns
    • Glass Art
    • Home & Garden Ideas
    • Indie Crafts
    • Jewelry Making
    • Kids Crafts
    • Knitting Patterns
    • Lesson Plans
    • Needlework
    • Party Ideas
    • Polymer Clay
    • Quilting Ideas
    • Recycled Crafts
    • Scrapbooking
    • Sewing Patterns
    • Card Making
    • DIY Weddings
    • Not Craft Ideas
  • Giveaways
  • Roundups
  • Store
  • Search

Tutorial: Pennant banner from fabric scraps

July 1, 2009 by Anne Weaver

scrapfabricbanner
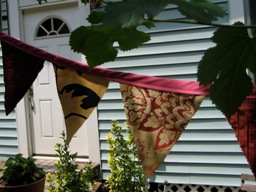
Crafting a Green World shows how to make a pennant banner using scrap fabric.  Get the tute!

[photo from Crafting a Green World]

Technorati Tags: sewing, tutorial, fabric, scrap, banner, pennant, bunting
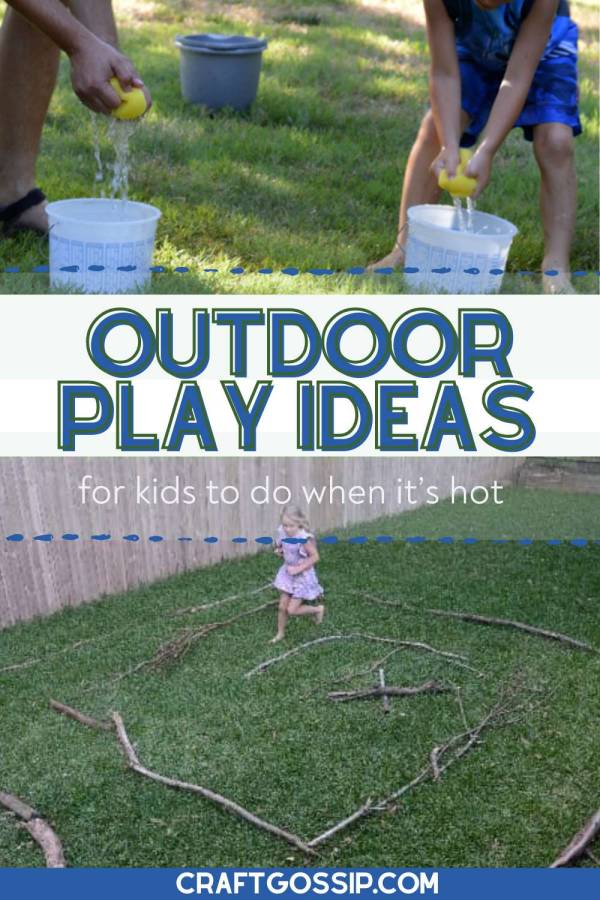
Read These Next

  • Patriotic Sewing Patterns For 4th of July Decor,…
  • Scrap Quilt Patterns That Actually Look Beautiful…
«
»

Have you read?

Why You Need A Stick Blender For Soap Making

If you are just starting out with homemade soap, there is one tool that will very quickly earn its place on your soapmaking bench: the humble stick blender.

Also called an immersion blender, this handy little gadget is one of those tools that makes you wonder how anyone had the patience to make cold process soap without it. Technically, yes, you can stir soap batter by hand. You can also sew an entire quilt by candlelight, but that does not mean we need to make life harder than it already is.

A stick blender helps bring your oils and lye solution together faster, smoother, and more evenly. It is especially useful for cold process soap making, where you need your mixture to reach “trace” before pouring it into the mould. Trace is the stage where the soap batter thickens enough that drizzles leave a faint mark on the surface before sinking back in. It is one of those soapmaking terms that sounds mysterious until you see it happen once, and then suddenly it all makes sense.

If you are working through beginner recipes from our soap making recipes collection, a stick blender is one of the first tools I would recommend adding to your kit.

What Does A Stick Blender Do In Soap Making?

In cold process soap, you combine melted oils with a lye solution. These ingredients need to emulsify, which means they need to blend together properly rather than separating back into oily layers.

A stick blender speeds up that process. Instead of stirring and stirring and wondering whether your arm is about to fall off, you can use short bursts of blending to bring the soap batter together.

A stick blender helps:

speed up trace
create a smoother soap batter
reduce hand-stirring time
blend oils, lye solution, colourants, clays, and fragrance evenly
make beginner soapmaking feel much less intimidating

It is not about whipping the mixture like cake batter. You are not trying to beat air into the soap. You are gently encouraging the oils and lye solution to become one smooth mixture.

Can You Make Soap Without A Stick Blender?

Yes, you can make soap without a stick blender, but it can take a long time. Some soap recipes may come together with hand stirring, especially if they contain faster-moving oils or additives, but others can stay thin for what feels like forever.

If you are making your first batch of cold process soap, hand stirring can be frustrating because you may not know whether the recipe is simply slow to trace or whether something has gone wrong. A stick blender removes a lot of that uncertainty.

For melt and pour soap, you usually do not need a stick blender. Melt and pour soap bases are already made; you are simply melting, colouring, scenting, and pouring. If you are making a recipe like a simple soap bar, guest soap, or decorative melt and pour project, a spoon or spatula is usually enough.

For cold process soap recipes, especially recipes like our Mermaid Dreams Cold Process Soap and DIY Charcoal and Beer Soap, a stick blender is a very useful tool.

What To Look For In A Stick Blender For Soap Making

You do not need the fanciest stick blender in the shop, but there are a few features worth looking for.

Stainless Steel Shaft

Choose a stick blender with a stainless steel shaft rather than plastic. Soap batter can be warm, alkaline, and messy, and stainless steel is much easier to clean. It is also more durable over time.

Detachable Blender Head

A detachable head makes washing much easier. Soapmaking cleanup is not glamorous, and anything that makes it simpler is a win.

Low Speed Option

You do not need a turbo-powered kitchen monster for soap. A low speed setting gives you more control and helps avoid splashing. Soap batter is not something you want flicked across the bench, especially when it is still caustic.

Comfortable Handle

Soapmaking can be a little stop-start, especially when you are checking for trace. A comfortable handle makes the process easier, particularly if you are making larger batches.

Bell-Shaped Guard

The bell-shaped bottom around the blade helps reduce splatter and keeps the blade safely covered while blending. It also helps pull the soap batter through the blade more efficiently.

If you are buying one specifically for soapmaking, Amazon is a handy place to compare stainless steel immersion blenders, but make sure you keep your soapmaking blender separate from your kitchen blender. Once a tool has been used for lye soap, it belongs to the soap bench, not the soup pot.

Do You Need A Separate Stick Blender For Soap?

Yes, I strongly recommend keeping a separate stick blender just for soap making.

Even with careful cleaning, soapmaking tools come into contact with raw soap batter, fragrance oils, colourants, clays, and lye solution. It is much safer and cleaner to have dedicated soapmaking equipment.

Label it if you need to. Put it in a separate tub with your soap tools. Hide it from anyone in the house who thinks all appliances are fair game for smoothies. Ask me how I know that families do not always understand “craft-only equipment.”

A basic soapmaking tool kit might include:

a dedicated stick blender
stainless steel or heat-safe mixing bowls
silicone spatulas
digital scale
thermometer
safety goggles
gloves
soap mould
pH strips or testing supplies
old towels for insulating soap

If you are building your first kit, start small. You do not need every shiny soapmaking gadget straight away. A good scale, safety gear, mould, and stick blender will get you much further than a drawer full of pretty but unnecessary extras.

How To Use A Stick Blender For Soap Making

The biggest beginner mistake is holding the stick blender on continuously. That can bring your soap to trace too quickly, create air bubbles, or make the batter thicken before you have added colours and fragrance.

The trick is short bursts.

Place the stick blender fully into the soap batter before turning it on.

Tap it gently on the bottom of the bowl to release trapped air bubbles.

Blend for a few seconds.

Turn it off and stir with the blender head.

Blend again briefly.

Repeat until the soap reaches light trace.

This blend-stir-blend method gives you much more control. You are coaxing the batter along, not attacking it like a milkshake.

For recipes with swirls, layers, embeds, or detailed designs, stop at light trace. This keeps the soap fluid enough to pour and work with. For simple loaf soaps, a medium trace is often fine.

What Is Trace In Soap Making?

Trace is the point where your soap batter has thickened enough to show that emulsification is happening.

At light trace, the batter looks like thin custard or cream. If you drizzle a little over the surface, it leaves a faint line before disappearing.

At medium trace, the batter is thicker and holds marks more clearly.

At thick trace, it looks more like pudding and may need to be spooned rather than poured.

A stick blender helps you reach trace faster, but it can also push you past light trace if you are not careful. This matters when you are using fragrance oils that accelerate, or if you want time to add mica colours, clays, botanicals, or decorative layers.

For beginners, light trace is usually the sweet spot.

Stick Blender Mistakes To Avoid

Blending Continuously

Do not just switch it on and hope for the best. Continuous blending can move your soap from thin to thick very quickly.

Lifting The Blender While It Is Running

Keep the blender head fully submerged before turning it on. Lifting it while running can create splashes, and raw soap batter is not something you want on your skin or bench.

Using A Kitchen Blender

A jug blender is not ideal for cold process soap. It can trap pressure, splash, overmix, and be harder to clean safely. A stick blender gives better control.

Using A Plastic Shaft

Plastic can become scratched, stained, or damaged over time. Stainless steel is the better choice for soapmaking.

Sharing It With Food

Once used for soap, keep it for soap. No exceptions. No “just this once” soup emergencies.

Safety Tips When Using A Stick Blender For Cold Process Soap

Cold process soapmaking involves sodium hydroxide, also known as lye. Lye is caustic before it has fully reacted with the oils, so safety matters.

Wear goggles, gloves, long sleeves, long pants, and closed-toe shoes. Work in a well-ventilated area and keep children and pets away from your soapmaking space. Always lower the stick blender into the oils and lye mixture before turning it on, and always turn it off before lifting it.

If raw soap batter splashes, rinse the area with plenty of cool running water. Do not keep working while hoping it will be fine. Soapmaking is fun, but it is still chemistry, and chemistry likes us better when we respect it.

Cleaning Your Soapmaking Stick Blender

Cleaning is not the most exciting part of soapmaking, but it is important.

After pouring your soap, scrape as much batter as possible from the blender head with a silicone spatula. Wipe away excess batter with paper towel if needed, while still wearing gloves. Some soapmakers wash tools right away, while others let the residue saponify overnight before washing.

Either way, remember that fresh soap batter may still contain active lye, so keep gloves on during cleanup.

Wash the detachable blender head in warm soapy water, rinse well, and let it dry completely before storing. Avoid soaking the motor section. That little bit of common sense comes from anyone who has ever ruined a kitchen appliance by being overly enthusiastic at the sink.

Best Stick Blender Size For Soap Making

For small beginner batches, a standard household stick blender is usually enough. For very large batches, you may want something more powerful and durable, but most home soapmakers can start with a basic stainless steel immersion blender.

If you are making tiny test batches, make sure your container is narrow enough for the blender head to stay submerged. If the bowl is too wide and shallow, the blender can splash or pull in too much air.

A tall, heat-safe jug or deep mixing container works beautifully for small batches.

Do You Need An Expensive Stick Blender?

Not necessarily.

A mid-range stick blender is usually fine for beginner soap making. You want something sturdy, washable, and comfortable to hold. Fancy attachments are not needed unless you also plan to use the blender for other non-food craft projects.

Spend your money on accurate scales, quality oils, safe fragrance oils, and proper safety gear before buying an expensive blender. Soapmaking already has a habit of becoming a supply rabbit hole, and we all know how quickly “I’ll just buy one mould” becomes an entire cupboard.

My Practical Advice For Beginners

If you are serious about learning cold process soap, buy a dedicated stick blender early. It will save time, reduce frustration, and help you get more consistent results.

Use it gently. Blend in short bursts. Stop at light trace. Keep it submerged. Clean it carefully. Store it with your soapmaking supplies.

A stick blender will not magically fix a bad recipe, but it does make the process much easier to manage. And for beginner soapmakers, that confidence makes a big difference.

Once you have used one properly, you will understand why soapmakers talk about their stick blenders like beloved craft-room companions. It is not glamorous, but it is practical, hardworking, and absolutely worth having in your soapmaking kit.

RSS More Articles

  • Merino vs Romney Wool – Texture, Structure, and Speed in Felting
  • How To Make Matching Beaded Earrings From Leftover Beads
  • Bastille Day for Kids
  • Cloud Sweater Knitting Pattern Review For Cozy Sweater Makers
  • Easy Triangle Scarf Knitting Patterns For Beginners
  • How To Make Natural Face Cleanser: A Beginner-Friendly Guide To DIY Cleansers That Actually Make Sense
  • Crochet Leg Warmers Patterns You’ll Want to Make This Season
  • 12 Handmade Card Ideas with Tropical Vibes
  • 26 Clever Ways to Upcycle Your Old Sewing Machine Table or Parts
  • Cross Stitch Creatures from the Sea

Pick Your Blog

  • Sewing
  • Knitting
  • Quilting
  • Crochet
  • Home & Garden
  • Recycled Crafts
  • Scrapbooking
  • Card Making
  • Polymer Clay
  • Cross-Stitch
  • Edible Crafts
  • Felting
  • Glass Art
  • Indie Crafts
  • Kids Crafts
  • Jewelry Making
  • Lesson Plans
  • Needlework
  • Bath & Body
  • Party Ideas
  • Candle Making
  • DIY Weddings
  • Not Craft
  • Free Craft Projects

Copyright © 2026 · CraftGossip | Start Here | Contact Us | Link to Us | Your Editors | Privacy and affiliate policy