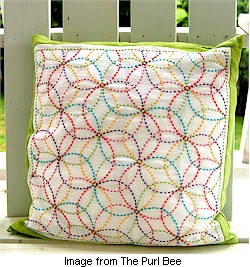
The customer is always right. In this case, customer Rickie bought a traditional Sashiko sampler from PurlSoho.com; but instead of using traditional navy-blue thread, she stitched the pattern in decidedly upbeat colors. The result: classic + modern = beautiful. Jen of The Purl Bee blog walks us through Rickie’s design choices and construction steps so we can duplicate the results for ourselves. See the tute.
Have you read?
Sew a Pleated Dress from Your Measurements
I do love wearing a pretty dress, but they’re strangely hard to find in the stores. And even more difficult to find one that fits. The bodice is either too long or the shoulders too short, the waist too low or the hips too tight. And when you do find the unicorn dress that fits and has a style you like, you often end up paying quite a bit for it. But you can sew your own dress and have exactly what you want.
Melissa at Melly Sews has a tutorial showing how you can make your own pleated dress. You won’t need a pattern – she shows how to cut the pieces based on your measurements. This is such a pretty dress! And made from your own measurements, you’ll end up with a dress literally made just for you.
This pretty dress has pleats above and below the bust and tie straps. The top is a straight edge which is easy to cut and easy to fit. Sundress style tie straps are easily adjustable. You can make your dress as long or as short as you like – maxi length, midi length, or even a mini length dress! (Personally, I love a good maxi dress.)
Melissa’s tutorial is easy to follow, with all the information you need to take your own measurements and then use that information to cut your pieces to the right size. She then walks you through what you need to do to sew everything up.
Marking and ironing pleats is a not a quick task, but the end result is worth it. The pleats create strong vertical lines while adding fullness to a skirt. You will need to use a fabric that can hold a crease in order for the pleats to work.
Head over to Melly Sews for the pleated dress sewing tutorial.
[photo credit: Melly Sews]