• Home
  • Suggest A Craft
  • DIY Newsletter

Craft Gossip

The largest independent craft review site since 2007

  • About CraftGossip
  • Our Network
    • Bath & Body Crafts
    • Candle Making Ideas
    • Crochet Ideas
    • Cross Stitch
    • Edible Crafts
    • Felting Patterns
    • Glass Art
    • Home & Garden Ideas
    • Indie Crafts
    • Jewelry Making
    • Kids Crafts
    • Knitting Patterns
    • Lesson Plans
    • Needlework
    • Party Ideas
    • Polymer Clay
    • Quilting Ideas
    • Recycled Crafts
    • Scrapbooking
    • Sewing Patterns
    • Card Making
    • DIY Weddings
    • Not Craft Ideas
  • Giveaways
  • Roundups
  • Store
  • Search

Tutorial: Friendship hair band from old t-shirts

July 19, 2009 by Anne Weaver

braidedhairband
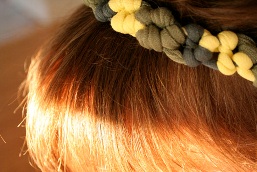
Pickles shows how to make this hair band from old t-shirts.  She cut long strips of knit and them knotted them like a friendship bracelet.  Get the how-to.

[photo from Pickles]

Technorati Tags: sewing, tutorial, friendship, headband, hair, band, t-shirt, tee

Read These Next

  • DIY Taylor Swift Bracelets and Ideas: Craft Your Own…
  • 17 Beaded Bracelet Tutorials
«
»

Have you read?

How to Make Textured Wall Art: Easy DIY Canvas Art

There’s something magical about textured wall art. It’s got depth, personality, and that “I spent a fortune at a boutique gallery” vibe—without the boutique price tag. And the best part? You don’t need to be a trained artist to create it. If you can spread butter on toast, you can make this.

I made my first DIY textured canvas art on a rainy Saturday afternoon, with a cup of tea on the table and a curious dog sniffing my paint tray (Aloo was very unimpressed). A couple of hours later, I had a statement piece that looked like it belonged in a high-end décor magazine—except it cost me less than a takeaway dinner. Since then I have been obsessed and even made a Halloween Ghost one which you can see over here on our sister blog.

Whether you want a calming neutral piece for above the sofa or a bold modern texture for a gallery wall, this technique works for all styles.

Why You’ll Love Making Your Own Textured Canvas Art

  • Budget-Friendly: Store-bought textured art can cost hundreds—yours will cost a fraction. 
  • Custom Colours: Match your décor exactly (no more “almost” shades). 
  • Therapeutic Process: There’s something soothing about smoothing plaster and watching your art take shape. 
  • One-of-a-Kind: No one else will have the exact same piece hanging on their wall. 

Supplies You’ll Need

Canvas – Any size you like; larger canvases make a bigger impact.

Joint compound, spackle, or lightweight plaster – This is what creates the texture. You’ll find it in the hardware store’s paint aisle.

Putty knife or palette knife – For spreading and sculpting the texture.

Acrylic paint – Choose your main colour(s). Matte paints give a modern, designer look.

Paintbrush or sponge – For applying your colour after the texture dries.

Drop cloth or old sheet – To protect your workspace.

Optional:

  • Metallic paint for highlights 
  • Sandpaper for a smoother finish 
  • Stencils or combs for patterned textures 

Step-by-Step: How to Make Textured Wall Art

1. Prepare Your Workspace

Spread out your drop cloth and set your canvas on a flat surface. This can get a little messy, so old clothes are a must.

2. Apply the Texture

Scoop some joint compound or spackle onto your putty knife. Spread it over the canvas in sweeping motions, as if you’re frosting a cake.

  • For a smooth, modern look, keep your strokes even. 
  • For a rustic, organic feel, let the plaster peak and ripple naturally. 
  • For patterned textures, press in stencils, combs, or even bubble wrap for an imprint. 

3. Let It Dry Completely

Depending on how thick you applied the texture, this can take anywhere from 12–24 hours. Patience is key here—painting too soon can ruin the effect.

4. Paint Your Design

Once dry, use acrylic paint to cover the texture. Neutrals like beige, ivory, or warm grey work beautifully for a minimalist look.

  • Want a bold statement? Go for deep navy, charcoal, or even emerald green. 
  • For a luxe finish, lightly dry-brush metallic gold or bronze over the raised areas to make the texture pop. 

5. Hang and Admire

Once the paint is dry, your art is ready for its gallery debut—aka your living room wall.

Tips for Gorgeous Results

  • Mix Texture Heights: Add thicker plaster in some areas and thinner layers in others for depth. 
  • Use Two Tones: Layer a darker base coat, then brush a lighter shade over the raised texture for a dimensional effect. 
  • Practice First: Try a small canvas before committing to a large statement piece. 

Creating your own textured wall art is a satisfying, budget-friendly way to bring designer style into your home. The process is relaxing, the materials are affordable, and the result is a unique piece that looks far more expensive than it is.

So next time you’re tempted to scroll online for pricey wall décor, grab a canvas, some plaster, and your favourite paint colours—you might just surprise yourself with how chic your creation turns out.


RSS More Articles

  • Crochet Pattern Review: Pullover Crochet Pattern by Lion Brand
  • How to Make Textured Wall Art: Easy DIY Canvas Art
  • 8 FREE Printable Thank You Teacher Cards
  • Pencil Bookmark Cross Stitch Pattern
  • Book Review: No Fear Sock Knitting
  • Your “Sustainable Fabric” Isn’t as Eco-Friendly as You Think
  • Book Review: Punch Needle Rug Hooking Handbook
  • 12 Back to School Scrapbook Layout Ideas
  • One Block Baby Quilt Tutorial
  • Crochet Pattern Review: Shelby Skirt – Lion Brand

Pick Your Blog

  • Sewing
  • Knitting
  • Quilting
  • Crochet
  • Home & Garden
  • Recycled Crafts
  • Scrapbooking
  • Card Making
  • Polymer Clay
  • Cross-Stitch
  • Edible Crafts
  • Felting
  • Glass Art
  • Indie Crafts
  • Kids Crafts
  • Jewelry Making
  • Lesson Plans
  • Needlework
  • Bath & Body
  • Party Ideas
  • Candle Making
  • DIY Weddings
  • Not Craft
  • Free Craft Projects

Copyright © 2025 · CraftGossip | Start Here | Contact Us | Link to Us | Your Editors | Privacy and affiliate policy