• Home
  • Suggest A Craft
  • DIY Newsletter

Craft Gossip

The largest independent craft review site since 2007

  • About CraftGossip
  • Our Network
    • Bath & Body Crafts
    • Candle Making Ideas
    • Crochet Ideas
    • Cross Stitch
    • Edible Crafts
    • Felting Patterns
    • Glass Art
    • Home & Garden Ideas
    • Indie Crafts
    • Jewelry Making
    • Kids Crafts
    • Knitting Patterns
    • Lesson Plans
    • Needlework
    • Party Ideas
    • Polymer Clay
    • Quilting Ideas
    • Recycled Crafts
    • Scrapbooking
    • Sewing Patterns
    • Card Making
    • DIY Weddings
    • Not Craft Ideas
  • Giveaways
  • Roundups
  • Store
  • Search

Tutorial: Embroidered trick or treat tote

October 18, 2009 by Anne Weaver

trickortreattotes
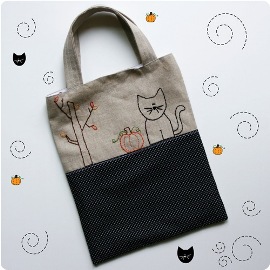
Christina from The Sometimes Crafter shares a free pattern for this trick or treat tote.  The bag itself is made of two different prints, but the real star is the simple embroidery at the top.  Go to the free pattern.

[photo from The Sometimes Crafter]

Technorati Tags: sewing, tutorial, trick or treat, tote, bag, halloween

Read These Next

  • 50 Quilted Tote Bag Patterns
  • 14 Lone Star Quilt Tutorials and Patterns
«
»

Have you read?

Beginner’s Melt and Pour Soap Recipe with Essential Oils – A Natural Soapmaking DIY for Luxurious Skin

If you’ve been dreaming of making your own soap but feel intimidated by lye and lab goggles—breathe easy. This melt and pour soap recipe is beginner-approved, mum-tested, and totally lye-free. It’s one of the easiest ways to dip your toes into natural skincare crafting without needing a chemistry degree (or a hazmat suit!).

This tutorial walks you through a gorgeous base soap recipe and shows you how to customise it with essential oils, dried herbs, skin-loving add-ins, and creative molds. Whether you’re making handmade gifts, stocking your own bathroom, or just craving a cozy afternoon project, this one is a winner.

Why Choose Melt and Pour Soap?

Melt and pour soap bases are pre-made, which means the saponification process (that whole lye-and-fat chemistry bit) has already been done for you. All you have to do is melt it down, add your goodies, and pour it into a mold. The result? A professional-looking, totally customizable bar of soap without the fuss.

Benefits of Using Melt and Pour:

  • No lye handling 
  • Ready in under 30 minutes 
  • Great for kids, beginners, or busy mums 
  • Takes beautifully to scents, colors, herbs, clays, and oils 

Basic Melt and Pour Soap Recipe

Ingredients:

  • 500g melt and pour soap base (goat’s milk, shea butter, or clear glycerin) 
  • 1 tbsp carrier oil (sweet almond, jojoba, or castor oil for added nourishment) 
  • 10–20 drops essential oils (see scent ideas below) 
  • 1–2 tsp dried botanicals (optional: rose petals, lavender buds, calendula) 
  • Silicone mold of choice 
  • Spray bottle of rubbing alcohol (to remove bubbles) 

Tools:

  • Heat-safe jug or double boiler 
  • Silicone spatula or wooden spoon 
  • Small spray bottle 
  • Soap cutter or knife (if using a block base) 

Instructions:

Step 1: Cut the Base
Chop your melt and pour soap into small cubes. This helps it melt evenly and quickly.

Step 2: Melt Gently
Place cubes in a microwave-safe jug or double boiler. Heat in 20-30 second bursts, stirring between each until completely liquid. Avoid boiling.

Step 3: Customize Your Soap
Once melted, stir in your carrier oil, essential oils, and botanicals. Work quickly but gently—over-stirring creates bubbles.

Step 4: Pour Into Molds
Pour the liquid soap into your silicone molds. Spritz the tops with rubbing alcohol to pop bubbles and create a smooth finish.

Step 5: Let Set
Allow to cool and harden for at least 2 hours at room temperature (or pop in the fridge for a quicker set). Gently pop them out of the molds once solid.

Scent Blend Ideas for Essential Oil Soap

MoodBlend Recipe
Relaxing Spa10 drops lavender, 5 drops cedarwood, 3 drops ylang ylang
Zesty Wakeup8 drops lemon, 6 drops peppermint, 4 drops rosemary
Skin Soothing10 drops chamomile, 6 drops frankincense
Autumn Comfort8 drops sweet orange, 4 drops cinnamon leaf, 2 drops clove

Add-In Options for Skin Nourishment

  • Oats: Add 1 tsp of finely ground oats for gentle exfoliation and calming properties. 
  • Pink Clay or Bentonite: Add ½ tsp for a skin-purifying twist. 
  • Dried flowers: Sprinkle a few petals in the mold for a pretty finish. 
  • Activated charcoal: For a detox bar—use sparingly (¼ tsp per 500g base). 

Storage Tips

Store your finished bars in a cool, dry place or wrap them in cling wrap to prevent sweating (glycerin bases tend to draw moisture from the air). Use within 3–6 months for best results.

FAQs – Melt and Pour Soap Troubleshooting

Why is my soap sweating?
That’s just glycerin doing its job—pulling moisture from the air. Wrap in plastic wrap and store in a sealed container.

Can I use fresh fruit or juice?
Not recommended. Fresh ingredients can cause mold or spoilage. Stick to dried or powdered botanicals.

How do I color my soap naturally?
Try turmeric (yellow), spirulina (green), beetroot powder (pink), or cocoa powder (brown). Go light to avoid staining.

Once you try making melt and pour soap, there’s a good chance you’ll never go back to store-bought again. It’s fast, fun, and endlessly customizable. Best of all, you get to create something beautiful and useful with your own hands—whether it’s for self-care, gifting, or even starting a little soap side hustle.

So grab your jug, heat up that soap base, and let your creativity pour.

Want more melt and pour soap recipes? Try these:

  • Herbal Tea Soap Bars 
  • Exfoliating Coffee Scrub Soap 
  • Calming Chamomile Honey Bars 
  • Turmeric and Clay Complexion Soap


RSS More Articles

  • Crossbody Sling Bag – Sewing Pattern
  • Beginner’s Melt and Pour Soap Recipe with Essential Oils – A Natural Soapmaking DIY for Luxurious Skin
  • More Summer Shirts to Knit
  • 20 Apple Crafts for Kids
  • 35 Creative Ways to Make Bowls from Recycled Materials – Genius Eco-Friendly DIYs You Can Actually Use
  • Crochet Pattern Review: Geode Crochet Pattern by Crafty Intentions
  • Etsy Spotlight: Layered Ruffle Skirt PDF Pattern
  • 18 FREE Celestial Pattern Papers to Download
  • Quilt Block Binder Cover Tutorial
  • Magnolia Granny Square Tote – Crochet Pattern

Pick Your Blog

  • Sewing
  • Knitting
  • Quilting
  • Crochet
  • Home & Garden
  • Recycled Crafts
  • Scrapbooking
  • Card Making
  • Polymer Clay
  • Cross-Stitch
  • Edible Crafts
  • Felting
  • Glass Art
  • Indie Crafts
  • Kids Crafts
  • Jewelry Making
  • Lesson Plans
  • Needlework
  • Bath & Body
  • Party Ideas
  • Candle Making
  • DIY Weddings
  • Not Craft
  • Free Craft Projects

Copyright © 2025 · CraftGossip | Start Here | Contact Us | Link to Us | Your Editors | Privacy and affiliate policy