• Home
  • Suggest A DIY
  • DIY Newsletter

Craft Gossip

Independent craft blog since 2007

  • About CraftGossip
  • Our Network
    • Bath & Body Crafts
    • Candle Making Ideas
    • Crochet Ideas
    • Cross Stitch
    • Edible Crafts
    • Felting Patterns
    • Glass Art
    • Home & Garden Ideas
    • Indie Crafts
    • Jewelry Making
    • Kids Crafts
    • Knitting Patterns
    • Lesson Plans
    • Needlework
    • Party Ideas
    • Polymer Clay
    • Quilting Ideas
    • Recycled Crafts
    • Scrapbooking
    • Sewing Patterns
    • Card Making
    • DIY Weddings
    • Not Craft Ideas
  • Giveaways
  • Roundups
  • Store
  • Search

Tutorial: Clean and organize your lace trim stash

September 7, 2009 by Anne Weaver

organizelacetrims
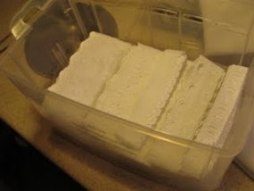
If you’ve got a collection of old lace and eyelet trims, there are most likely at least a few of them with stains or yellowing.  They may even be stored in a baggie, all balled up together.  (This is what tends to happen with my trims.)   This is no life for such treasured trims. 

With advice from Bunny from La Sewista!, you can clean and organize your lace trims.  Your trims will be happy, and they’ll be all ready for your next sewing project.  Get the how-to.

[photo from La Sewista!]

[tags]sewing, tutorial, clean, organize, lace, trim, stash

Read These Next

  • 40 Recycled Crafts For Adults That Turn Trash Into Treasure
  • How To Clean A Fabric Shower Curtain
«
»

Have you read?

How to Make a Dried Flower Bouquet with Mini Alcohol Bottles

This dried flower bouquet is a fun twist on a traditional gift bouquet, combining preserved flowers, fragrant lavender, and mini alcohol bottles into one eye-catching arrangement. It has that lovely handmade look, but it is also surprisingly easy to put together.

The dried flowers give it a soft, rustic feel, while the miniature bottles turn it into more of a gift bouquet than a floral one. It works well for birthdays, celebrations, thank-you gifts, party table displays, or as a creative handmade present when you want something a little different from the usual bottle-in-a-bag approach.

Supplies You Will Need

  • Dried flowers in mixed textures and colors
  • Dried lavender stems
  • Preserved baby’s breath or similar filler flowers
  • Dried eucalyptus or other greenery
  • Mini alcohol bottles
  • Floral tape 
  • Floral wire
  • Wooden skewers or thin dowels 
  • Twine, ribbon, or jute string
  • Wrapping paper, tissue paper, or florist wrap
  • Clear tape
  • Scissors
  • Optional: glue dots for positioning lightweight stems

Choosing Flowers for This Style of Bouquet

Because the mini bottles are the stars of this arrangement, the flowers work best when they look soft and airy rather than too bulky.

A good mix might include:

  • lavender for scent and color
  • baby’s breath for fullness
  • eucalyptus for shape and movement
  • dried daisies or tiny filler flowers
  • wispy grasses for texture

Try not to use flowers that are too stiff or heavy, otherwise the bouquet can start to feel crowded.

Step 1: Prepare the Mini Bottles

Start by attaching each mini bottle to a skewer or thin dowel so it can sit inside the bouquet like a stem. You can also uses these ready made stickers and the skewer just slips inside the tip. A faster and neater way to prepare your bouquets.

Use floral wire to wrap firmly around the neck of the bottle, then twist the wire around the skewer to hold it in place. Once secure, wrap floral tape around the wire and skewer to tidy it up and help everything blend in with the flower stems.

Make sure each bottle feels stable before adding it to the bouquet. You do not want one suddenly dropping out halfway through wrapping everything, because that changes the mood of the craft project very quickly.

Step 2: Create the Center of the Bouquet

Choose one or two mini bottles to form the center of the arrangement. Hold them in your hand and start adding dried flower stems around them.

Cross the stems naturally as you build, turning the bouquet slightly as you go. This helps create a rounded, balanced shape rather than a flat bunch.

Add a little baby’s breath or lavender between the bottles so they do not sit too tightly together.

Step 3: Add More Bottles One at a Time

Once the center is established, add the remaining mini bottles around the bouquet. Spread them out so they feel balanced and visible from the front.

It usually looks best to angle the bottles slightly outward instead of standing them perfectly upright. That makes the bouquet feel fuller and allows the labels or bottle shapes to show.

Keep the heavier bottles closer to the center where they are better supported by the stems.

Step 4: Fill in with Dried Flowers and Lavender

Now tuck in more flowers between the bottles to soften the arrangement. Use lavender, baby’s breath, grasses, and small dried blooms to fill gaps and hide any visible wires or skewers.

This is the stage where the bouquet starts looking more polished. The flowers help blend the gift elements into the arrangement so it feels intentional rather than like a bunch of bottles with a few random stems shoved in.

Step 5: Frame with Greenery

Add eucalyptus or other dried greenery around the outside edge of the bouquet. Longer stems work well here because they create that loose, abundant shape and help everything look more layered.

Greenery is also very useful for disguising the mechanics of the bouquet, especially around the bottle stems.

Step 6: Secure the Bouquet

When you are happy with the overall shape, wrap the stems tightly with floral tape near the base. Make sure the bottle skewers are fully included and secure.

Once taped, tie the bouquet with twine, ribbon, or jute string. Trim the bottoms of the stems and skewers so they are a similar length and sit neatly inside the wrapping.

Step 7: Wrap the Bouquet

Lay out wrapping paper or florist paper on a flat surface. Place the bouquet on top at an angle and fold the paper around the stems.

Kraft paper gives it a rustic feel, while white paper creates a cleaner modern look. Soft tissue paper underneath can make the bouquet feel fuller and more gift-like.

Secure the wrap with clear tape, then tie with ribbon or twine.

Step 8: Add a Finishing Touch

Finish the bouquet with a tag, a little handwritten note, or an extra sprig of lavender tucked into the ribbon.

That final detail makes it feel complete and gift-ready.

Tips for Making It Look Better

  • Keep the bottles evenly spaced so one side does not feel too heavy
  • Use filler flowers generously to soften the hard edges of the bottles
  • Attach each bottle very securely before you begin arranging
  • Let some greenery extend beyond the flowers for a looser, more natural shape
  • Check the bouquet from the front and sides as you build

Easy Variations

You can easily change the look of this bouquet depending on the style you want.

Try:

  • an all-lavender version with purple wrap
  • a rustic neutral bouquet with dried grasses and kraft paper
  • a celebration bouquet with brighter preserved flowers
  • a more elegant version using white filler flowers and silver ribbon

Why This Bouquet Works So Well

This type of bouquet has all the charm of dried flowers, but with a fun gift-bouquet twist. The flowers keep it feeling soft and handmade, while the mini bottles make it feel special and a bit unexpected.

It is one of those projects that looks much more complicated than it really is, which is always a nice bonus. And because dried flowers last so well, the bouquet can be enjoyed long after the celebration is over.


RSS More Articles

  • Knit a Swirly Square in Any Size You Like
  • Free Crochet Oreo Cookie Blanket Pattern
  • Book Review: Crochet in a Day by Angie Bivins – Quick Crochet Patterns For Gifts, Blankets And Cozy Make
  • How to Travel with Cross Stitch
  • AITA for Copying a Sewing Trend I Saw on Pinterest (But Making It Myself)?
  • 12 Rosé Ninja Slushies That Will Make You Forget Every Other Summer Drink Ever
  • Teach the Teacher Printable Worksheets: A Fun End-of-Year Student Lesson Activity
  • Zero Cost Indoor Garden for Beginners Review: Grow Herbs and Vegetables at Home Without Spending a Fortune
  • Make Your Own Nourishing Stretch Mark Oil
  • FREE Die Cut Hummingbird Shaker Card

Pick Your Blog

  • Sewing
  • Knitting
  • Quilting
  • Crochet
  • Home & Garden
  • Recycled Crafts
  • Scrapbooking
  • Card Making
  • Polymer Clay
  • Cross-Stitch
  • Edible Crafts
  • Felting
  • Glass Art
  • Indie Crafts
  • Kids Crafts
  • Jewelry Making
  • Lesson Plans
  • Needlework
  • Bath & Body
  • Party Ideas
  • Candle Making
  • DIY Weddings
  • Not Craft
  • Free Craft Projects

Copyright © 2026 · CraftGossip | Start Here | Contact Us | Link to Us | Your Editors | Privacy and affiliate policy