• Home
  • Suggest A Craft
  • DIY Newsletter

Craft Gossip

Independent craft blog since 2007

  • About CraftGossip
  • Our Network
    • Bath & Body Crafts
    • Candle Making Ideas
    • Crochet Ideas
    • Cross Stitch
    • Edible Crafts
    • Felting Patterns
    • Glass Art
    • Home & Garden Ideas
    • Indie Crafts
    • Jewelry Making
    • Kids Crafts
    • Knitting Patterns
    • Lesson Plans
    • Needlework
    • Party Ideas
    • Polymer Clay
    • Quilting Ideas
    • Recycled Crafts
    • Scrapbooking
    • Sewing Patterns
    • Card Making
    • DIY Weddings
    • Not Craft Ideas
  • Giveaways
  • Roundups
  • Store
  • Search

Tutorial: Big quilted fabric letters!

July 5, 2009 by Anne Weaver

ragletters
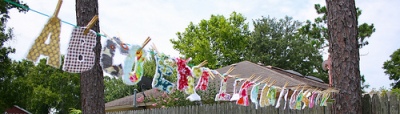
Jessica from Happy Together shows how to make these super cute fabric letters.  She made them for her daughter, who is learning her ABC’s right now.  I’m also thinking this would be big fun for on-the-fly banners to hang on your door or over your mantel.  Find out how to make them!

[photo from Happy Together]

Technorati Tags: sewing, tutorial, big, quilted, fabric, letters, alphabet, rag

Read These Next

  • 15 Desks You Can DIY From Doors
  • How to Make a Flag Rag Quilt
«
»

Have you read?

DIY Pottery Clay Sardines with Hand-Drawn Designs

If you’ve ever walked through a Greek market, you’ll know the charm of sardines lined up fresh on ice. This project brings that same coastal energy into your home, but with clay instead of fishy fingers! These glossy ceramic sardines are simple to make, fun to decorate, and can be strung up as ornaments, kitchen wall décor, or even Mediterranean-style gifts.

Whether you use earthy pottery clay or an easy air-dry alternative, these sardines look stunning with their hand-painted red and blue designs. Think seaside tavernas, olives, and a glass of wine while you create—a craft that feels like a holiday.

Why Make Clay Sardines?

  • They’re a beginner-friendly pottery project. 
  • You can decorate them with bold, folk-art patterns in classic coastal colors. 
  • Add a little hole and string, and you’ve got instant hanging ornaments. 
  • They make wonderful kitchen décor or handmade gifts. 

Materials You’ll Need

  • White pottery clay (stoneware or earthenware works best) 
  • Rolling pin 
  • Sardine printable template (available from Craft Gossip) 
  • Craft knife or needle tool 
  • Wooden modeling tools 
  • Small bowl of water 
  • Underglazes or ceramic paints in cobalt blue and terracotta red 
  • Fine paintbrushes 
  • Clear glaze 
  • Twine or rustic string 
  • Kiln (or air-dry clay if you don’t have kiln access) 

Step-by-Step Tutorial

Step 1 – Roll Out the Clay

Roll out your clay into an even slab about 6–8mm thick. Use guides to keep the thickness consistent.

Step 2 – Cut the Sardine Shapes

Place your sardine template on the clay and trace around it with a needle tool. Cut out as many as you’d like—bundles of 5–6 look fantastic.

Step 3 – Smooth and Add Details

Gently smooth the edges with a damp sponge. Use a tool to press a tiny hole in the tail end—this will allow you to thread string later. Add light details like fins or eyes if you’d like, but keep it simple.

Step 4 – Dry and Bisque Fire

Let your sardines dry slowly under a cloth for a day or two, then fully dry before bisque firing in the kiln. (If using air-dry clay, skip the kiln and let them cure naturally.)

Step 5 – Paint in Red and Blue Designs

Once fired, bring them to life with underglazes or ceramic paints. Use bold, simple folk-art patterns such as:

  • Wavy lines for the sea 
  • Stripes for a nautical feel 
  • Leafy spines down the middle 
  • Dots or chevrons for variation 

Keep each one different so they look like a joyful, mismatched family of fish.

Step 6 – Apply Glaze and Final Firing

Coat the sardines with a layer of clear glaze to give them a beautiful glossy finish. Fire again according to your glaze instructions.

Step 7 – String and Display

Thread rustic twine through the tail hole and tie into loops. Hang them in bundles on the wall, string them along a shelf, or gift them to a friend who loves coastal charm.

Ideas for Using Your Clay Sardines

  • Kitchen Wall Hanging: Group 5–6 sardines together for a bold focal point. 
  • Christmas Ornaments: Folk-art sardines make quirky, coastal tree decorations. 
  • Gift Tags: Tie them onto a wrapped present for a handmade extra. 
  • Table Styling: Scatter them across a breadboard or tray for a Greek-inspired tablescape. 

Don’t stress about making them “perfect.” The beauty is in their handmade irregularities—slightly uneven shapes, brushstrokes that wander, and rustic twine ties. That’s what makes them feel authentic and special.

RSS More Articles

  • DIY Pottery Clay Sardines with Hand-Drawn Designs
  • Learn about Costa Rica for Kids
  • Trick or Treat in Style with the Free Happy Jack Treat Bag Pattern
  • DIY Eyeball Plant – Creepy Halloween Craft with Ping Pong Balls
  • DIY Milk Jug Halloween Skeleton Faces – Day of the Dead Inspired
  • 13 Witchy Halloween Card Ideas using Stamps and Dies
  • Create Personalized Dish Towels with DIY Infusible Ink: A Simple Craft Idea
  • DIY Clay Egg Tray – Handmade Farmhouse Charm for Your Kitchen
  • Textured Hat Knitting Patterns
  • Free Crochet Skull and Bones Granny Square Pattern

Pick Your Blog

  • Sewing
  • Knitting
  • Quilting
  • Crochet
  • Home & Garden
  • Recycled Crafts
  • Scrapbooking
  • Card Making
  • Polymer Clay
  • Cross-Stitch
  • Edible Crafts
  • Felting
  • Glass Art
  • Indie Crafts
  • Kids Crafts
  • Jewelry Making
  • Lesson Plans
  • Needlework
  • Bath & Body
  • Party Ideas
  • Candle Making
  • DIY Weddings
  • Not Craft
  • Free Craft Projects

Copyright © 2025 · CraftGossip | Start Here | Contact Us | Link to Us | Your Editors | Privacy and affiliate policy