• Home
  • Suggest A Craft
  • DIY Newsletter

Craft Gossip

The largest independent craft review site since 2007

  • About CraftGossip
  • Our Network
    • Bath & Body Crafts
    • Candle Making Ideas
    • Crochet Ideas
    • Cross Stitch
    • Edible Crafts
    • Felting Patterns
    • Glass Art
    • Home & Garden Ideas
    • Indie Crafts
    • Jewelry Making
    • Kids Crafts
    • Knitting Patterns
    • Lesson Plans
    • Needlework
    • Party Ideas
    • Polymer Clay
    • Quilting Ideas
    • Recycled Crafts
    • Scrapbooking
    • Sewing Patterns
    • Card Making
    • DIY Weddings
    • Not Craft Ideas
  • Giveaways
  • Roundups
  • Store
  • Search

Turn an Old Shirt into a Stylish Scrunchie: A Fun Upcycling Tutorial

May 31, 2025 by Shellie Wilson

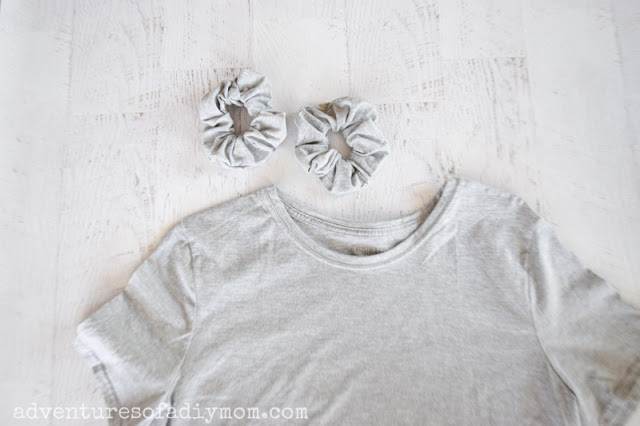
Are you looking for a quick and easy sewing project that not only saves you money but also helps you recycle old clothes? In this tutorial from Adventures of a DIY Mom, you’ll learn how to make a scrunchie out of an old shirt, turning a piece of fabric you no longer wear into a fashionable and functional accessory!

The tutorial walks you through the entire process of transforming a worn-out shirt into a cute scrunchie that’s perfect for tying up your hair in style. Not only is it an excellent way to reuse fabric you would otherwise throw away, but it also gives you a unique, custom accessory that’s completely one-of-a-kind. Whether you’re using a shirt with a fun pattern or a plain old tee, this project is a fantastic way to add a personal touch to your wardrobe.

The instructions are simple, and even beginner sewists can follow along with ease. Plus, the scrunchie can be made in just a few steps, so it’s the perfect project when you need a quick, satisfying DIY fix.

If you’ve got an old shirt lying around, don’t throw it out! Check out the full tutorial here and get started on making your own trendy, upcycled scrunchie today!

Read These Next

  • 30 Amazing Crochet Hair Scrunchie Patterns
  • Upcycling or Hoarding? Why Your DIY Projects Could…
«
»

Have you read?

Summer Headband Knitting Patterns

Some knitters have trouble coming up with projects they can both knit and wear when it’s warm outside. Especially if you’re not ready for garments (thought tank tops and summer tops are great first garment projects!) it might seem like there’s nothing to do when it’s hot outside.

One way to remedy this situation is by knitting headbands. Headbands are great any time of year to keep hair out of your face and make you look a little more pulled together without any effort. Wider headbands double as ear warmers when it gets colder, but skinnier ones are great throughout the year.

A couple of great examples are from designer Elly Donner, who has a set of headband knitting patterns on Ravelry you can buy individually or as an ebook. Homebody, shown here, is worked in garter stitch (the ties are crocheted but you could also use I-cord), while Slipstream uses slipped stitches and garter ridges, and Sounds of Spring has little cables. The patterns use DK weight yarn and are a great way to use a little leftover yarn from another project.

I also recently came across the lovely Plush Braided Headband by Yevgeniya Li. A free pattern on Ravelry, this wider design is covered in lush cables for a sleek and fancy look. It uses worsted weight yarn and you can customize the length for a perfect fit.

Celeste Knitwear’s Spikelet is a simple twisted headband with columns of eyelet lace to keep it from being too heavy. It’s worked flat and sewn together to make the twist, and uses DK weight yarn. It has three sizes available.

This skinny lace headband from Lusi Knits is another cute choice. It calls for fine weight cotton yarn, but you could use heavier yarn if you have it on hand to make a wider headband (or use any fine yarn you have available). It uses ties to customize the fit.

And if you want to go super basic but still really cute, try the easy ring headband from Lulu Pattern. The sample is knit pretty wide, but you could make a narrower version if you want, and the little ring turns it from a plain loop into a bow with very little extra work. It calls for worsted weight yarn but you could also use whatever weight you like for this one to change up the look and size.

RSS More Articles

  • Summer Headband Knitting Patterns
  • Swirly Do – Online Quilt Class
  • Create a Beautiful DIY Flower Press and a Little Girl’s Flower Garden
  • 13 Fun Door Stops You Can Crochet For Your Home
  • Creative Ways to Reuse UNO Cards: Fun Upcycled Crafts to Try
  • Crewel Embroidery Handy Pocket Guide: Everything to Get You Started
  • Etsy Spotlight: Tank Top and Shorts PDF Pattern for Boys
  • What’s Next for Joann?
  • Color Wheel Mini Scrapbook Album
  • Sunday Shout Out – A Must-Have Crochet Pattern

Pick Your Blog

  • Sewing
  • Knitting
  • Quilting
  • Crochet
  • Home & Garden
  • Recycled Crafts
  • Scrapbooking
  • Card Making
  • Polymer Clay
  • Cross-Stitch
  • Edible Crafts
  • Felting
  • Glass Art
  • Indie Crafts
  • Kids Crafts
  • Jewelry Making
  • Lesson Plans
  • Needlework
  • Bath & Body
  • Party Ideas
  • Candle Making
  • DIY Weddings
  • Not Craft
  • Free Craft Projects

Copyright © 2025 · CraftGossip | Start Here | Contact Us | Link to Us | Your Editors | Privacy and affiliate policy