• Home
  • Suggest A Craft
  • DIY Newsletter

Craft Gossip

The largest independent craft review site since 2007

  • About CraftGossip
  • Our Network
    • Bath & Body Crafts
    • Candle Making Ideas
    • Crochet Ideas
    • Cross Stitch
    • Edible Crafts
    • Felting Patterns
    • Glass Art
    • Home & Garden Ideas
    • Indie Crafts
    • Jewelry Making
    • Kids Crafts
    • Knitting Patterns
    • Lesson Plans
    • Needlework
    • Party Ideas
    • Polymer Clay
    • Quilting Ideas
    • Recycled Crafts
    • Scrapbooking
    • Sewing Patterns
    • Card Making
    • DIY Weddings
    • Not Craft Ideas
  • Giveaways
  • Roundups
  • Store
  • Search

Tip: Keeping cutting info for bias tape right where you need it

August 20, 2009 by Anne Weaver

DSC_9048I love bias tape.  Love, love, love it!!  Love it so much I could marry it.  I especially love custom bias tape out of printed fabrics. 

Given my jr. high crush on custom bias tape, it should come as no surprise that I’m constantly MAKING bias tape.  The only problem is, I’m always forgetting how wide to cut my fabric to go into the different sized bias tape makers.  To make matters worse, not all of them are clearly labeled with a size.  One has the number 18 stamped into the plastic, but the others have no measurement indicated at all.  In order to figure out the width to cut my strips, I have to first determine the size of the bias tape maker, then cross-reference that on a chart that came with one of my bias tape makers.   What a hassle!

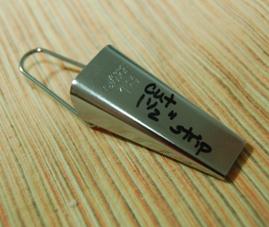
I decided this morning that there was a better way.  I measured my bias tape makers and determined the strip widths for each, then marked that on the top of the bias tape maker in permanent ink.  Voila!  Simple solution, and it only took me a year to come up with it.  Yeah, I’m swift like that.

Technorati Tags: sewing, tip, bias tape, bias, strip, width

Read These Next

  • Beginner Sewing - How To Make And Cut Out A Sewing Pattern
  • 15+ Stamped Mermaid Card Ideas for Mer-May
«
»

Have you read?

Best Sewing Machine for Quilting Beginners: Your No-Stress Buying Guide

beginner's-quilting-sewing-machine-guide

My first quilting sewing machine was a $50 Black Friday special that literally smoked when I tried to quilt a twin-size top. (RIP, little guy.) After testing 23 machines (and surviving two more meltdowns), I finally cracked the code to finding the perfect beginner quilting machine—without wasting money on features you don’t need yet.

Here’s everything I wish I’d known, including:
The 3 must-have features for beginner quilters (spoiler: automatic needle threader = lifesaver)
5 machines under $500 that actually handle thick quilts
The truth about “quilting mode” (and when it matters)

What Makes a Sewing Machine “Good for Quilting”?

Non-Negotiables for Beginners

  • Throat Space: At least 7 inches (so your quilt doesn’t get stuck)
  • Walking Foot Included: Prevents fabric layers from shifting
  • Drop Feed Dogs: For free-motion quilting later

Nice-to-Have Perks

  • Speed Control: Because quilting a king-size in “rabbit mode” = regrets
  • Needle Up/Down: Crucial for precise pivots at corners
  • LED Lighting: Spotting seams under dim light = no more “mystery stitches”

2. The Best Machines Under $500 (Tested on Real Quilts)

1. Brother PQ1500SL ($479)

  • Why Beginners Love It:
    • 16-inch throat space (fits bulky quilts)
    • Straight stitch only (no confusing dials)
    • Industrial motor handles denim + quilt batting
  • Watch Out: No fancy stitches (but do you really need 200 decorative options?)

2. Janome 3160QDC ($449)

  • Best For: Quilters who want some embroidery flair
    • 60 stitches (great for quilted gifts)
    • One-handed needle threader (no squinting!)
    • Automatic thread cutter = fewer thread nests

3. Juki TL-2010Q ($499)

  • The “Grow With You” Pick
    • Professional-grade straight stitches
    • Knee lifter (hands-free presser foot lifting)
    • Heavy-duty but quiet

Pro Tip: Watch for Joann’s 50% off coupons—they work on these!

3. The “Don’t Waste Your Money” List

Overkill for Beginners

  • $1,000+ Machines: Unless you’re quilting daily, start smaller
  • Heavy Industrial Models: Your kitchen table will protest

Too Basic

  • Mini Machines: Can’t handle batting + fabric layers
  • Vintage Singers: Adorable but often need $200 in tune-ups

4. Your First Quilting Project: Start Here!

Pair your new machine with:

  • This free “Disappearing 9-Patch” pattern (uses only squares!)
  • Pre-cut fabric bundles (no scary rotary cutter yet)

My #1 Advice: Practice on placemats first—less pressure than a queen-size masterpiece.


RSS More Articles

  • Best Sewing Machine for Quilting Beginners: Your No-Stress Buying Guide
  • McCall’s Half-Price Pattern Sale – Starts Friday!
  • Learning about Chad for Kids – Lesson Plan
  • Peacock Stitch Crochet Cardigan in Sirdar Country Classic
  • FREE Mother and Child Mother’s Day Digital Stamp
  • I Found a Table Made from Mannequin Legs—and I’m Still Not Over It
  • Cheerful Sun Cross Stitch Patterns
  • Yarn Cozy Knitting Patterns
  • 12 Scrapbook Layout Ideas for Mom
  • Whooo’s Ready to Quilt? The HOOT Quilt Pattern is a Hoot-Tastic Must-Have

Pick Your Blog

  • Sewing
  • Knitting
  • Quilting
  • Crochet
  • Home & Garden
  • Recycled Crafts
  • Scrapbooking
  • Card Making
  • Polymer Clay
  • Cross-Stitch
  • Edible Crafts
  • Felting
  • Glass Art
  • Indie Crafts
  • Kids Crafts
  • Jewelry Making
  • Lesson Plans
  • Needlework
  • Bath & Body
  • Party Ideas
  • Candle Making
  • DIY Weddings
  • Not Craft
  • Free Craft Projects

Copyright © 2025 · CraftGossip | Start Here | Contact Us | Link to Us | Your Editors | Privacy and affiliate policy