• Home
  • Suggest A Craft
  • DIY Newsletter

Craft Gossip

Independent craft blog since 2007

  • About CraftGossip
  • Our Network
    • Bath & Body Crafts
    • Candle Making Ideas
    • Crochet Ideas
    • Cross Stitch
    • Edible Crafts
    • Felting Patterns
    • Glass Art
    • Home & Garden Ideas
    • Indie Crafts
    • Jewelry Making
    • Kids Crafts
    • Knitting Patterns
    • Lesson Plans
    • Needlework
    • Party Ideas
    • Polymer Clay
    • Quilting Ideas
    • Recycled Crafts
    • Scrapbooking
    • Sewing Patterns
    • Card Making
    • DIY Weddings
    • Not Craft Ideas
  • Giveaways
  • Roundups
  • Store
  • Search

The Stuff of Life

April 27, 2014 by Kimberly Jones

 The Stuff of Life by Hilary Robertson Book Review and Givewawy via weddings.craftgossip.com

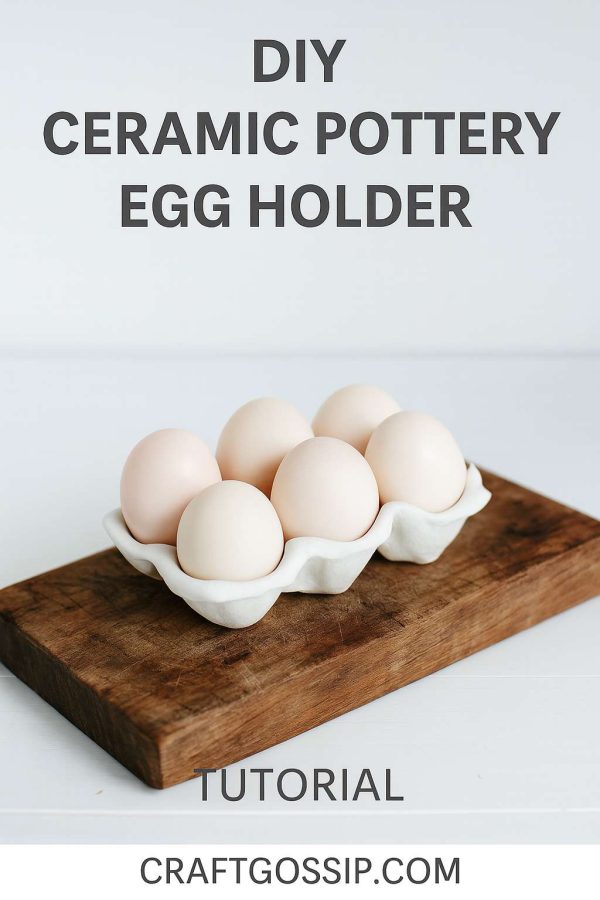
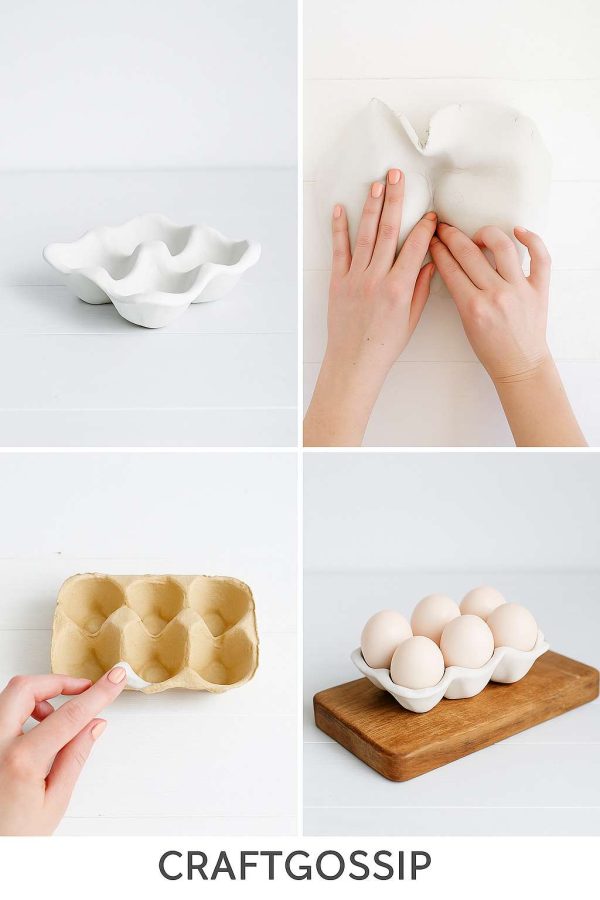
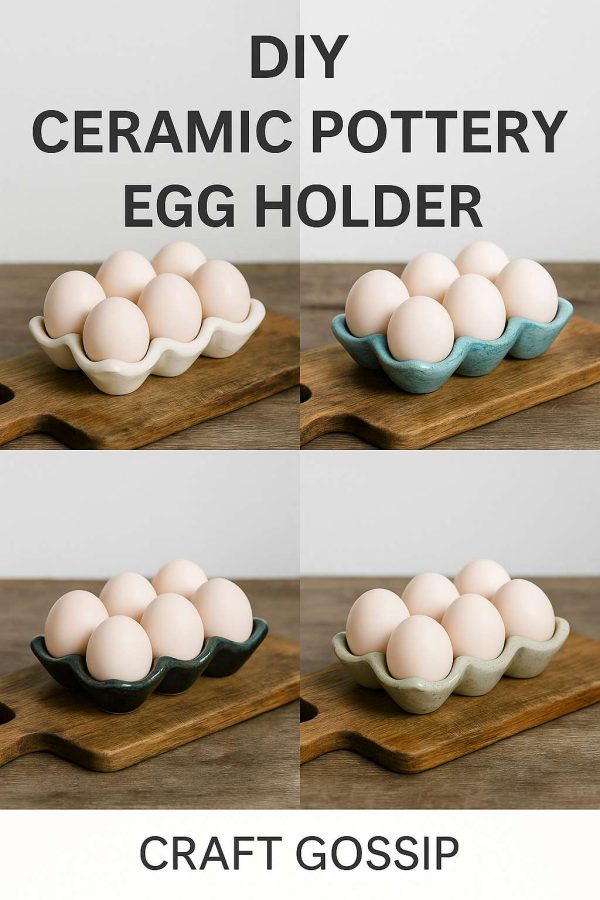
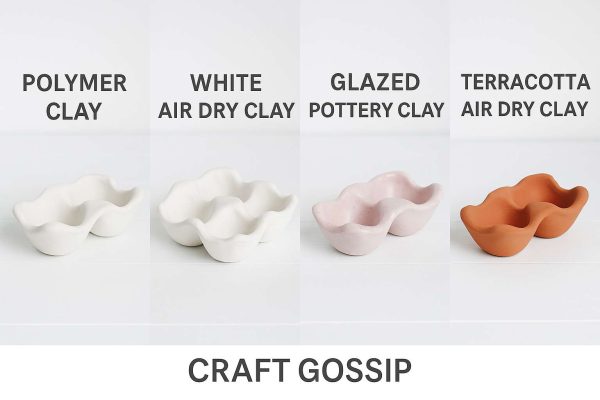
The most memorable weddings are those that tell a story. The same is true of our homes. In her new book, The Stuff of Life, interiors stylist Hilary Robertson shares stunning images and thoughtful insights on our possessions, and what they reveal about our personalities. If you want to create a meaningful wedding celebration that truly reflects who you are as a couple, it’s as simple as looking around your living spaces and letting the colors, themes, and objects that you love serve as inspiration!

The Stuff of Life by Hilary Robertson

In The Stuff of Life, Hilary shares four methods for arranging the treasured objects and collections that we all seem to gather over time, and later in the book she discusses five categories of collectors and the various ways they approach styling the interiors of their homes. I find myself looking at this lovely book over and over, and I’m thrilled to offer a chance to win a copy to one of our readers! Just leave a comment on this post before midnight CST on Saturday, May 3rd, 2014. Best wishes to all the entrants!


The Stuff of Life by Hilary Robertson Glass Domes

I thought it would be fun to take some of my favorite images from the book and create inspiration boards based on them to inspire your handmade wedding celebrations. I loved the idea of the glass cloches above shown here with a seemingly random display of objects that in fact represent special memories and mementos.

Glass Cloche Centerpieces via weddings.craftgossip.com

The first board I created takes the concept of the glass jars and turns them into beautiful centerpieces. Gather items that have special meaning to the bride and groom, whether it be favorite books, flowers, childhood mementos, photos, or travel souvenirs, and display them singly or in groups. Click the links below for all the details on the centerpieces shown here.

Cedarwood Weddings

Collage Interiors

Remodelista

My So Called Crafty Life

Unruly Things

The Stuff of Life by Hilary Robertson Pink and Black

If you’re seeking a color palette, look no further than the colors you’ve chosen for your walls, furniture, and accessories! I love the monochromatic scheme of this still life created by landscape gardener and florist Lindsey Taylor, captured beautifully in the chapter “How to Arrange Your Stuff.”

Wedding Mood Board Inspired by The Stuff of Life via weddings.craftgossip.com

I created a mood board based on the black furniture, neutral accessories, and the soft pink blooms in the photo that creates a marriage of sophisticated minimalism with a soft, romantic vibe. You can do the same for your wedding by taking   the time to look at the colors of your home or wardrobe and incorporating those into your wedding decor!

The Stuff of Life by Hilary Robertson Eiffel Tower

Whether it’s a theme based on your travels or dream destinations,

 The Stuff of Life by Hilary Robertson Coral

the objects you gather while beachcombing or hiking,

The Stuff of Life Hilary Robertson Noble Salvage

or the vintage treasures you’ve collected along the way, look around at your home, your hobbies, and your interests for inspiration, and let your personality shine through in the way you style your wedding!


Read These Next

  • How To Plan A Rustic Farm Wedding
  • How To Plan A Rustic Farm Wedding
«
»

Have you read?

DIY Clay Egg Tray – Handmade Farmhouse Charm for Your Kitchen

There’s something about eggs that feels timeless—whether it’s a basket of freshly laid ones from the farmer’s market or the dozen you picked up on your weekly grocery run. But let’s be honest, those cardboard cartons aren’t exactly pretty to look at. That’s where this little project comes in: a handmade ceramic pottery egg holder that looks beautiful sitting out on the counter, ready for breakfast or brunch.

This DIY egg holder is both practical and stylish, giving you a sturdy place to store or display your eggs. It’s also a fun way to experiment with clay, even if you’re brand new to pottery. By using a recycled egg carton as a mold, you can easily create those classic rounded shapes without complicated tools.

I love projects like this because they blend utility with charm—you’ll end up with a piece that feels rustic, modern, and completely one-of-a-kind. Plus, they make thoughtful gifts for foodies, farmhouse kitchen lovers, or anyone who appreciates a touch of handmade in their home.

In this tutorial, I’ll walk you through step by step how to transform a lump of clay into a farmhouse-chic ceramic egg holder. Whether you use air-dry clay for a simple weekend project or pottery clay for a kiln-fired piece, you’ll be amazed at how quickly it comes together.

Materials You’ll Need:

  • Air-dry clay or pottery clay (depending on whether you’ll kiln-fire it or not) 
  • A recycled egg carton (cardboard type works best) 
  • Rolling pin or bottle 
  • Craft knife or clay cutting tool 
  • Water and a small sponge for smoothing 
  • Optional: white paint or glaze if firing 

Step 1: Prep Your Carton

Grab a standard cardboard egg carton and trim it down so you only have the section you’ll use for your holder (six-egg size is perfect). If the cone peaks inside the carton are too tall, snip them shorter so the clay will form neatly over the top.

(Refer to image: cut-out carton with holes in the peaks)

Step 2: Roll Out the Clay

Take a ball of clay and roll it out flat to about ½ cm thickness. Keep it even but not paper-thin—this is what gives the egg holder strength.

(Refer to image: hands pressing clay flat)

Step 3: Mold the Clay

Drape your rolled clay over the inside of the egg carton. Gently press it down into the cups so it takes the familiar egg-carton shape. Smooth the edges with your fingers or trim them neatly with a craft knife for a clean finish.

(Refer to image: hand pressing clay into the egg carton mold)

Step 4: Refine the Shape

Carefully peel the clay from the carton. At this point, you’ll have the wavy outline and little pockets where your eggs will sit. Use damp fingers or a sponge to smooth away cracks and rough edges.

(Refer to image: formed clay holder on table)

Step 5: Dry and Harden

  • Air-dry clay: Leave it out for 24–48 hours until fully hardened. 
  • Pottery clay: Let it dry leather-hard before bisque firing in the kiln. Once bisque-fired, apply glaze (a glossy white looks so modern!) and fire again. 

Step 6: Style and Use

Once dry (or fired and glazed), your egg holder is ready to use! It looks beautiful styled on a breakfast table, in the fridge for farm-fresh eggs, or even as a quirky jewelry holder for rings and beads.

(Refer to hero image: finished ceramic egg holder with eggs inside)

Tips for Success:

  • Don’t roll your clay too thin—it will warp or crack when drying. 
  • For a rustic look, leave the edges organic and wavy. 
  • If you’re painting air-dry clay, a matte chalk paint works best for that ceramic-like finish. 

This little DIY egg holder is proof that something so simple can become a handmade treasure. Plus, it makes a brilliant handmade gift for foodies and farmhouse lovers.


Which Clay Should You Choose for Your Egg Holder?

One of the most common questions I get asked is: what kind of clay works best for a project like this? The truth is, there’s no single right answer—it depends on the look and finish you want. To give you a little side-by-side comparison, here are four variations of the same egg holder, each made with a different type of clay.

  • Polymer Clay – Perfect for beginners or small projects, polymer clay is easy to handle and cures in a standard oven. It gives a smooth, lightweight finish, but keep in mind it’s not food-safe unless properly sealed. Best for decorative use. 
  • White Air Dry Clay – This is the simplest choice if you don’t have access to a kiln. Air dry clay dries naturally at room temperature, leaving a matte, chalky ceramic look. It’s beautiful painted or left natural, though it’s not as strong as fired pottery. 
  • Glazed Pottery Clay (Pink) – For that authentic, long-lasting ceramic finish, pottery clay is the way to go. After firing and glazing, you’ll get a glossy, durable, food-safe piece. The blush pink glaze here adds a touch of softness and farmhouse charm. 
  • Terracotta Air Dry Clay – This clay has a warm, earthy tone that brings out a rustic, Mediterranean feel. Like white air-dry clay, it doesn’t require firing, but it’s more porous. It’s best for decorative displays rather than functional use. 

Each version has its own charm, so the choice really depends on your tools, skills, and whether you want a purely decorative piece or something durable enough for daily kitchen use.


RSS More Articles

  • Create Personalized Dish Towels with DIY Infusible Ink: A Simple Craft Idea
  • DIY Clay Egg Tray – Handmade Farmhouse Charm for Your Kitchen
  • Textured Hat Knitting Patterns
  • Free Crochet Skull and Bones Granny Square Pattern
  • Easy Fall Crafts To Decorate Your Home
  • Copycat Sizzler Cheese Toast Recipe – Bring Back the Family Favorite
  • Floppy Disk Crafts: Clever Ways to Upcycle Retro Tech
  • Etsy Spotlight: Goose Baby Lovey PDF Pattern
  • Summer Accordion Mini Album
  • How to Make 3 NEW Pinwheel Quilts – Free Quilting Tutorial

Pick Your Blog

  • Sewing
  • Knitting
  • Quilting
  • Crochet
  • Home & Garden
  • Recycled Crafts
  • Scrapbooking
  • Card Making
  • Polymer Clay
  • Cross-Stitch
  • Edible Crafts
  • Felting
  • Glass Art
  • Indie Crafts
  • Kids Crafts
  • Jewelry Making
  • Lesson Plans
  • Needlework
  • Bath & Body
  • Party Ideas
  • Candle Making
  • DIY Weddings
  • Not Craft
  • Free Craft Projects

Copyright © 2025 · CraftGossip | Start Here | Contact Us | Link to Us | Your Editors | Privacy and affiliate policy