• Home
  • Suggest A Craft
  • DIY Newsletter

Craft Gossip

The largest independent craft review site since 2007

  • About CraftGossip
  • Our Network
    • Bath & Body Crafts
    • Candle Making Ideas
    • Crochet Ideas
    • Cross Stitch
    • Edible Crafts
    • Felting Patterns
    • Glass Art
    • Home & Garden Ideas
    • Indie Crafts
    • Jewelry Making
    • Kids Crafts
    • Knitting Patterns
    • Lesson Plans
    • Needlework
    • Party Ideas
    • Polymer Clay
    • Quilting Ideas
    • Recycled Crafts
    • Scrapbooking
    • Sewing Patterns
    • Card Making
    • DIY Weddings
    • Not Craft Ideas
  • Giveaways
  • Roundups
  • Store
  • Search

Sunday Spotlight – Coffee House Quilted Bag Pattern

November 10, 2024 by Shellie Wilson

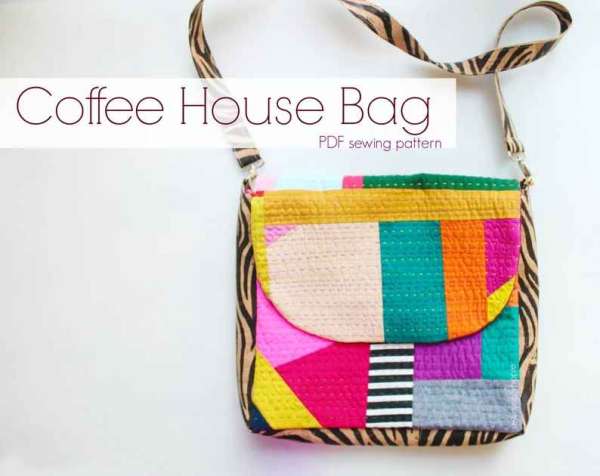
Welcome to our Sunday Spotlight series, where we unveil a captivating quilting pattern from Etsy each week to ignite your creative spark! Today, we’re excited to introduce the “Coffee House Bag” pattern by SewHungryHippie.

Sewing enthusiasts, get ready to create your own chic and versatile accessory with the “Coffee House Bag” pattern! Designed by SewHungryHippie, this pattern offers the perfect blend of functionality and style, making it a must-have for bag-making aficionados.

The “Coffee House Bag” is not just any ordinary bag pattern; it’s highly customizable, allowing you to switch out the front flap and straps to suit your mood or outfit. With three zipper pockets, one vinyl pocket, and ample space for everyday essentials, this bag is ideal for daily use.

What sets this pattern apart is its user-friendly design. It comes with clear instructions, accompanied by color photos, diagrams, and illustrations to guide you through each step. Tested by sewists of all levels, this pattern ensures a seamless sewing experience.

One of the standout features of the “Coffee House Bag” is its compatibility with vinyl, including the body, flaps, and straps. The pattern creator even provides links to tutorials for attaching snaps, rivets, sewing cork, and binding, ensuring you have all the resources you need to bring your bag to life.

Measuring approximately 12″ x 10.5″ x 2.5″ when finished, this bag strikes the perfect balance between practicality and style. Plus, with a supply list included in the photos, you’ll have everything you need to get started on your project right away.

For added inspiration and tips, be sure to check out the blog post dedicated to this pattern on SewHungryHippie’s website.

Ready to embark on your bag-making journey? Purchase the “Coffee House Bag” pattern today and create a stylish accessory that’s uniquely yours!

Stay tuned for next week’s Sunday Spotlight, where we’ll unveil another exciting quilting pattern to inspire your creativity!

50 Quilted Tote Bag Patterns

Book Review – Patchwork Quilted Bags: Totes, Purses and Accessories

Read These Next

  • 50 Quilted Tote Bag Patterns
  • Sunday Spotlight - Quilted Apple Bottom Bag Pattern
«
»

Have you read?

Make Your Cross Stitch into an Iron On Patch

A while back I made a little rainbow cross stitch pattern and I wasn’t sure what I wanted to do with it, so I turned it into a patch. My idea was that it could be used on a jacket or backpack, or you could add a pin to the back and wear it temporarily on a shirt or elsewhere. 

But what if you want to make your design more permanent? Is it possible to turn a piece of cross stitch into an iron-on design?

It turns out yes, it is, and Sirious Stitches has done it so I didn’t have to try to figure it out on my own. 

The way they did it was by using HeatnBond, an iron-on adhesive that attaches fabrics without sewing. There was still sewing involved to finish the edges of the cross stitch fabric and make it look like a purchased patch. The post shows how to do this by hand or with your sewing machine. (I just did blanket stitch edging on mine, which doesn’t look like a “real” patch but is also a lot faster.)

Once you have the patch prepared it’s a pretty easy matter of using the fusible adhesive to the back of the patch so you can then iron it onto whatever jacket, pair of jeans, bag or whatever else you might want to add it to. 

I guess I’m a little paranoid about the washability of cross stitch projects, though you could hand wash anything with an iron-on cross stitch patch as you might need to with a purchased iron-on patch, anyway. But this does look really cool and is a great option if you know you want to permanently add a cross stitch patch to a garment of bag. 

Get the full tutorial over at Sirious Stitches. Would you add an iron-on cross stitch patch to something? I’d love to hear what you would use this technique for!

[Photo: Sirious Stitches]

RSS More Articles

  • Make Your Cross Stitch into an Iron On Patch
  • How to Make a Trendy Capybara Card
  • DIY Valentine Shabby Chic Bookmarks: A Creative and Heartfelt Gift Idea
  • Stitch Stars: Taylor: Over 20 unofficial embroidery patterns for stitchy superfans
  • Bee Themed Mini Scrapbook Album
  • Fun Tank Top Knitting Patterns
  • Books to Get Ready for Back to School
  • Just Feel Festive Shawl crochet pattern by QuirkyMondayCrafts
  • Cozy Up Your Holidays with This Stunning Christmas Blanket!
  • 5 Must-Know Secrets to Turning Your Suburban Home into a Profitable, Sustainable Homestead

Pick Your Blog

  • Sewing
  • Knitting
  • Quilting
  • Crochet
  • Home & Garden
  • Recycled Crafts
  • Scrapbooking
  • Card Making
  • Polymer Clay
  • Cross-Stitch
  • Edible Crafts
  • Felting
  • Glass Art
  • Indie Crafts
  • Kids Crafts
  • Jewelry Making
  • Lesson Plans
  • Needlework
  • Bath & Body
  • Party Ideas
  • Candle Making
  • DIY Weddings
  • Not Craft
  • Free Craft Projects

Copyright © 2025 · CraftGossip | Start Here | Contact Us | Link to Us | Your Editors | Privacy and affiliate policy