• Home
  • Suggest A DIY
  • DIY Newsletter

Craft Gossip

Independent craft blog since 2007

  • About CraftGossip
  • Our Network
    • Bath & Body Crafts
    • Candle Making Ideas
    • Crochet Ideas
    • Cross Stitch
    • Edible Crafts
    • Felting Patterns
    • Glass Art
    • Home & Garden Ideas
    • Indie Crafts
    • Jewelry Making
    • Kids Crafts
    • Knitting Patterns
    • Lesson Plans
    • Needlework
    • Party Ideas
    • Polymer Clay
    • Quilting Ideas
    • Recycled Crafts
    • Scrapbooking
    • Sewing Patterns
    • Card Making
    • DIY Weddings
    • Not Craft Ideas
  • Giveaways
  • Roundups
  • Store
  • Search

Stitch Up a Cute Fall Greeting — Hello Pumpkin

October 9, 2025 by Sarah White

I love the idea of stitching greeting cards, or really making any kinds of greeting cards to send to people. Or maybe sending cards in general. Whatever. 

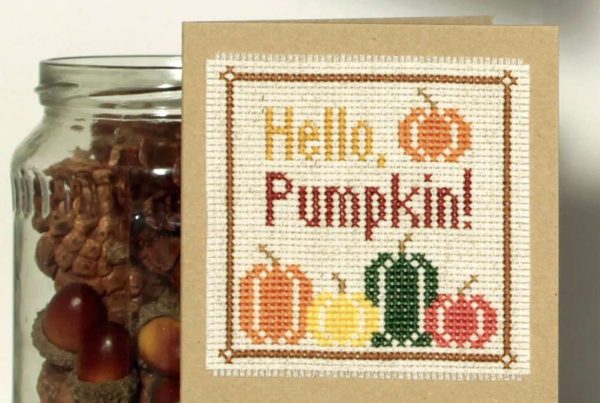
This “Hello Pumpkin” chart from Gathered would be a perfect one to stitch up as a greeting card, and it’s actually shown in the pattern being used in that way. 

This project was designed by Jenny Van De Wiele for The World of Cross Stitching magazine and is being offered as a free pattern. There’s actually a whole set of these little harvest time greetings, and you can buy a digital copy of the magazine if you want to stitch any of the others. 

This one is 46 by 45 stitches, and it uses 10 colors. You could make the pumpkins any colors you like or make them in two different colors instead of four if you want to use fewer colors. 

On 14 count fabric or 28 count evenweave it measures 3.25 inches square, or about 8.5 cm. So it’s perfect for mounting onto a little card or just putting into a small frame. It would easily fit in a 4-inch hoop or a little frame of your choosing and would be cute in a display of pumpkins (handcrafted, real or otherwise). 

There are a couple of different ways that you can mount a piece of cross stitch onto a greeting card. If your card has a hole (or you can cute out a hole to fit) then you can easily tape the cross stitch to the inside of the card, using the tape to cover up the raw edges of the cross stitch fabric. 

This image shows the cross stitch on the outside of the card, but it doesn’t have instructions for how to do that. I’m inclined to think you’d want to use a spray adhesive to try to hold down every strand of the fabric, but you could also use decorative tape on the outside or finish the edges of your design with a bit of fabric or ribbon to keep it from fraying. 

You can grab this free pattern from Gathered, and check out their digital editions if you want more of the patterns. 

[Photo: Gathered]
«
»

Have you read?

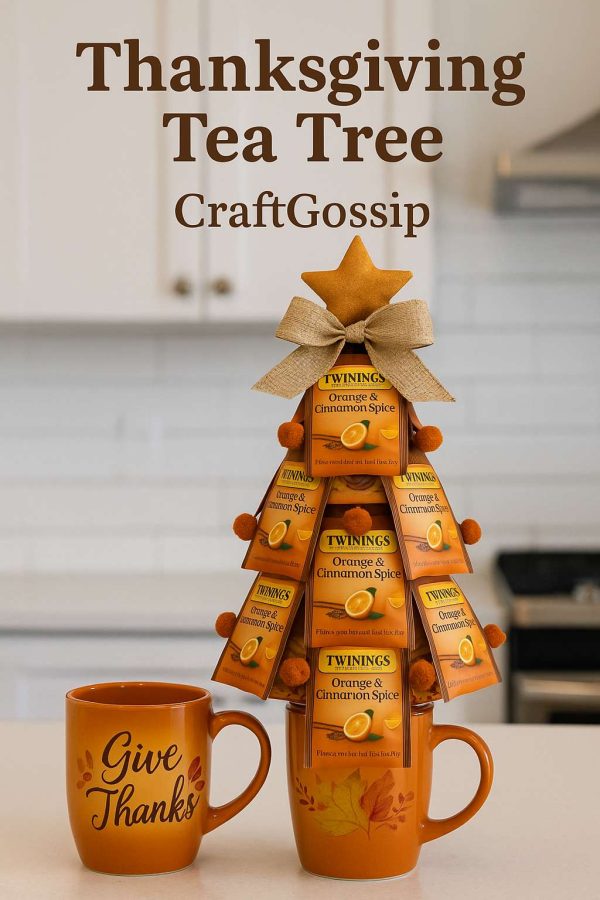
DIY Thanksgiving Tea Bag Tree with Twinings Orange and Cinnamon Spice

If you’ve been looking for a cozy, budget-friendly craft that doubles as a heartfelt gift, this Thanksgiving Tea Bag Tree is the perfect project. Using Twinings Orange & Cinnamon Spice tea bags, a fall-themed mug, and just a few embellishments, you can create a festive centerpiece that’s as practical as it is pretty.

I make several of these every year and take them to the local nursing home where my daughter works. The residents love them — not only do they brighten the tables, but the tea can be shared by everyone. It’s a thoughtful, affordable gift that brings people together over a warm cup. And here’s my thrifty secret: I buy the wrapped tea bags when they go on sale throughout the year and stash them away until holiday season.

Supplies You’ll Need

  • Twinings Orange & Cinnamon Spice tea bags (about 12–20, depending on the size of your tree) 
  • A sturdy fall-themed mug (look for ones with leaves, pumpkins, or gratitude quotes like “Thankful” or “Give Thanks”) 
  • Thin ribbon in autumn shades (orange, brown, gold, or plaid) 
  • Hot glue gun or double-sided tape 
  • Small fall embellishments (mini felt leaves, acorns, or faux berries) 
  • A decorative topper (a glitter star, pumpkin, or rustic bow) 

How to Make a Thanksgiving Tea Bag Tree

Step 1 – Prep your base
Start with your mug. This will be the “trunk” of your tree, so choose one with an autumn vibe.

Step 2 – Create your tree layers
Stack the tea bags in a cone shape. Begin with the largest layer on the bottom and work your way up to a single tea bag at the top. Slightly overlap each bag for a full look.

Step 3 – Secure with ribbon
Tie a piece of ribbon around each layer to hold it snug. I recommend orange satin or plaid ribbon for that Thanksgiving touch.

Step 4 – Add decorations
Hot glue mini pom-poms, faux berries, or tiny felt leaves between the tea bags to give the tree a decorated look. This makes it look more festive and less “stacked.”

Step 5 – Finish with a topper
Top your tea tree with a bow, star, or even a small faux pumpkin. This is what gives the tree its charming holiday character.

Step 6 – Add a personal touch
Slip in a gift tag with a note like, “Grateful for you — enjoy a cozy cup this Thanksgiving.”

Variations to Try

  • Mixed Flavors Tree: Combine Orange & Cinnamon Spice with Chai or Apple Cinnamon for variety. 
  • Rustic Farmhouse Style: Use burlap ribbon and a wooden star topper. 
  • Christmas Version: Swap out the mug and ribbon for red and green tones — perfect to carry this idea into December. 

Why This Project Works

This isn’t just a pretty gift — it’s a way of sharing warmth. The Twinings Orange & Cinnamon Spice tea bags give off a cozy autumn flavor that’s perfect for Thanksgiving gatherings. And because the tree is built from individually wrapped bags, it’s ideal for sharing in group settings like workplaces, classrooms, or nursing homes.

It’s quick, inexpensive, and full of heart — which to me is exactly what handmade gifting is all about.


RSS feed: More Articles More Articles

  • 10 Snowflake Christmas Winter Scrapbook Page Layout Ideas
  • Free Christmas Gonk Cross Stitch Pattern With DMC Colour Key and Tutorial
  • 10 Fall-Themed Thank You Cards and Gift Card Holders to Make
  • DIY Leaf Imprint Pottery Soap Dish – Green Glazed Botanical Design
  • Free Crochet Snowman Patterns for Gifts and Winter Décor
  • Weasley Sweater Knitting Tutorial Review: Plan Your Own Personalised Christmas Jumper
  • 10 Elephant Cross Stitch Patterns for Sweet Gifts and Beautiful Wall Art
  • Calendrier de l’Avent Scrapbooking: Make a Christmas Envelope Calendar
  • Free Christmas Postage Stamp Digital Stamps (Vintage, Modern and Religious Printables)
  • 10 Cosy Leg Warmer Knitting Patterns for Warm Legs and a Little Retro Charm

Pick Your Blog

  • Sewing
  • Knitting
  • Quilting
  • Crochet
  • Home & Garden
  • Recycled Crafts
  • Scrapbooking
  • Card Making
  • Polymer Clay
  • Cross-Stitch
  • Edible Crafts
  • Felting
  • Glass Art
  • Indie Crafts
  • Kids Crafts
  • Jewelry Making
  • Lesson Plans
  • Needlework
  • Bath & Body
  • Party Ideas
  • Candle Making
  • DIY Weddings
  • Not Craft
  • Free Craft Projects

Copyright © 2026 · CraftGossip | Start Here | Contact Us | Link to Us | Your Editors | Privacy and affiliate policy