• Home
  • Suggest A Craft
  • DIY Newsletter

Craft Gossip

The largest independent craft review site since 2007

  • About CraftGossip
  • Our Network
    • Bath & Body Crafts
    • Candle Making Ideas
    • Crochet Ideas
    • Cross Stitch
    • Edible Crafts
    • Felting Patterns
    • Glass Art
    • Home & Garden Ideas
    • Indie Crafts
    • Jewelry Making
    • Kids Crafts
    • Knitting Patterns
    • Lesson Plans
    • Needlework
    • Party Ideas
    • Polymer Clay
    • Quilting Ideas
    • Recycled Crafts
    • Scrapbooking
    • Sewing Patterns
    • Card Making
    • DIY Weddings
    • Not Craft Ideas
  • Giveaways
  • Roundups
  • Store
  • Search

Stack and Whack Four Patch Quilt Tutorial – A Beginner-Friendly Quilting Method You’ll Love

May 13, 2025 by Shellie Wilson

If you’re looking for a fast, fun, and beginner-friendly quilt project, Leah Day’s Stack and Whack Four Patch Quilt Tutorial is an absolute must-see. Whether you’re new to quilting or just craving a fresh project that showcases beautiful fabric combinations with minimal fuss, this clever method ticks all the boxes.

We took a deep dive into Leah’s tutorial to see just how effective this technique is—and spoiler alert—it’s a game-changer for quilters of all skill levels.

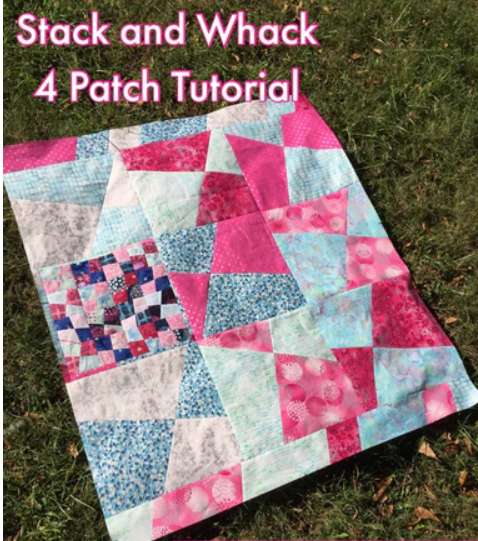
What Is a Stack and Whack Four Patch Quilt?
The “stack and whack” method is a time-saving piecing technique that allows you to cut and sew multiple quilt blocks quickly by layering fabrics, slicing them together, and mixing the pieces to create striking, high-contrast four-patch blocks. It’s the perfect fusion of efficiency and creativity.

In Leah Day’s tutorial, she breaks down the method step by step, showing how to create 48 unique four-patch blocks with just 8 fat quarters. This makes it an excellent scrap-busting project, too!

Why We Love Leah Day’s Tutorial
1. Clear Instructions for Beginners
Leah is known for her approachable teaching style, and this tutorial is no exception. Her detailed guidance makes the process feel simple and doable, even if you’re new to rotary cutting or haven’t made a quilt before. The tutorial includes both written instructions and a video—ideal for visual learners.

2. Great for Fat Quarters and Stash Busting
If your fabric stash is overflowing with fat quarters or random yardage, this project will help you use those prints in a fresh, dynamic way. The stack-and-whack method allows for unexpected fabric combinations, making every quilt unique.

3. Fast Piecing = Quicker Finishes
One of the biggest perks of the four-patch stack and whack method is how fast it is. Leah’s process allows you to make dozens of blocks quickly, which means you can finish a quilt top in a weekend—yes, even if you’re a casual or part-time quilter.

Key Takeaways from the Stack and Whack Four Patch Tutorial
Perfect for beginners: The technique doesn’t require complex cutting or piecing, and there’s lots of room for creativity.

Efficient block creation: Stack and slice method saves time while maximizing fabric use.

Quilt top layout tips included: Leah offers great advice on arranging your blocks to create contrast and balance in your design.

Optional sashing guidance: Want to add sashing or borders? Leah’s blog includes layout ideas that take your quilt to the next level.

Includes a downloadable pattern: There’s a printable guide for those who prefer step-by-step instructions in hand.

 10 Free Stack-N-Whack Quilt Patterns

Tutorial: Easy peasy pieced blocks

Stack and Whack worksheet


Read These Next

  • 25 Easy And Fast Four Patch Quilt Patterns
  • 15+ DIY Easter Treat Holders, Bags and Boxes (and…
«
»

Have you read?

Turn an Old Shirt into a Stylish Scrunchie: A Fun Upcycling Tutorial

Are you looking for a quick and easy sewing project that not only saves you money but also helps you recycle old clothes? In this tutorial from Adventures of a DIY Mom, you’ll learn how to make a scrunchie out of an old shirt, turning a piece of fabric you no longer wear into a fashionable and functional accessory!

The tutorial walks you through the entire process of transforming a worn-out shirt into a cute scrunchie that’s perfect for tying up your hair in style. Not only is it an excellent way to reuse fabric you would otherwise throw away, but it also gives you a unique, custom accessory that’s completely one-of-a-kind. Whether you’re using a shirt with a fun pattern or a plain old tee, this project is a fantastic way to add a personal touch to your wardrobe.

The instructions are simple, and even beginner sewists can follow along with ease. Plus, the scrunchie can be made in just a few steps, so it’s the perfect project when you need a quick, satisfying DIY fix.

If you’ve got an old shirt lying around, don’t throw it out! Check out the full tutorial here and get started on making your own trendy, upcycled scrunchie today!

RSS More Articles

  • Turn an Old Shirt into a Stylish Scrunchie: A Fun Upcycling Tutorial
  • Designer Spotlight: TesLime Cross Stitch
  • Crochet Kit – The Arpeggio Set
  • 4 FREE Father’s Day Digital Stamp Sentiments
  • DIY Kraft Paper Roll Message Board – The Perfect Rustic Organizer You Need
  • How to Turn Photos into Beatrix Potter-Style Illustrations Using AI
  • How to make DIY Fabric Flowers
  • Pet Themed Learning Activities
  • 4 FREE Graduation Pattern Papers to Download
  • A Knit Vest to Get You Ready for Summer

Pick Your Blog

  • Sewing
  • Knitting
  • Quilting
  • Crochet
  • Home & Garden
  • Recycled Crafts
  • Scrapbooking
  • Card Making
  • Polymer Clay
  • Cross-Stitch
  • Edible Crafts
  • Felting
  • Glass Art
  • Indie Crafts
  • Kids Crafts
  • Jewelry Making
  • Lesson Plans
  • Needlework
  • Bath & Body
  • Party Ideas
  • Candle Making
  • DIY Weddings
  • Not Craft
  • Free Craft Projects

Copyright © 2025 · CraftGossip | Start Here | Contact Us | Link to Us | Your Editors | Privacy and affiliate policy