• Home
  • Suggest A Craft
  • DIY Newsletter

Craft Gossip

The largest independent craft review site since 2007

  • About CraftGossip
  • Our Network
    • Bath & Body Crafts
    • Candle Making Ideas
    • Crochet Ideas
    • Cross Stitch
    • Edible Crafts
    • Felting Patterns
    • Glass Art
    • Home & Garden Ideas
    • Indie Crafts
    • Jewelry Making
    • Kids Crafts
    • Knitting Patterns
    • Lesson Plans
    • Needlework
    • Party Ideas
    • Polymer Clay
    • Quilting Ideas
    • Recycled Crafts
    • Scrapbooking
    • Sewing Patterns
    • Card Making
    • DIY Weddings
    • Not Craft Ideas
  • Giveaways
  • Roundups
  • Store
  • Search

Soy/Palm Wax Blend Candles

March 25, 2011 by SandraW

Palm/Soy Blend Compared to Soy Blend

Candle making can be a fun and rewarding experience, but it’s not always easy to get it right the first time. Sometimes, even experienced candle makers struggle with certain aspects of the craft. Recently, I tried something new and found a solution to a problem that I had been experiencing for a while.

I had been trying to create soy wax pillars and votives, but I was having difficulty getting them to harden properly. The texture of the wax was not smooth, and the colors were not as bright as I had hoped. That’s when I decided to try blending the soy wax with palm wax, as I had heard that this could help improve the texture and appearance of the candles.

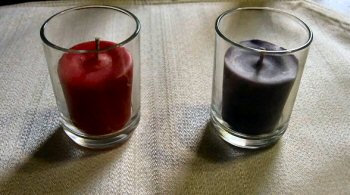
To start, I made a pure soy wax votive in purple, and a soy/palm wax blend in pink. When comparing the two candles side by side, the soy/palm blend was noticeably better. It had a smoother texture and brighter colors, which was a great bonus. The pink color of the soy/palm blend was also more vibrant than the purple of the pure soy wax candle.

I used a 25% palm wax blend, as palm wax can be expensive, and I wanted to see how little I could use and still achieve good results. The pillar I made with this blend could have used a bit more palm wax, as the melt pool stretched out to an inch too quickly. Despite this, the candle was still a significant improvement over my previous attempts, as it did not fall or melt all over the place like before.

Blending soy wax with palm wax can be a great solution for those struggling with the texture and appearance of their candles. The palm wax helps to smooth out the texture and brighten the colors of the candle. However, it’s important to note that the more palm wax you use, the more it will affect the burning properties of the candle. So, it’s best to experiment with different ratios until you find the perfect balance for your needs.

In conclusion, blending soy wax with palm wax is a great solution for those looking to improve the texture and appearance of their candles. I found that a 25% palm wax blend worked well for me, but the ratio will vary depending on your specific needs. Don’t be afraid to experiment until you find the right blend for your candles.

Soy/Palm PillarThis soy/palm blend is only 25% palm, because that stuff isn’t cheap and I wanted to see how little I could get away with. The pillar could use some more palm wax, as the melt pool stretched out to an inch too quickly.  It’s still an improvement because at least the candle isn’t falling and/or melting all over the place!


Read These Next

  • 13 Ways to Embellish Boring Candles
  • 12 DIY Candles You Can Make At Home Using Ice
«
»

Have you read?

“Transform Popsicle Sticks into Adorable Garden Makers – A Crafting Project You’ll Love

If you’re looking for a creative way to add some personality to your garden, this Popsicle Stick Garden Makers project is the perfect craft for you! Whether you’re an experienced DIYer or just starting your crafting journey, this fun and easy project will help you create charming little garden markers that not only look great but also serve a practical purpose in your outdoor space.

With just a few popsicle sticks, some paint, and your imagination, you can make unique markers for your garden plants. This project allows you to add a personal touch to your garden, making it both organized and aesthetically pleasing. Plus, it’s a perfect activity for kids, letting them join in on the fun of creating something that they can proudly display in the garden.

Ready to get started? href=”https://gluesticksblog.com/popsicle-stick-garden-makers/” target=”_new” rel=”noopener” data-start=”905″ data-end=”998″>Check out the full tutorial here! and craft your own custom garden markers today!

 
Wood Spoon Garden Markers
 
How to make Heart-Shaped Wooden Herb Garden Markers
Super Cute Garden Markers

RSS More Articles

  • “Transform Popsicle Sticks into Adorable Garden Makers – A Crafting Project You’ll Love
  • Book Review: The Sewing Book by Alison Smith
  • Apple Learning Activities
  • 12 Scrapbook Layout Ideas with a Quilted Look and some Sketches
  • Mastering the Basics: A Beginner’s Guide to Quilting
  • Honeycomb Cardigan – Free Crochet Pattern
  • Apple Cider Vinegar Scalp Scrub for Dry, Flaky, or Itchy Scalps – A DIY Detox That Works
  • Designer Spotlight: Knotty Bytes
  • Spotlight on Salt Stitches: A Journey Through Colorful Threads and Creative Embroidery
  • Printable Quilt Block Coloring Pages – Free Download for Quilters

Pick Your Blog

  • Sewing
  • Knitting
  • Quilting
  • Crochet
  • Home & Garden
  • Recycled Crafts
  • Scrapbooking
  • Card Making
  • Polymer Clay
  • Cross-Stitch
  • Edible Crafts
  • Felting
  • Glass Art
  • Indie Crafts
  • Kids Crafts
  • Jewelry Making
  • Lesson Plans
  • Needlework
  • Bath & Body
  • Party Ideas
  • Candle Making
  • DIY Weddings
  • Not Craft
  • Free Craft Projects

Copyright © 2025 · CraftGossip | Start Here | Contact Us | Link to Us | Your Editors | Privacy and affiliate policy