• Home
  • Suggest A Craft
  • DIY Newsletter

Craft Gossip

The largest independent craft review site since 2007

  • About CraftGossip
  • Our Network
    • Bath & Body Crafts
    • Candle Making Ideas
    • Crochet Ideas
    • Cross Stitch
    • Edible Crafts
    • Felting Patterns
    • Glass Art
    • Home & Garden Ideas
    • Indie Crafts
    • Jewelry Making
    • Kids Crafts
    • Knitting Patterns
    • Lesson Plans
    • Needlework
    • Party Ideas
    • Polymer Clay
    • Quilting Ideas
    • Recycled Crafts
    • Scrapbooking
    • Sewing Patterns
    • Card Making
    • DIY Weddings
    • Not Craft Ideas
  • Giveaways
  • Roundups
  • Store
  • Search

SoapyLove book review

October 12, 2009 by jessica neaves

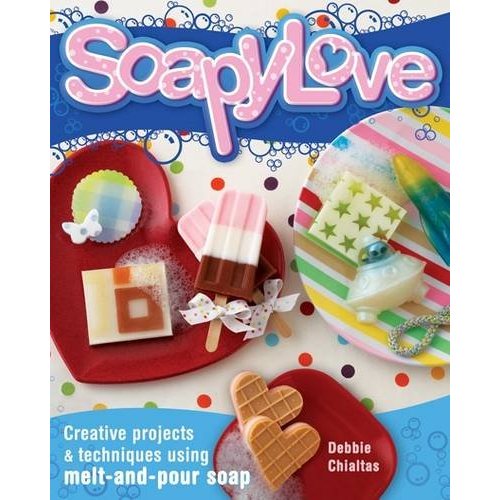
516h37O9EOL._SS500_Debbie Chialtas of Soapylove has published her first book, SoapyLove: Squeaky-clean projects using melt and pour soap, and it does not disappoint!  SoapyLove is not only a great introductory book for the beginner melt and pour soap crafter, but will teach soapmaking veterans some new tricks as well.

The first portion of the book has an overview of  basic melt and pour techniques and materials, such as preventing surface bubbles; adding colorants, micas, and fragrances; layering soaps; and cutting soap. The balance of the book is dedicated to projects and more detailed techniques.  Some of the skills taught are layering, embedding shapes, cutting out shapes, soap on a rope, marbling, and using transfer sheets to create designs.

There are 25 wonderful projects included in SoapyLove, and several of the projects also have other suggested ideas for the skills used in the project. Projects include cameo bars, checkered stars, heavenly bars (clouds and grass with a blue sky), marbled ice cream cones, soap tarts (toaster pastries), and soap candies.  A couple of my personal favorites include the flame bars and plaid soaps.

Each project has lots of full color pictures and step-by-step instructions. While some of the projects are better suited to more advanced melt and pour soapcrafters, beginners should have no problem with the majority of the projects included.

The only thing that I would like to have been included would be a short resource guide in the back as a reference.  While Chialtas does mention some brand names of items and the occasional store, it would be helpful, especially for beginners, to have a resource guide giving more specific information on where to find some of the items, such as fragrances and molds, from such a seasoned soapmaker.  All in all, this is definitely the best melt and pour soap crafting book that I have seen!  Pick it up for only $19.99 at your favorite bookstore.

Read These Next

  • 15 Melt and Pour Goat's Milk Soap
  • A Guide to Photographing Handmade Soaps and…
«
»

Have you read?

Easy Ways to Make Your Cross Stitch Better

The post over at The Crafty Mummy has the click-baity title of “Is there a right or wrong way to cross stitch?” Of course the answer is no. As with any other craft, as long as you are happy with the results you’re doing it right and no one should try to convince you otherwise.

That said, there are things that you can do to make your cross stitch a little better if you aren’t totally happy with the way your projects are looking. They might not be considered the “right way,” but they are important things to think about and if you want to deviate from these “rules” at least you’ll know that you’re doing it.

You can head over there to read all the tips, but it’s things like making sure your stitches are all going in the same direction (meaning you stitch the bottom legs of a row all in the same direction, then work back and stitch all the top legs in the same direction). You wouldn’t think something like that would make a huge difference until you don’t do it and then you can’t unsee it.

Most of things things aren’t rules so much as they are reminders to be consistent in what you are doing as you work a project. So however you start doing things like stitch direction or the number of strands of floss (I might even add using a hoop versus not, since the hoop can stretch the fabric and change the tension of the stitches a bit) you should continue in that way throughout the project in order for it to look its best.

Head over to The Crafty Mummy to read the rest of her list, then come back here if you have something to add. I’d love to hear your thoughts!

[Photo: The Crafty Mummy]

RSS More Articles

  • Easy Ways to Make Your Cross Stitch Better
  • 12 Handmade Masculine Card Ideas for Father’s Day
  • The Perfect Sewing Guide for Making Indian Clothes
  • Minecraft Learning Activities
  • Knit a Spiky Balaclava
  • 12 Scrapbook Layout Ideas using Repeated Shapes
  • Upcycling or Hoarding? Why Your DIY Projects Could Be Doing More Harm Than Good
  • Circle Of Leaves Afghan Pattern
  • Make a Stunning DIY Paper Vase – A Creative and Budget-Friendly Craft
  • How to Make a Rag Quilt – An Easy, Cozy Beginner-Friendly Tutorial

Pick Your Blog

  • Sewing
  • Knitting
  • Quilting
  • Crochet
  • Home & Garden
  • Recycled Crafts
  • Scrapbooking
  • Card Making
  • Polymer Clay
  • Cross-Stitch
  • Edible Crafts
  • Felting
  • Glass Art
  • Indie Crafts
  • Kids Crafts
  • Jewelry Making
  • Lesson Plans
  • Needlework
  • Bath & Body
  • Party Ideas
  • Candle Making
  • DIY Weddings
  • Not Craft
  • Free Craft Projects

Copyright © 2025 · CraftGossip | Start Here | Contact Us | Link to Us | Your Editors | Privacy and affiliate policy