• Home
  • Suggest A Craft
  • DIY Newsletter

Craft Gossip

The largest independent craft review site since 2007

  • About CraftGossip
  • Our Network
    • Bath & Body Crafts
    • Candle Making Ideas
    • Crochet Ideas
    • Cross Stitch
    • Edible Crafts
    • Felting Patterns
    • Glass Art
    • Home & Garden Ideas
    • Indie Crafts
    • Jewelry Making
    • Kids Crafts
    • Knitting Patterns
    • Lesson Plans
    • Needlework
    • Party Ideas
    • Polymer Clay
    • Quilting Ideas
    • Recycled Crafts
    • Scrapbooking
    • Sewing Patterns
    • Card Making
    • DIY Weddings
    • Not Craft Ideas
  • Giveaways
  • Roundups
  • Store
  • Search

Shaving Cream Easter Egg Painting

March 20, 2018 by Shellie Wilson

Easter is a wonderful time for families to come together and celebrate. One of the most exciting traditions during this holiday is decorating Easter eggs.

However, traditional egg dyeing can be messy and time-consuming, and it often involves using harsh chemicals. If you’re looking for a fun and hands-on way to decorate Easter eggs with your kids, then you’re in luck! In this Easter kid’s craft tutorial, we will be showing you how to make Shaving cream Easter eggs.

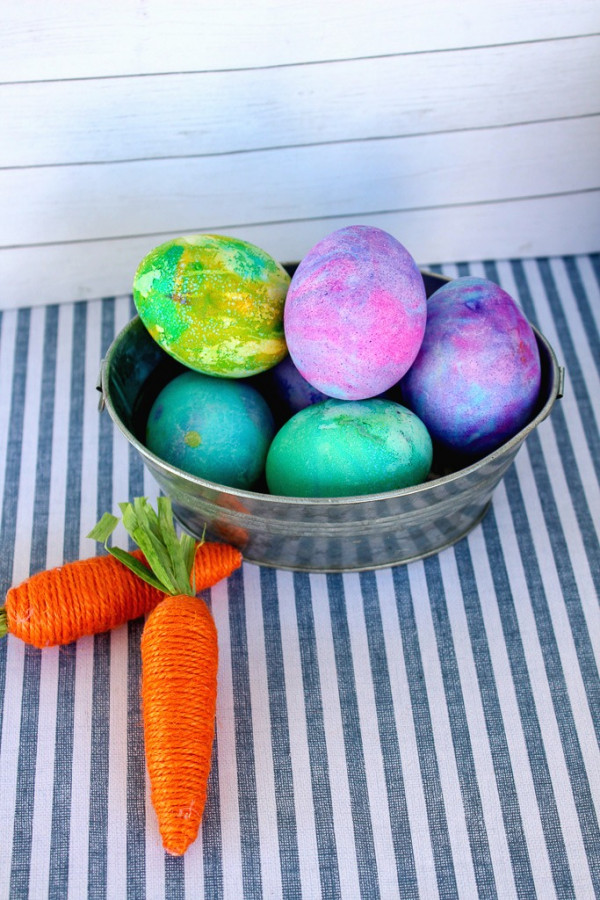
This is a fun and creative alternative to traditional egg dyeing that is safe, easy, and inexpensive. With just a few simple ingredients, you can create beautiful and unique Easter eggs that your kids will love. Plus, it’s a great way to spend quality time with your family and create lasting memories. So get ready to roll up your sleeves, get a little messy, and have some fun making Shaving cream Easter eggs!

Supplies:

    • Eggs – hard boiled
    • Whipped Topping – large container
    • Gel Food Coloring
  • Vinegar

Instructions:

Hard boil 12 eggs.  Allow to cool.

Soak the eggs in a bowl of vinegar for at least 10 minutes.  

In a large container thaw out whipped topping, smoothing it until it is even.

Using gel food coloring, mix and swirl the coloring.  You can do solid colors or mix to swirl several colors.


NOTE: It is important to use gel food coloring!  Traditional food coloring will not be as dark or easily seen.  

Place your egg in the whipped topping.

Spoon over to fully cover the egg.  Leave it there for 15 minutes.

In a small bowl, fill it with water.  Gently dunk the egg in water and swish it around.  Do not rub the excess whipped cream off or run it under the tap as that will wash away the coloring.  

Allow to dry.  

Read These Next

  • 21 Delicious Spring Icecream Recipes
  • 20 Must Try Recipes Using Cadbury Creme Easter Eggs
«
»

Have you read?

Turn an Old Shirt into a Stylish Scrunchie: A Fun Upcycling Tutorial

Are you looking for a quick and easy sewing project that not only saves you money but also helps you recycle old clothes? In this tutorial from Adventures of a DIY Mom, you’ll learn how to make a scrunchie out of an old shirt, turning a piece of fabric you no longer wear into a fashionable and functional accessory!

The tutorial walks you through the entire process of transforming a worn-out shirt into a cute scrunchie that’s perfect for tying up your hair in style. Not only is it an excellent way to reuse fabric you would otherwise throw away, but it also gives you a unique, custom accessory that’s completely one-of-a-kind. Whether you’re using a shirt with a fun pattern or a plain old tee, this project is a fantastic way to add a personal touch to your wardrobe.

The instructions are simple, and even beginner sewists can follow along with ease. Plus, the scrunchie can be made in just a few steps, so it’s the perfect project when you need a quick, satisfying DIY fix.

If you’ve got an old shirt lying around, don’t throw it out! Check out the full tutorial here and get started on making your own trendy, upcycled scrunchie today!

RSS More Articles

  • Turn an Old Shirt into a Stylish Scrunchie: A Fun Upcycling Tutorial
  • Designer Spotlight: TesLime Cross Stitch
  • Crochet Kit – The Arpeggio Set
  • 4 FREE Father’s Day Digital Stamp Sentiments
  • DIY Kraft Paper Roll Message Board – The Perfect Rustic Organizer You Need
  • How to Turn Photos into Beatrix Potter-Style Illustrations Using AI
  • How to make DIY Fabric Flowers
  • Pet Themed Learning Activities
  • 4 FREE Graduation Pattern Papers to Download
  • A Knit Vest to Get You Ready for Summer

Pick Your Blog

  • Sewing
  • Knitting
  • Quilting
  • Crochet
  • Home & Garden
  • Recycled Crafts
  • Scrapbooking
  • Card Making
  • Polymer Clay
  • Cross-Stitch
  • Edible Crafts
  • Felting
  • Glass Art
  • Indie Crafts
  • Kids Crafts
  • Jewelry Making
  • Lesson Plans
  • Needlework
  • Bath & Body
  • Party Ideas
  • Candle Making
  • DIY Weddings
  • Not Craft
  • Free Craft Projects

Copyright © 2025 · CraftGossip | Start Here | Contact Us | Link to Us | Your Editors | Privacy and affiliate policy