• Home
  • Suggest A Craft
  • DIY Newsletter

Craft Gossip

The largest independent craft review site since 2007

  • About CraftGossip
  • Our Network
    • Bath & Body Crafts
    • Candle Making Ideas
    • Crochet Ideas
    • Cross Stitch
    • Edible Crafts
    • Felting Patterns
    • Glass Art
    • Home & Garden Ideas
    • Indie Crafts
    • Jewelry Making
    • Kids Crafts
    • Knitting Patterns
    • Lesson Plans
    • Needlework
    • Party Ideas
    • Polymer Clay
    • Quilting Ideas
    • Recycled Crafts
    • Scrapbooking
    • Sewing Patterns
    • Card Making
    • DIY Weddings
    • Not Craft Ideas
  • Giveaways
  • Roundups
  • Store
  • Search

Realism = No symmetrical flowers!

August 18, 2009 by Denise Felton

annieAs I browsed through Annies Crazy World just now, I had one of those lightbulb moments.

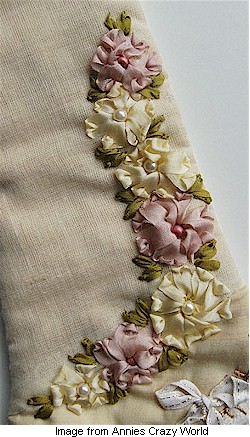
Her latest work includes a band of gorgeous silk-ribbon flowers. They’re truly lovely and the ideal touch for this piece — an embellishment I’d like to emulate. But my vicious internal critic said, “Don’t bother. You can’t make those flowers correctly. You’ve tried a hundred times and they always look stupid and false.” Then I saw this close-up shot of the flower band, and it finally hit me: Annie Whitsed’s posies are not symmetrical! They’re tipped and tilted and gently ruffled. The composition is balanced, but the flowers are as varied as they would be in a live garden. By avoiding perfect repetition, Annie has achieved……perfection!

How in the world did it take me so long to figure this out? Many, many thanks to Annie for providing a model that I — and perhaps a few other stitchers — can connect with. Guess what I’ll be practice-stitching tonight.

Go to Annie’s blog to see beautiful photos of this and many other charming projects.

Read These Next

  • Sola Wood Flowers - What Are They And What's All The Craze?
  • 35 Make Ahead Christmas Brunch Ideas
«
»

Have you read?

Stack and Whack Four Patch Quilt Tutorial – A Beginner-Friendly Quilting Method You’ll Love

If you’re looking for a fast, fun, and beginner-friendly quilt project, Leah Day’s Stack and Whack Four Patch Quilt Tutorial is an absolute must-see. Whether you’re new to quilting or just craving a fresh project that showcases beautiful fabric combinations with minimal fuss, this clever method ticks all the boxes.

We took a deep dive into Leah’s tutorial to see just how effective this technique is—and spoiler alert—it’s a game-changer for quilters of all skill levels.

What Is a Stack and Whack Four Patch Quilt?
The “stack and whack” method is a time-saving piecing technique that allows you to cut and sew multiple quilt blocks quickly by layering fabrics, slicing them together, and mixing the pieces to create striking, high-contrast four-patch blocks. It’s the perfect fusion of efficiency and creativity.

In Leah Day’s tutorial, she breaks down the method step by step, showing how to create 48 unique four-patch blocks with just 8 fat quarters. This makes it an excellent scrap-busting project, too!

Why We Love Leah Day’s Tutorial
1. Clear Instructions for Beginners
Leah is known for her approachable teaching style, and this tutorial is no exception. Her detailed guidance makes the process feel simple and doable, even if you’re new to rotary cutting or haven’t made a quilt before. The tutorial includes both written instructions and a video—ideal for visual learners.

2. Great for Fat Quarters and Stash Busting
If your fabric stash is overflowing with fat quarters or random yardage, this project will help you use those prints in a fresh, dynamic way. The stack-and-whack method allows for unexpected fabric combinations, making every quilt unique.

3. Fast Piecing = Quicker Finishes
One of the biggest perks of the four-patch stack and whack method is how fast it is. Leah’s process allows you to make dozens of blocks quickly, which means you can finish a quilt top in a weekend—yes, even if you’re a casual or part-time quilter.

Key Takeaways from the Stack and Whack Four Patch Tutorial
Perfect for beginners: The technique doesn’t require complex cutting or piecing, and there’s lots of room for creativity.

Efficient block creation: Stack and slice method saves time while maximizing fabric use.

Quilt top layout tips included: Leah offers great advice on arranging your blocks to create contrast and balance in your design.

Optional sashing guidance: Want to add sashing or borders? Leah’s blog includes layout ideas that take your quilt to the next level.

Includes a downloadable pattern: There’s a printable guide for those who prefer step-by-step instructions in hand.

 10 Free Stack-N-Whack Quilt Patterns

Tutorial: Easy peasy pieced blocks

Stack and Whack worksheet


RSS More Articles

  • Eco-Craft Fun: 25+ Sustainable Activities to Teach Kids About Going Green
  • Stack and Whack Four Patch Quilt Tutorial – A Beginner-Friendly Quilting Method You’ll Love
  • 12+ Mermaid Cards to Celebrate MerMay
  • Embroidery Patterns Stabilizers Wildflowers
  • Book Review: Off to the Nursery
  • Add a Little Lace to Your Knitting Patterns
  • How To Hide Ugly Outdoor Hose Pipes
  • Let’s Make the Lowink Beginners Blanket TOGETHER
  • The Secret to Perfect Topstitching (No More Frayed Thread!)
  • Etsy Spotlight – Girls A-Line Dress Sewing Pattern

Pick Your Blog

  • Sewing
  • Knitting
  • Quilting
  • Crochet
  • Home & Garden
  • Recycled Crafts
  • Scrapbooking
  • Card Making
  • Polymer Clay
  • Cross-Stitch
  • Edible Crafts
  • Felting
  • Glass Art
  • Indie Crafts
  • Kids Crafts
  • Jewelry Making
  • Lesson Plans
  • Needlework
  • Bath & Body
  • Party Ideas
  • Candle Making
  • DIY Weddings
  • Not Craft
  • Free Craft Projects

Copyright © 2025 · CraftGossip | Start Here | Contact Us | Link to Us | Your Editors | Privacy and affiliate policy