RONNIE'S POST STITCH BELT DESIGN BY JD
I was experimenting with post stitches the other day and came up with this cute belt pattern that my 23 year old daughter finds attractive. So, I’ve written it down to share with you. It’s easy – if you’ve mastered post stitches. If you have yet to master post stitches, here’s a great project for practicing them because it’s such a quick project using very little yarn.
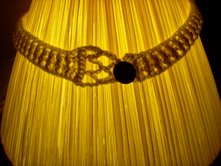
The belt pictured above was made by my friend Ronnie and photographed by her over a lampshade. Shows the detail nicely, I think. Ronnie is a master crocheter, so I feel honored that she tested my pattern.
Please feel free to make this pattern for yourself or gifts. Do not print the pattern elsewhere without my permission. Should you find an error in the pattern, kindly post in the comments section or email me.
I used a H hook and Bernat Denim Style yarn (a fuller worsted weight) in ‘Stonewash’ (color #03117). You can easily make two belts with one skein of yarn. Mine is fairly short for my wasp-waisted daughter. You can adjust the starting chain to any length you need. Just add 3 chains for your first double crochet.
You’ll also need scissors, a tapestry needle, and a fairly shank button to coordinate with your yarn.
Abbreviations:
CH = chain
SK = skip
SL ST = slip stitch
SC = single crochet
DC = double crochet
BPDC = back post double crochet
FPDC = front post double crochet
1. Chain 75 loosely (or any length you want), leaving a fairly long end to weave in. Double Crochet in 4th ch (counts as first DC) from hook and in each stitch across = 74 DC.
2. Chain 3, turn. DC in first DC, *FPDC in next DC, BPDC in next DC* across to last DC, DC in last DC. Chain 3, turn.
3. DC in first DC, BPDC in each FPDC and FPDC in each BPDC across to last DC, DC in last DC. Chain 1 turn.
At this point, my belt measures 23 inches long by 1.5 inches wide. If this measurement will not work for you, adjust your starting chain.
4. SC evenly across across the short end of the belt. Chain 6, sk 2 sc, sc in next sc. Chain 6, sk 2 sc, sc in next sc. Chain 6, sk 2 sc, sc in last sc. Ch 1 turn.
5. Sl st in first 3 chains of first 6 chain space loop. Sl st into same chain 6 space loop. Chain 6, sc in next chain space loop. Ch 1, turn.
6. Sl st in first 3 chains of this loop. Sl St into this loop. Chain 7 and SC in next ch 6 loop. Sl st down this side of the chains for stability. Fasten off. Using tapestry needle, weave tail thru the chain loops to reinforce them.
7. Weave in beginning tail thru chain 1 row and thru chain loops for reinforcement.
8. Using a scrap of yarn (not thread or any other fiber), sew the shank button to the middle of the 2nd DC on the other end of the belt. Use the final chain 7 loop as your buttonhole.
9. Wear and enjoy – especially if you need a bit of decorative color around your middle.