• Home
  • Suggest A Craft
  • DIY Newsletter

Craft Gossip

The largest independent craft review site since 2007

  • About CraftGossip
  • Our Network
    • Bath & Body Crafts
    • Candle Making Ideas
    • Crochet Ideas
    • Cross Stitch
    • Edible Crafts
    • Felting Patterns
    • Glass Art
    • Home & Garden Ideas
    • Indie Crafts
    • Jewelry Making
    • Kids Crafts
    • Knitting Patterns
    • Lesson Plans
    • Needlework
    • Party Ideas
    • Polymer Clay
    • Quilting Ideas
    • Recycled Crafts
    • Scrapbooking
    • Sewing Patterns
    • Card Making
    • DIY Weddings
    • Not Craft Ideas
  • Giveaways
  • Roundups
  • Store
  • Search

Party Idea – Beach Party

May 7, 2013 by Shellie Wilson

Party Idea - Beach

This Beach party idea is a little extra special as it’s was for my little boy 🙂 The photos are looking a little old as this party was in 2009.

We created a Beach/Pool party for his 1st birthday party and it was lots of fun, even the adults had fun.

I printed surfboards for cupcake toppers and used flip flop shoe keyrings , We also printed off some shark fins to use as cupcake toppers.  I laminated the printouts so they were firm enough to stick into the cupcake and could be washed and re-used if required.

Party Guests were able to keep the shoe keyring from their cupcake if they wanted to and every child got a plastic beach bucket and an inexpensive beach towel to take home.

A beach party would not be complete without a sandpit and giant beach ball so we added those too.

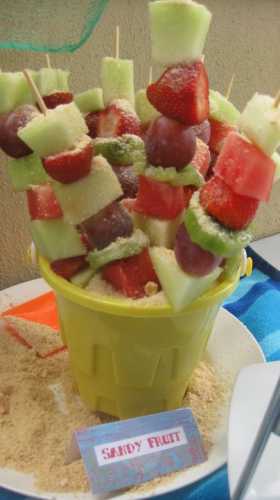
The party food was all about sand, so I used my food mixer to crush graham crackers for the sand, you could use any type of light brown biscuit.

The fruit sticks were a huge hit and I added a Shark Gummy to the top of the lolly sticks.

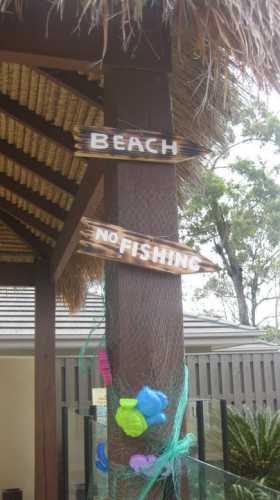
I decorated the table with thin bird netting which was very inexpensive and small plastic sand molds.

We dressed up in Lifeguard shirts and the kids just wore swimmers.

Beach Party Cupcakes


Beach Sand Pit
Beach Sand Pit
Beach Umbrellas
Beach Umbrellas
Bucket of chips
Bucket of chips
Beach themed food
Beach themed food

167003_1728226558539_4284237_n

beach party decorations
Beach party decorations
Hot Chips
Hot Chips
Sand castle cake
Sandcastle cake

168677_1728181037401_5192554_n

168622_1728177677317_3939452_n

Read These Next

  • DIY Plunge Pools For Your Backyard
  • 12 Pool Time Scrapbook Layout Ideas plus a FREEBIE
«
»

Have you read?

Make Your Cross Stitch into an Iron On Patch

A while back I made a little rainbow cross stitch pattern and I wasn’t sure what I wanted to do with it, so I turned it into a patch. My idea was that it could be used on a jacket or backpack, or you could add a pin to the back and wear it temporarily on a shirt or elsewhere. 

But what if you want to make your design more permanent? Is it possible to turn a piece of cross stitch into an iron-on design?

It turns out yes, it is, and Sirious Stitches has done it so I didn’t have to try to figure it out on my own. 

The way they did it was by using HeatnBond, an iron-on adhesive that attaches fabrics without sewing. There was still sewing involved to finish the edges of the cross stitch fabric and make it look like a purchased patch. The post shows how to do this by hand or with your sewing machine. (I just did blanket stitch edging on mine, which doesn’t look like a “real” patch but is also a lot faster.)

Once you have the patch prepared it’s a pretty easy matter of using the fusible adhesive to the back of the patch so you can then iron it onto whatever jacket, pair of jeans, bag or whatever else you might want to add it to. 

I guess I’m a little paranoid about the washability of cross stitch projects, though you could hand wash anything with an iron-on cross stitch patch as you might need to with a purchased iron-on patch, anyway. But this does look really cool and is a great option if you know you want to permanently add a cross stitch patch to a garment of bag. 

Get the full tutorial over at Sirious Stitches. Would you add an iron-on cross stitch patch to something? I’d love to hear what you would use this technique for!

[Photo: Sirious Stitches]

RSS More Articles

  • Make Your Cross Stitch into an Iron On Patch
  • How to Make a Trendy Capybara Card
  • DIY Valentine Shabby Chic Bookmarks: A Creative and Heartfelt Gift Idea
  • Stitch Stars: Taylor: Over 20 unofficial embroidery patterns for stitchy superfans
  • Bee Themed Mini Scrapbook Album
  • Fun Tank Top Knitting Patterns
  • Books to Get Ready for Back to School
  • Just Feel Festive Shawl crochet pattern by QuirkyMondayCrafts
  • Cozy Up Your Holidays with This Stunning Christmas Blanket!
  • 5 Must-Know Secrets to Turning Your Suburban Home into a Profitable, Sustainable Homestead

Pick Your Blog

  • Sewing
  • Knitting
  • Quilting
  • Crochet
  • Home & Garden
  • Recycled Crafts
  • Scrapbooking
  • Card Making
  • Polymer Clay
  • Cross-Stitch
  • Edible Crafts
  • Felting
  • Glass Art
  • Indie Crafts
  • Kids Crafts
  • Jewelry Making
  • Lesson Plans
  • Needlework
  • Bath & Body
  • Party Ideas
  • Candle Making
  • DIY Weddings
  • Not Craft
  • Free Craft Projects

Copyright © 2025 · CraftGossip | Start Here | Contact Us | Link to Us | Your Editors | Privacy and affiliate policy