• Home
  • Suggest A DIY
  • DIY Newsletter

Craft Gossip

Independent craft blog since 2007

  • About CraftGossip
  • Our Network
    • Bath & Body Crafts
    • Candle Making Ideas
    • Crochet Ideas
    • Cross Stitch
    • Edible Crafts
    • Felting Patterns
    • Glass Art
    • Home & Garden Ideas
    • Indie Crafts
    • Jewelry Making
    • Kids Crafts
    • Knitting Patterns
    • Lesson Plans
    • Needlework
    • Party Ideas
    • Polymer Clay
    • Quilting Ideas
    • Recycled Crafts
    • Scrapbooking
    • Sewing Patterns
    • Card Making
    • DIY Weddings
    • Not Craft Ideas
  • Giveaways
  • Roundups
  • Store
  • Search

Painted Muffin Tin Tealight Holder Project

March 14, 2011 by SandraW

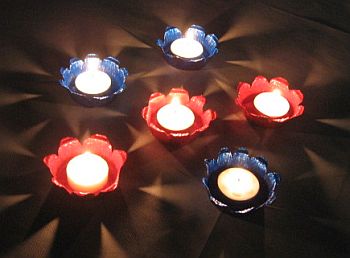
Painted tealight candle holderThis painted muffin tin tealight candle holder was inspired by the garden candle holder project in The New Candle Book: Inspirational Ideas For Displaying, Using and Making Candles by Gloria Nicol.

Since I have no garden to speak of presently, the garden candle holder didn’t appeal to me. Perhaps when it warms up, I’ll glue them on stakes and see how they look.

All you need to make these tealight holders are: stained glass paint, foil muffin tins, tealights, paintbrushes and scissors. You could draw the shape you want to cut into the foil muffin tins beforehand, or you could wing it like I did.

Cut little triangles fairly evenly and then round out the petal shapes with the scissors. Children would need to be closely supervised during this part because those little bits are sharp.

Next, start painting the outside and inside of the candle holder with the stained glass paint. I used Gallery Glass Window Color, which has gorgeous little sparkles in it when it dries.

Since blue and red is what I have, that’s what I used, although purple and yellow would have been nice. I’m quite mad over the stained glass paint and have to restrain myself from using it on everything. You’ll probably need a couple coats. If you can’t get your hands on stained glass paint or you don’t want to use it, try colored foil.

The paint takes at least an hour to dry, so try to be patient between coats. Also, add rags and/or paper towels to your supply list as it can get messy.

«
»

Have you read?

Learn a Flower Bobble Technique to Knit a Fun Shawl

Generally I like knitting patterns where I feel like you can use whatever yarn you have (because my stash is big enough and I want to use it, thanks) and make a successful project. This is one of those times when a special yarn makes the process that much easier. 

The Floral Bouquet Shawl from Xandy Peters uses a specific extended color pooling yarn from Feisty Fibers, which allows you to place the bobble flowers with increasing frequency as you knit the project. 

It starts with a solid color yarn, then the two color yarn is added in, and you make a bobble whenever you encounter the color pops. This would be hard to replicate with other yarn that doesn’t have the extended color pooling built in.

The background of the shawl is ribbed, making the project reversible. 

The shawl uses fingering/sock yarn and comes out to be an asymmetrical triangle that’s 54 inches/137 cm long and 36 inches/ 90 cm deep and 60 inches/150 cm across the top edge. 

Xandy says the pattern is for intermediate to advanced knitters. Knowing how to work traditional bobbles would probably help, but there’s a great video tutorial for how to work the floral bobbles so you can practice on other yarn or even incorporate the bobbles into other projects. 

The bobbles are five-petaled flowers but they also kind of look like starfish to me, which could be fun on a child’s cardigan or other pattern. They’d also be fun on the leg of a sock or around the brim of a hat for extra whimsy. 

The pattern includes photo and video tutorials, and written and charted instructions. It also includes tips on what to look for if you choose to use different yarn for the project, and instructions on how to dye your own yarn to use in the project. 

If you want to give it a try, you can find the pattern on Ravelry. 

[Photo: Xandy Peters]

RSS More Articles

  • DIY Burn Relief Soap – A Soothing Aloe Vera and Lavender Recipe for Sunburn, Windburn, and Irritated Skin
  • 10 Bookmark Embroidery Patterns for Quick Handmade Gifts
  • Necklace Length Guide For Handmade Jewelry Makers
  • Toy Story Cross Stitch Patterns
  • Vintage Bed Socks Knitting Pattern – A Cozy Little Gift Project With Old-Fashioned Charm
  • Vintage Crochet Baby Dress Pattern Review
  • 12+ Beautiful Butterfly Card Ideas
  • Cute Little Backpack Knitting Patterns
  • Easy Pen and Paper Games for Road Trips and Beyond
  • Air-Dry Clay Sunflower Trinket Dish Tutorial

Pick Your Blog

  • Sewing
  • Knitting
  • Quilting
  • Crochet
  • Home & Garden
  • Recycled Crafts
  • Scrapbooking
  • Card Making
  • Polymer Clay
  • Cross-Stitch
  • Edible Crafts
  • Felting
  • Glass Art
  • Indie Crafts
  • Kids Crafts
  • Jewelry Making
  • Lesson Plans
  • Needlework
  • Bath & Body
  • Party Ideas
  • Candle Making
  • DIY Weddings
  • Not Craft
  • Free Craft Projects

Copyright © 2026 · CraftGossip | Start Here | Contact Us | Link to Us | Your Editors | Privacy and affiliate policy