• Home
  • Suggest A DIY
  • DIY Newsletter

Craft Gossip

Independent craft blog since 2007

  • About CraftGossip
  • Our Network
    • Bath & Body Crafts
    • Candle Making Ideas
    • Crochet Ideas
    • Cross Stitch
    • Edible Crafts
    • Felting Patterns
    • Glass Art
    • Home & Garden Ideas
    • Indie Crafts
    • Jewelry Making
    • Kids Crafts
    • Knitting Patterns
    • Lesson Plans
    • Needlework
    • Party Ideas
    • Polymer Clay
    • Quilting Ideas
    • Recycled Crafts
    • Scrapbooking
    • Sewing Patterns
    • Card Making
    • DIY Weddings
    • Not Craft Ideas
  • Giveaways
  • Roundups
  • Store
  • Search

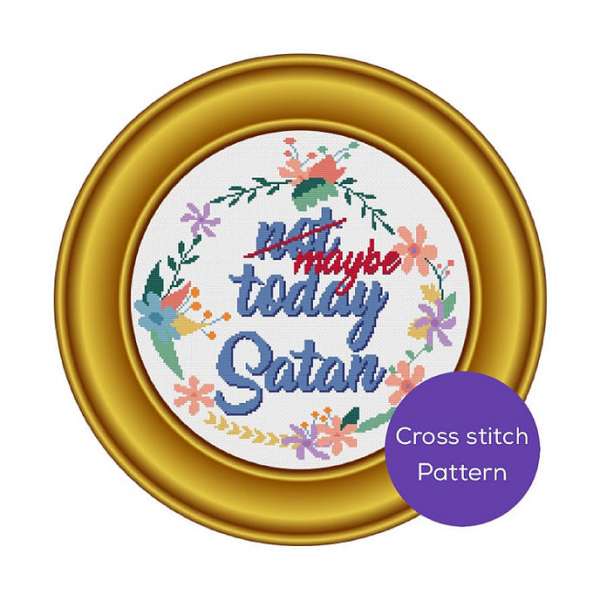
Maybe Today Satan?

April 7, 2021 by Sarah White

I think most people are familiar with the expression “Not today, Satan.” Popularized by Bianca del Rio on “Rupal’s Drag Race,” it’s an expression that means nothing is going to stand in your way of getting what you want, including the Devil himself.

But some days you might be feeling less confident about your ability to take on the world. Instead of not today, maybe you’re only feeling maybe today.

In that case, this cross stitch pattern from 8 Bit Stitch is for you.

The design comes out to 8.5 inches square on 18 count fabric, and uses lots of colors for the flowers that circle the words.

You can get the pattern directly from 8 Bit Stitch for $6.

[Photo: 8 Bit Stitch.]

Looking for more Snarky Cross stitch charts and designs? Check these out on Etsy. 
«
»

Have you read?

15 Easy DIY Halloween Treat Bag Ideas for Candy and Non-Candy Gifts

There is something rather lovely about a Halloween treat bag with a wonky little monster face. It doesn’t need expensive supplies or a cutting machine. Sometimes a paper lunch bag, a black marker and a few scraps of cardstock do the job beautifully.

These DIY Halloween treat bag ideas are designed for the sort of crafting most of us actually do: at the kitchen table, with supplies already in the cupboard, and preferably without discovering halfway through that we need a very specific die.

Whether you’re making Halloween party favors, preparing classroom goodie bags or putting together a little surprise for the grandchildren, there’s an option here to suit. Most are simple no-sew projects, and you can fill them with wrapped candy, stickers, crayons or other small gifts.

My advice? Choose one design for a large batch. Making twenty different characters sounds delightful until you’re still cutting bat wings when you should be making dinner.

Which Halloween Treat Bag Should You Make?

What you needBest projects
Quick bags for a classroomGhost bags, stamped bags or washi tape bags
A project children can decorateMonster bags or pumpkin bags
Packaging for lightweight favorsTissue paper pumpkins or envelope pouches
Something reusableMuslin spiderweb bags or fabric gift wraps
A gift for grandchildrenHalloween sock favors
A larger Halloween surprisePillowcase ghost gift bags

The paper projects below are small favor bags, rather than sturdy bags for collecting a whole evening’s trick-or-treat haul.

Basic Supplies for Homemade Halloween Goodie Bags

You won’t need everything on this list. Pick your design first, then gather the supplies it uses.

  • Plain paper lunch bags or small paper gift bags
  • Black, white, orange and green cardstock
  • Scissors
  • Glue stick and double-sided tape
  • Black marker
  • Ribbon or cotton twine
  • Tissue paper
  • Optional stamps, ink pads and washi tape
  • Optional plain muslin drawstring bags

Amazon can be handy for bulk paper bags, cardstock and plain drawstring pouches. Check the measurements before ordering, though. “Mini” can mean anything from a useful favor bag to something that barely accommodates a chocolate.

Keep food in its own packaging. Craft paper, paint, ink and glue should stay outside the food wrapper. For homemade treats, use a suitable food-safe inner bag.

1. White Paper Ghost Treat Bags

Best for: Quick classroom favors and beginner crafters.

You’ll need: White paper bags, a black marker and optional black cardstock.

Lay the bag flat and draw two oval eyes and a little open mouth on the front. Keep the face below the area you’ll fold over to close the bag.

Fill with a few wrapped treats or a sticker sheet, fold the top over twice and secure it with tape.

For a bolder face, cut the eyes and mouth from black cardstock and glue them on instead. Make one face you like, then use those shapes as templates for the rest.

A tiny “Boo!” on the folded top is all the extra decoration these need.

2. Orange Pumpkin Goodie Bags

Best for: A cheerful Halloween party table.

You’ll need: Orange paper bags, black cardstock, green cardstock and glue.

Cut two eyes, a nose and a smiling mouth from black cardstock. Glue them to the front of the bag, leaving the top clear for closing.

Add treats, fold down the top and tape it closed. Attach a green paper leaf and a short brown cardstock stem to the folded flap.

If you only have brown lunch bags, glue an orange cardstock panel to the front. You get the pumpkin look without waiting for painted bags to dry.

3. Scrap-Paper Monster Bags

Best for: Using the bits in your paper stash.

You’ll need: Paper bags, colorful cardstock scraps, white paper and a marker.

Glue a colorful rectangle to the front of each bag. Add one enormous eye, three little eyes or a wonderfully uneven pair.

Make a mouth from black paper and add white paper teeth. Keep the mouth on the front panel so it won’t interfere with opening the bag.

This is a good decorate-your-own Halloween activity. Prepare the shapes beforehand and let children choose their monster’s features.

Crooked teeth are very much part of the charm.

4. Mummy Treat Bags With Paper Bandages

Best for: A textured design made with basic supplies.

You’ll need: Brown or black paper bags, white paper, glue and paper eyes.

Tear white paper into narrow strips. Glue them diagonally across the front of the bag, overlapping some and leaving gaps between others.

Add two paper eyes in one gap. Trim any strips extending beyond the sides and keep the folding area at the top clear.

Decorating only the front makes these quicker to assemble and easier to open than wrapping the entire bag.

Old white envelopes are useful for the bandages. Remove any sections with addresses or printed details first.

5. Black Cat Halloween Favor Bags

Best for: Cute Halloween packaging without a scary face.

You’ll need: Black paper bags, black cardstock, white paper and pink paper.

Cut two triangular ears with an extra tab along the bottom of each. Glue the tabs behind the front edge of the bag so the ears stick up.

Add white eyes, a pink nose and narrow paper whiskers. Position everything below the bag’s closing fold.

Fill the bag and secure the folded top at the back with tape.

If you’re making a batch, cut all the ears together before assembling the faces.

6. Bat-Wing Treat Bags

Best for: A little extra dimension on a party table.

You’ll need: Small paper bags, black cardstock, scissors and double-sided tape.

Fold a piece of cardstock in half and sketch one bat wing beside the fold. Cut it out and open it to make a matching pair.

Separate the wings, leaving a small attachment tab on the inner edge of each. Tape the tabs to the back of the bag so the wings extend out at the sides.

Add eyes to the front, then fill and close the bag.

Keep the wings reasonably short. Huge wings look dramatic but make the bags awkward to pack into a tray.

7. Stamped Kraft Paper Halloween Bags

Best for: Cardmakers and stampers making a coordinated batch.

You’ll need: Kraft paper bags, Halloween stamps, an ink pad and scrap paper.

Slide scrap paper inside each bag to protect against ink transferring through. Stamp the front while the bag is flat, then leave it until the ink is dry.

A scattered pattern of pumpkins, stars or tiny ghosts looks lovely. Alternatively, stamp one large image and add a short greeting.

Fill and fold the top, then finish with a strip of washi tape.

If you enjoy adding stamped tags and die-cut details, our handmade Halloween treat bags and boxes with paper crafting supplies feature offers more ideas for decorating your packaging.

8. Spiderweb Muslin Drawstring Bags

Best for: Reusable Halloween gift pouches.

You’ll need: Plain muslin bags, a fabric marker and scrap cardboard.

Place cardboard inside the bag to stop the marker transferring to the back. Draw several lines radiating from one point, then join them with curved lines to form a web.

Add a small drawn spider if you like. Let the design dry and follow the fabric marker’s setting instructions before using the bag.

Choose a marker suitable for fabric rather than assuming an ordinary pen will survive washing.

These are lovely for a small stationery gift or a few individually wrapped treats.

9. Tissue Paper Pumpkin Parcels

Best for: Lightweight favors displayed together in a basket.

You’ll need: Orange tissue paper, green paper tape and a food-safe inner bag if needed.

Layer two roughly 25 cm squares of tissue paper. Put a small lightweight gift or sealed treat packet in the middle.

Gather the tissue around it and gently twist the excess at the top. Wrap green paper tape around the gathered neck to create a stem.

Leave a little breathing room around the filling rather than pulling the tissue tight.

These are delicate parcels. Avoid heavy toys, sharp corners and anything that could poke through the paper.

10. Witch’s Broom Paper Favor Bags

Best for: A Halloween table decoration that doubles as a favor.

You’ll need: Two small brown paper bags, scissors, twine and a paper straw.

Keep one bag intact as the inner container. On the second bag, cut narrow fringe from the open top down toward the base, stopping several centimetres above the bottom.

Place the intact bag inside the fringed one and add lightweight favors.

Position a paper straw upright between the two bags. Gather the fringed bag around the top of the inner bag and tie with twine, allowing the fringe to spread around the broom.

The inner bag holds the contents; the outer bag provides the decoration. Use a paper straw instead of a pointed stick for children’s favors.

11. Fold-Over Halloween Bag Toppers

Best for: A tidy finish for food-safe treat bags.

You’ll need: Treat bags, cardstock, a ruler, scissors and double-sided tape.

Measure the width of the filled bag while its top is flattened. Cut a cardstock rectangle slightly wider than the bag and about 8 cm tall.

Fold the cardstock in half to create a topper approximately 4 cm deep. Decorate the front with a stamped greeting, pumpkin or ghost.

Seal the inner bag first, then attach the topper with double-sided tape on both inside faces.

For loose food, position the topper above the food area. The cardstock is decoration rather than a food-contact liner.

12. Washi Tape Halloween Lunch Bags

Best for: Last-minute favors with very little cutting.

You’ll need: Paper lunch bags, washi tape and a marker.

Add two or three strips of Halloween washi tape across the front of each bag. Write “Boo to you!” or “A little Halloween treat” above them.

Fill the bag, fold down the top twice and secure it with stronger tape at the back.

Washi tape is lovely decoration, but some varieties don’t hold a filled bag closed particularly well.

This design also works nicely with leftover orange, black or purple patterned paper.

13. Halloween Envelope Gift Pouches

Best for: Flat non-candy treats.

You’ll need: New envelopes, cardstock scraps, glue and a marker.

Decorate the front of an envelope with a ghost, pumpkin or monster face. Slip in a sticker sheet, bookmark or small activity card and seal the flap.

Match the envelope to the gift before decorating. A large envelope works better for coloring sheets; a smaller one suits bookmarks.

These are especially useful when you want to give one thoughtful item rather than a bag full of tiny plastic toys.

14. Halloween Sock Gift Favors

Best for: Grandchildren, teens and small Halloween gifts.

You’ll need: A new pair of Halloween socks, ribbon and a gift tag.

Keep the socks together and roll or fold them neatly. Tie ribbon around the middle and add a “Treat your feet!” tag.

If including candy, put it in a separate sealed pouch and tie that to the sock bundle. You can also pair the socks with a bookmark or a small notebook.

It’s Halloween packaging that becomes part of the present, which is always a win in my book.

15. Pillowcase Ghost Gift Bags

Best for: A larger Halloween surprise with pajamas or books.

You’ll need: A clean white pillowcase, black felt or a fabric marker, ribbon and cardboard.

Lay the pillowcase flat and slide cardboard inside. Add a ghost face with a fabric marker, following its drying and setting instructions.

Alternatively, attach black felt eyes and a mouth with fabric glue suitable for the pillowcase fabric.

Once fully dry, fill with Halloween pajamas, a book or a cozy gift. Gather the open end and tie with ribbon.

For a temporary design, attach the face to a separate white fabric band and wrap that around the filled pillowcase.

If you’d rather try a small stitched project, take a look at this felt Halloween treat bag children can help make.

What Can You Put in Halloween Treat Bags Besides Candy?

A Halloween goodie bag doesn’t have to revolve around sugar. Choose fillers that suit the recipients’ ages and the size of your packaging.

Some useful options include:

  • Halloween sticker sheets
  • Bookmarks
  • Small coloring books
  • Crayon packs
  • Pencils and pencil toppers
  • Mini notebooks
  • Age-appropriate temporary tattoos
  • Play dough in its sealed container
  • Small craft kits
  • Halloween socks

For a classroom, check the school’s rules before buying food, toys or scented items. Choose age-appropriate fillers and avoid small detachable decorations for very young children.

Keep non-food favors separate from candy, and retain food packaging so parents can check ingredients. A non-candy bag is a useful choice, but don’t label it “allergy-safe” without checking its contents.

How to Make Halloween Treat Bags in a Batch

The easiest way to make twenty bags is to treat the process like a little assembly line.

  1. Make one sample. Check that the filling fits and the bag closes.
  2. Cut all matching pieces. Do every eye, ear or wing together.
  3. Decorate while the bags are flat. It’s easier to stamp, draw and glue.
  4. Allow everything to dry. Keep drying bags away from the filling station.
  5. Sort the contents into groups. This helps each recipient receive the same amount.
  6. Fill and close the bags. Add ribbon and tags last.

Skip individual bows if you’re short on time. A neat folded top with one decorative strip can look just as charming.

Budget Tips That Keep These Projects Affordable

Use one basic bag size and change the decoration rather than buying several styles of packaging.

Paper scraps make excellent faces, leaves and tags. Brown lunch bags work for monsters, pumpkins, mummies and stamped designs, so one packet can cover several ideas.

Work out your total cost including the filling before buying supplies. The little extras are usually where a budget creeps upward.

One useful filler, such as crayons or a notebook, can make a nicer gift than several novelty items.

For more packaging styles to browse, our collection of spooky Halloween treat bags includes fabric, paper and printable projects.

Common Halloween Treat Bag Mistakes to Avoid

Decorating the closing area: Leave space at the top for folding, taping or tying.

Filling delicate bags too heavily: Tissue paper and decorative paper pouches are best for lightweight gifts.

Using the wrong glue: A glue stick suits paper faces. Fabric projects need an adhesive appropriate for the fabric.

Putting unwrapped food against craft materials: Keep treats inside suitable food-safe packaging.

Buying supplies before choosing fillers: Measure the gift first. A beautifully decorated bag is less helpful when the crayons don’t fit.

DIY Halloween Treat Bag Questions

What is the easiest Halloween treat bag to make?

A white paper ghost bag is one of the simplest options. Draw the face, add the filling and fold the top closed. Washi tape bags are another quick choice.

Can I make Halloween treat bags without sewing?

Yes. Paper bags, envelope pouches, tissue paper parcels and decorated ready-made muslin bags all avoid sewing.

What works best for classroom Halloween favors?

Simple paper bags or envelope pouches are easy to prepare in a batch. Check school requirements first and keep the decorations and contents appropriate for the children’s ages.

Can I use recycled supplies?

Clean paper scraps, plain sections of old envelopes and suitable fabric remnants can become decorations. Use new food-safe inner packaging for anything edible.

Can these bags be used for trick-or-treating?

Most of these designs are small party favors. For collecting a larger haul outdoors, choose a sturdy tote or bucket with secure handles.

A handmade Halloween treat bag doesn’t need to be elaborate to feel special. Pick a face you like, use what you have and give yourself permission to keep it simple.

Those slightly uneven eyes and crooked paper teeth? They’re often the best part.

RSS feed: More Articles More Articles

  • Easy Fonts to Add to Your Cross Stitch
  • 10 Cat-Themed Scrapbook Layout Templates for Single-Page Designs (Perfect for 2–3 Photos of Your Favourite Feline)
  • Patchwork Blanket Knitting Patterns
  • DIY Ghost Wreath Using a Wire Coat Hanger: Easy Light-Up Halloween Decor
  • DIY Clay Flower Frog Tutorial – A Handmade Tool for Arranging Blooms
  • DIY Vintage Halloween Tin Can Decor With Printable Autumn Artwork – Free Printable
  • 10 Craft Gifts for Tweens Who Have Outgrown Kids’ Kits
  • Spooky Season Sweater Embroidery Design – Etsy Review
  • 5 FREE Bats and Moons in Windows SVG Die Cut Files for Halloween
  • The Forest Valley Shawl – Crochet Pattern

Pick Your Blog

  • Sewing
  • Knitting
  • Quilting
  • Crochet
  • Home & Garden
  • Recycled Crafts
  • Scrapbooking
  • Card Making
  • Polymer Clay
  • Cross-Stitch
  • Edible Crafts
  • Felting
  • Glass Art
  • Indie Crafts
  • Kids Crafts
  • Jewelry Making
  • Lesson Plans
  • Needlework
  • Bath & Body
  • Party Ideas
  • Candle Making
  • DIY Weddings
  • Not Craft
  • Free Craft Projects

Copyright © 2026 · CraftGossip | Start Here | Contact Us | Link to Us | Your Editors | Privacy and affiliate policy