• Home
  • Suggest A DIY
  • DIY Newsletter

Craft Gossip

Independent craft blog since 2007

  • About CraftGossip
  • Our Network
    • Bath & Body Crafts
    • Candle Making Ideas
    • Crochet Ideas
    • Cross Stitch
    • Edible Crafts
    • Felting Patterns
    • Glass Art
    • Home & Garden Ideas
    • Indie Crafts
    • Jewelry Making
    • Kids Crafts
    • Knitting Patterns
    • Lesson Plans
    • Needlework
    • Party Ideas
    • Polymer Clay
    • Quilting Ideas
    • Recycled Crafts
    • Scrapbooking
    • Sewing Patterns
    • Card Making
    • DIY Weddings
    • Not Craft Ideas
  • Giveaways
  • Roundups
  • Store
  • Search

Maoli Perfumes

June 22, 2009 by jessica neaves

small_maoli-cd_web-bottleMaoli Perfumes, a perfumery based out of Washington, was created when the Hughes family left tropical Hawaii for the rainy Pacific Northwest.  Their two young children, Kai and Kalani, were homesick for the beaches and heat of the islands where they spent their first years and asked their mother if they could make “their own cologne that smells like sunshine.”  Their mother studied natural perfumery with the boys and Colonia Dulce eau du cologne was born.

Colonia Dulce smells intoxicatingly of “sweet wild lime, juicy Ka’u Gold oranges, pink grapefruit, orange blossoms and hand-picked pikake. Balmy notes of  vanilla, nuances of cacao, caramel and coconut milk never overwhelm but rather comfort with their delicate sweetness.”   I first noticed the citrus and pikake scents upon opening the sample and I was delighted, as pikake always reminds me of my grandmother’s home in Hawaii.

Maoli, which means real or true in Hawaiian, is also the philosophy behind their dedication to honoring the art of natural perfumery by making real perfumes.  Created for kids and those who are young at heart, Colonia Dulce is made with pure essential oils, certified organic and made without synthetic ingredients.  It is also vegan and never tested on animals.  Maoli also donates portions of its proceeds to various non-profit organizations.  They are also committed to responsible packaging and the environment.

Maoli is a true family business, with dad doing the graphic design work, mom helping with office management, and Kai and Kalani mixing the cologne, as well as packaging and shipping orders.

Deluxe samples are available for only $5 and a 1 oz bottle is available for only $28, available online only here.
«
»

Have you read?

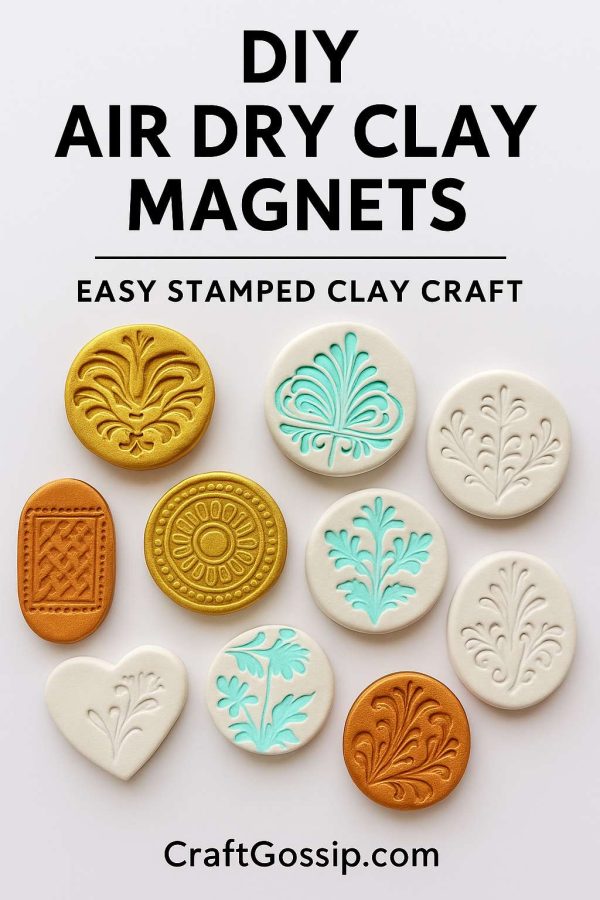
DIY Air Dry Clay Magnets – Easy Stamped Clay Craft

There’s something wonderfully nostalgic about clay crafts, isn’t there? The cool, smooth texture in your hands, the way it slowly transforms with just a little pressure and imagination—it’s both soothing and creative. Today, we’re making DIY air dry clay magnets that are stamped, painted, and perfect for adding a handmade touch to your fridge or craft room.

This project is simple, relaxing, and looks far more “designer” than it really is. Think of it as pottery without the kiln—no fancy equipment needed!

Why You’ll Love This Project

  • Uses air dry clay – no oven or kiln.

  • Great for leftover clay scraps.

  • Endless possibilities with different stamps, textures, and paints.

  • Makes thoughtful handmade gifts (great for teachers, neighbors, or stocking stuffers).

  • Works as a fun craft session with teens or grandkids.

Supplies You’ll Need

  • Air dry clay (white works best for stamping)

  • Rubber stamps or textured items (lace, doilies, leaves, even buttons!)

  • Acrylic paint or ink pads

  • Rolling pin (or just grab a glass bottle)

  • Circle cookie cutter (or jar lid)

  • Magnets (strong flat-backed ones work best)

  • Strong craft glue or hot glue gun

  • Sealer (optional: Mod Podge or matte varnish)

Step-by-Step Tutorial

Step 1 – Roll Out Your Clay

Start with a small ball of clay and roll it out to about ¼ inch thick. Not too thin, or it’ll crack while drying, and not too chunky, or your magnets will be too heavy.

Step 2 – Stamp and Texture

Press your chosen rubber stamp or textured object firmly into the clay. Don’t worry about perfection—slight variations give that handmade charm.

Tip: If you’re using an ink pad, you can ink the stamp before pressing to add instant color to the impression.

Step 3 – Cut Out Shapes

Use a cookie cutter, jar lid, or knife to cut neat circles (or any shape you like—hearts, squares, even freeform ovals).

Step 4 – Smooth Edges

Gently smooth the edges with damp fingers or a bit of water. This gives a polished finish.

Step 5 – Dry

Place your pieces on baking paper and allow them to dry for 24–48 hours. Flip halfway through to prevent curling.

Step 6 – Paint or Highlight

Once dry, you can leave them natural or lightly brush paint over the raised designs to highlight the texture. Metallics (gold, silver, copper) look stunning, but even soft pastels give a pretty effect.

Step 7 – Seal (Optional)

If you want extra durability, brush on a thin coat of Mod Podge or varnish.

Step 8 – Attach Magnets

Finally, glue a magnet to the back of each piece. Let the glue cure fully before sticking them on your fridge.

Variations to Try

  • Rustic farmhouse look: Use lace or burlap for stamping and paint with a whitewash effect.

  • Modern boho: Try geometric stamps and metallic paint accents.

  • Seasonal magnets: Use themed stamps (snowflakes, flowers, leaves) for year-round sets.

  • Kids’ art version: Let the kids press buttons, Lego bricks, or small toys into the clay for fun patterns.

Tips

These don’t just work as magnets—you can glue them onto gift tags, turn them into brooches, or even make them into pendants for necklaces. Once you start, you’ll be stamping everything in sight (don’t say I didn’t warn you!).

Handmade doesn’t have to be complicated or expensive. These DIY air dry clay magnets prove just that—simple materials, a little creativity, and you’ve got a set of unique, functional mini artworks. Perfect for gifting, decorating, or just adding a bit of joy to the everyday.


RSS feed: More Articles More Articles

  • DIY Air Dry Clay Magnets – Easy Stamped Clay Craft
  • HALO-5 Embroidery Machine Review: Are Five Needles Worth the Upgrade?
  • 14 FREE Vintage Botanical and Patterned Papers
  • How to Turn Any Quilt Pattern Into a Scrap Quilt (Without It Looking Messy)
  • How to Cross Stitch on Paper
  • Charity Crochet Pattern: Vintage Baby Bunting Cocoon
  • Emotional Support Ollivander Octopus Free Crochet Pattern
  • How to Make a Fun Fold Halloween Card
  • Freebie Friday – Vintage Halloween Candy Wrappers (Printable Ephemera)
  • Free Felting Tutorial Friday: Firm Felting with Armature

Pick Your Blog

  • Sewing
  • Knitting
  • Quilting
  • Crochet
  • Home & Garden
  • Recycled Crafts
  • Scrapbooking
  • Card Making
  • Polymer Clay
  • Cross-Stitch
  • Edible Crafts
  • Felting
  • Glass Art
  • Indie Crafts
  • Kids Crafts
  • Jewelry Making
  • Lesson Plans
  • Needlework
  • Bath & Body
  • Party Ideas
  • Candle Making
  • DIY Weddings
  • Not Craft
  • Free Craft Projects

Copyright © 2026 · CraftGossip | Start Here | Contact Us | Link to Us | Your Editors | Privacy and affiliate policy