• Home
  • Suggest A DIY
  • DIY Newsletter

Craft Gossip

Independent craft blog since 2007

  • About CraftGossip
  • Our Network
    • Bath & Body Crafts
    • Candle Making Ideas
    • Crochet Ideas
    • Cross Stitch
    • Edible Crafts
    • Felting Patterns
    • Glass Art
    • Home & Garden Ideas
    • Indie Crafts
    • Jewelry Making
    • Kids Crafts
    • Knitting Patterns
    • Lesson Plans
    • Needlework
    • Party Ideas
    • Polymer Clay
    • Quilting Ideas
    • Recycled Crafts
    • Scrapbooking
    • Sewing Patterns
    • Card Making
    • DIY Weddings
    • Not Craft Ideas
  • Giveaways
  • Roundups
  • Store
  • Search

Making Popsicle Stick Playing Cards – Surprisingly Fun and Totally Charming!

May 15, 2025 by Shellie Wilson

Okay, I’ll be honest — when I first saw the Popsicle Stick Playing Cards project floating around on Instructables, I wasn’t entirely sold. Popsicle sticks and playing cards? Sounds like a summer camp throwback, right? But curiosity got the best of me (as it usually does with anything slightly crafty and slightly quirky), and I decided to give it a whirl.

And let me just say: I loved this project way more than I expected to.

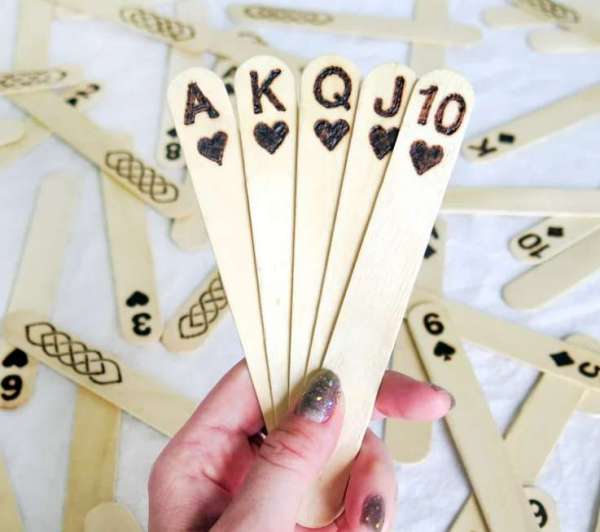
At its core, this DIY is super simple. You’re basically fusing old playing cards with humble craft sticks to create chunky, tactile “cards” that are durable enough for little hands — or just to enjoy as a cool novelty set. The end result? A full deck that feels a little bit rustic, a little bit retro, and totally unique.

What I really appreciated about this project was how accessible it was. You don’t need anything fancy to get started — just some basic glue, scissors, popsicle sticks (standard size worked fine for me), and of course, a deck of cards that’s either past its prime or missing a few members. We all have one of those lying around somewhere, right?

I ended up using an old UNO deck that was looking pretty rough around the edges, and it turned out great. The cards stick well to the wood, and once everything’s dry, you get these sturdy, chunky pieces that have such a fun hand-feel. It almost reminds me of vintage tile games or big wooden dominoes.

This would be such a great project for kids — whether it’s as a rainy-day craft, a classroom activity, or even as part of a DIY learning game (think memory matching or number recognition). I can see this also being a hit with older adults or people who need cards with a little more grip or visual clarity.

Plus, if you’re a DIY gift-giver like I am, imagine pairing these with a handmade fabric pouch or wooden box for a personalized twist. It would make a really thoughtful and low-cost present for a game lover or nostalgic friend.

Now, one tiny tip: make sure to let everything dry completely before stacking or using them. I rushed a bit on my first batch and ended up with a few cards stuck together. A bit of sanding or sealing would probably help prevent that too, especially if you want them to last.

Overall, this craft hit all the right notes — easy, upcycled, fun, and surprisingly satisfying to hold in your hands when they’re done. It’s a fantastic way to breathe new life into something old, and I honestly can’t wait to make a few themed sets as gifts.

So if you’re on the fence, give it a try. It’s playful, it’s practical, and hey, it might just be your new favorite weekend project.

Read These Next

  • 25 Knitting Projects That Sell Well At Craft Fairs,…
  • 45 amazing ways to reuse and recycle old playing cards
«
»

Have you read?

How to Travel with Cross Stitch

Cross stitch is not a craft I generally travel with (since I’m not that good at it, I prefer not to be moving while I’m doing it) but I’m sure there are lots of stitchers who would like to take their projects with them when they travel. 

Koekoek has a post all about cross stitching on a plane, which is a great plan since it’s lots of uninterrupted time to work. As mentioned in the post, you should be able to bring embroidery needles (which tend not to be that sharp anyway) on an airplane with you. 

Regulations in the United States say that scissors with blades up to 4 inches/10 cm are allowed in the cabin, but whether they are allowed by security as you pass through it is up to their discretion. And thread cutters that use a razor blade are not supposed to be allowed at any time. 

Alternatives include bringing nail clippers to snip your threads, or pre-cutting thread and placing it on bobbins so you can stitch on the plane. Then pack scissors in your checked bag so you can cut any loose ends or extra long strands later. 

Check out the post at Koekoek for more tips on traveling with cross stitch and suggestions for projects to pack when traveling. I’ve also written in the past about this post from Caterpillar Cross Stitch about traveling with cross stitch supplies and, importantly, what to do to make your screening as smooth as possible. And, importantly, what to do if the security agents question your supplies or want to confiscate anything you brought. 

And that’s a great tip, too: if you are packing scissors in your carry on but you’re also checking a bag, pack extras there just in case. 

Do you have any tips for traveling with cross stitch projects? I’d love to hear them. Also check out my post about planning a travel stitching kit. 

RSS More Articles

  • FREE Die Cut Hummingbird Shaker Card
  • Book Review: Better Homes and Gardens Flea Market Decorating
  • DIY Backyard Water Play Ideas To Keep Kids Cool All Summer
  • Book Review Wednesday: The Complete Guide to Trinket Dishes for Beginners
  • How to Embroider on Canvas Shoes for a Custom Look
  • 12 Unique Borders for Scrapbook Layouts
  • Book Review: Wild Your World
  • Knit a Stunning Bestiary Scarf
  • Quick Quilting Projects for the 4th of July
  • Samplers to Cross Stitch for the Fourth of July

Pick Your Blog

  • Sewing
  • Knitting
  • Quilting
  • Crochet
  • Home & Garden
  • Recycled Crafts
  • Scrapbooking
  • Card Making
  • Polymer Clay
  • Cross-Stitch
  • Edible Crafts
  • Felting
  • Glass Art
  • Indie Crafts
  • Kids Crafts
  • Jewelry Making
  • Lesson Plans
  • Needlework
  • Bath & Body
  • Party Ideas
  • Candle Making
  • DIY Weddings
  • Not Craft
  • Free Craft Projects

Copyright © 2026 · CraftGossip | Start Here | Contact Us | Link to Us | Your Editors | Privacy and affiliate policy