• Home
  • Suggest A Craft
  • DIY Newsletter

Craft Gossip

The largest independent craft review site since 2007

  • About CraftGossip
  • Our Network
    • Bath & Body Crafts
    • Candle Making Ideas
    • Crochet Ideas
    • Cross Stitch
    • Edible Crafts
    • Felting Patterns
    • Glass Art
    • Home & Garden Ideas
    • Indie Crafts
    • Jewelry Making
    • Kids Crafts
    • Knitting Patterns
    • Lesson Plans
    • Needlework
    • Party Ideas
    • Polymer Clay
    • Quilting Ideas
    • Recycled Crafts
    • Scrapbooking
    • Sewing Patterns
    • Card Making
    • DIY Weddings
    • Not Craft Ideas
  • Giveaways
  • Roundups
  • Store
  • Search

Instructions for Elliot “Moose” doll by “arsarca” jay smith (Felted)

July 22, 2009 by Linda Lanese

    400x555  moose

I found this pattern on Burda Styles but I can’t find out much about Jay.  Jay said “I unsuccessfully felted an old, holey sweater (unsuccessfully as I think the label lied & the “100% pure virgin wool” label only applied to the wool component of the sweater) and turned it into a very loose interpretation of Elliot Moose. I cut the body out so that the neck was formed of the bottom of the sweater (ie., upside down) and along the side hem of the sweater. The head is an arm– the wrist is actually the inside of the mouth. And then hand-sewed the head to look like a moose. The ears are freehand”.  Make sure yours is wool J

Materials:

Old sweater

Old pillow or batting

small scrap of other material for tongue

two button eyes small amount of embroidery thread for nose

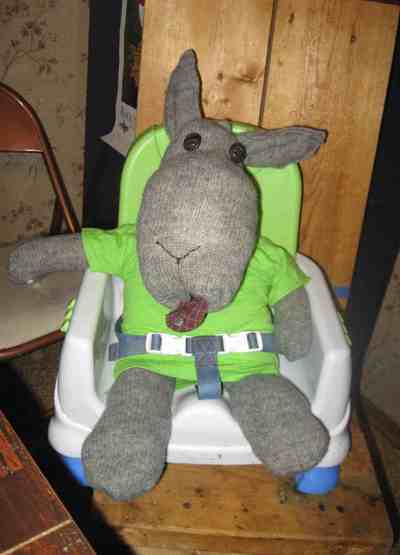
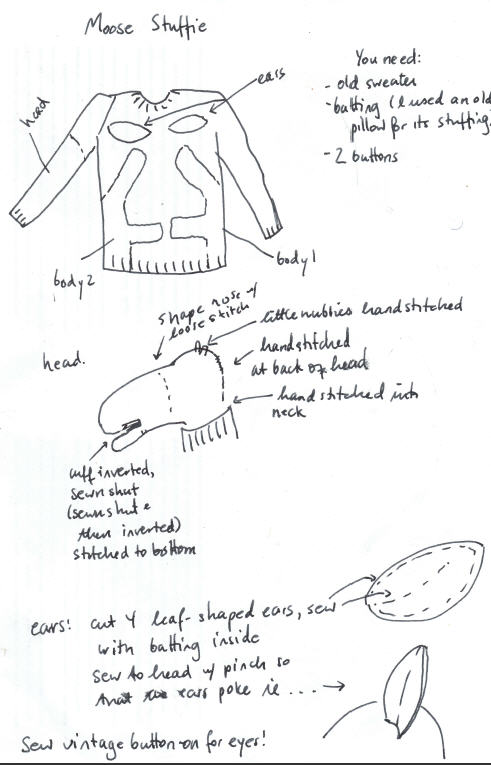
A wonderful, easy-to-make stuffed moose for kids. I used only already-used material, stuff that was destined for the dump, so this was a zero-footprint project! (Thread excluded, though.) Instructions are in the “pattern”. I forgot to mention: sewing up the snout with embroidery thread! I modified an old t-shirt to fit the toy, too. Also not hard stuff…. Please contact me if you need help, though; it’s pretty intuitive stuff but my instructions might confuse!  Ps. NEW! Instructions! Including tongue, which I forgot to mention!

1. Cut pattern. The two body pieces are cut on the seam of the sweater, with what will

be the animal’s neck on the ribbing of the waist of the sweater.

2. Sew wrong sides of body together, invert, and stuff.

3. Cut arm off of sweater. Sew “tongue” into wrong side wrist of sweater, closing off wrist

in the process, preserving good side of sweater for outside of head. (I used the cuff of

an old flannel shirt for the tongue.)

4. Tuck wrist ribbing of sleeve and tongue into sleeve; tack down the back of the mouth

to the underside of the moose’s mouth. Stuff so that the nose becomes elongated

and mooselike.

5. Loosely hand stitch around moose’s nose to preserve the big nose. Sew buttons just

above the line of stitching for eyes. Embroider the nose and cleft.

6. Stitch the little nubbins on the head above the eyes. Fold together the edges of the

back of the head, sew together by hand.

7. Make ears by cutting four teardrop-shaped pieces of sweater. Sew outer edge and

then stuff, sew line into ears. Hand sew to head on a curve so that the ears stand up.

Placement should be in line with nubbins, more or less.

8. Stuff the head into the neck, adding more stuffing if necessary. Hand sew neck ribbing

so that the head stands up and looks nice.

9. I cut down an old t-shirt to fit Elliot.

10.Take a picture and post for everyone to see!

Read These Next

  • 25 Primitive Folk Art Style Sewing Patterns
  • 12 Different Styles of Interactive Cards
«
»

Have you read?

Make Day and Night Floral Cards with the Same Stamp Set

Make Day and Night Floral Cards with the Same Stamp Set

I love a versatile stamp set, I know I’m getting my monies worth if I feel like I can create many different types of cards with the same stamp set. Anna is sharing a terrific way to get two very different looks using the same floral stamp set from Hero Arts for daytime and nighttime card designs. For both cards she heat embossed the flowers onto vellum paper using white embossing powder, die cutting them out. For the day card she colored on the *backside* using Zig Clean Color markers, for the night there’s no coloring. She die cut an oval from white cardstock, inking and splattering the opening for the night card and used the plain oval for the day, adding a die cut floral background behind it. Each card also has a heat embossed sentiment.

Visit the Hero Arts blog for more photos and to watch her video tutorial.

-Heather

You can shop for these products at Hero Arts


RSS More Articles

  • Make Day and Night Floral Cards with the Same Stamp Set
  • Book Review: “Sewing Guide to Cancer ” – A Heartfelt and Practical Companion for Difficult Times
  • 12 School Graduation Scrapbook Layout Ideas
  • A Whimsical Sock Pattern to Blow Your Mind
  • Fast, Fun, and Perfect for Vintage Fabrics: The Chunky Cuts Quilt Pattern
  • Free Crochet Pattern – Pachira Tee: The Ultimate Oversized Comfort
  • Exploring the Pink City Collection: A Fusion of Boho Style and India’s Timeless Charm
  • Zero-Waste Embroidery: How to Use Scrap Fabric and Threads
  • Fun Facts About Flags
  • Cross Stitch Patterns Fit for a Pool Party

Pick Your Blog

  • Sewing
  • Knitting
  • Quilting
  • Crochet
  • Home & Garden
  • Recycled Crafts
  • Scrapbooking
  • Card Making
  • Polymer Clay
  • Cross-Stitch
  • Edible Crafts
  • Felting
  • Glass Art
  • Indie Crafts
  • Kids Crafts
  • Jewelry Making
  • Lesson Plans
  • Needlework
  • Bath & Body
  • Party Ideas
  • Candle Making
  • DIY Weddings
  • Not Craft
  • Free Craft Projects

Copyright © 2025 · CraftGossip | Start Here | Contact Us | Link to Us | Your Editors | Privacy and affiliate policy