• Home
  • Suggest A DIY
  • DIY Newsletter

Craft Gossip

Independent craft blog since 2007

  • About CraftGossip
  • Our Network
    • Bath & Body Crafts
    • Candle Making Ideas
    • Crochet Ideas
    • Cross Stitch
    • Edible Crafts
    • Felting Patterns
    • Glass Art
    • Home & Garden Ideas
    • Indie Crafts
    • Jewelry Making
    • Kids Crafts
    • Knitting Patterns
    • Lesson Plans
    • Needlework
    • Party Ideas
    • Polymer Clay
    • Quilting Ideas
    • Recycled Crafts
    • Scrapbooking
    • Sewing Patterns
    • Card Making
    • DIY Weddings
    • Not Craft Ideas
  • Giveaways
  • Roundups
  • Store
  • Search

How to photograph your indie crafts

September 22, 2009 by Minnie

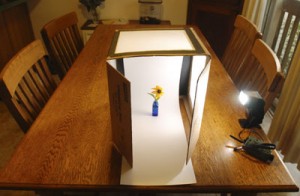
lightbox01There is a lot of talk about how to display your hand crafted items for sale. It’s important that first glance at a photo of your crafts. If your photo is too visually cluttered people can pass it by and you want to grab peoples attention and then keep it long enough for them to see your product, where they can buy it and what your name is.

For small items a lightbox is a great way to get a soft, difused, uncluttered photo that really showcases the product and not it’s surroundings. You can buy and expensive one from photography stores and you can also make one on the cheap and get great results.

there are tons of good DIY lightbox tutorials on the web and here are just a few that I have found.

Strobist has a DIY 10$ Macro Photo Studio tutorial that steps it out for you ad gets great results.

This DIY light tent tutorial from Digital Photography School looks similar.

Cheap Shooter has made a lighbox from PVC pipe.

I guess it depends on what you have lying around!

you can see peoples results in this flickr pool DIY Lightbox Addicts. OO, here is a flickr pool for other DIY photography equipment! I love the internet!
Share This

«
»

Have you read?

Vintage Crochet Baby Dress Pattern Review

There is something especially charming about a vintage baby dress pattern, and this Crocheted Cutie Dress #3112 has all the details that make older crochet designs so appealing.

The dress features a neatly shaped bodice, short sleeves, contrast stripes and a full lace skirt with a scalloped finish. It has that classic heirloom look without feeling overly formal, which makes it suitable for birthdays, family photos, baby showers or simply as a special handmade outfit.

One of the nicest things about this design is the balance between the structured upper section and the much softer, more decorative skirt. The bodice is worked in a simple repeating texture, while the skirt opens into a detailed lace pattern that gives the dress plenty of movement and fullness. The white trim around the neckline, sleeves and hem also helps define the shape beautifully.

The pattern includes instructions for sizes 1 and 2, with the second size shown in parentheses throughout. As with many vintage patterns, the sizing does not line up neatly with modern age labels, so it is important to check the gauge and finished proportions rather than relying on the size number alone.

This would be best suited to an intermediate crocheter, or a confident beginner who is comfortable reading traditional pattern instructions. The design uses chain stitches, single crochet, double crochet, treble crochet, colour changes, shaping, repeated lace sections and separate pieces that are sewn together during finishing.

The sleeves and collar are made separately and attached to the completed bodice. The back is finished with three buttons, giving the dress a practical opening while keeping the front clean and decorative.

The original version uses pink and white mercerized crochet cotton, but the design works beautifully in more modern combinations too. Sage and cream give it a soft botanical feel, lemon and white make it fresh and summery, while orange and ivory create a much warmer retro look.

Because the pattern was originally written for vintage crochet cotton and a steel hook, I would strongly recommend making a gauge swatch before beginning. Modern threads and hook-sizing systems can vary, and the bodice needs to fit correctly before the lace skirt is added.

The professionally reformatted PDF is much easier to follow than an unedited scan. It keeps the original stitch counts and construction while improving spacing and readability. It also includes a modern mockup and the original vintage reference image, which is helpful when visualising the finished shape.

Overall, this is a lovely pattern for anyone who enjoys making vintage-inspired baby clothes. The lace skirt is the real highlight, but the striped bodice and matching collar give the finished dress a polished, complete look.

RSS More Articles

  • Cute Little Backpack Knitting Patterns
  • Easy Pen and Paper Games for Road Trips and Beyond
  • Handmade Pretend Play Food Ideas For Kids’ Kitchens, Classrooms And Crafty Grandparents
  • Air-Dry Clay Sunflower Trinket Dish Tutorial
  • Beginner-Friendly Crochet Scarves and Cowls
  • Satisfying Adult Snacks That Crush Cravings and Boost Energy
  • 30 Jumpsuits You Can Sew Yourself – From Effortless Weekend Wear to Showstopping Styles
  • You Won’t Believe These 20 Upcycled Bar Tables and Carts – From Trash to Tipsy
  • Young Lady in a Hammock Hand Embroidery Pattern – Etsy Review
  • Crafty Themed Mini Scrapbook Album

Pick Your Blog

  • Sewing
  • Knitting
  • Quilting
  • Crochet
  • Home & Garden
  • Recycled Crafts
  • Scrapbooking
  • Card Making
  • Polymer Clay
  • Cross-Stitch
  • Edible Crafts
  • Felting
  • Glass Art
  • Indie Crafts
  • Kids Crafts
  • Jewelry Making
  • Lesson Plans
  • Needlework
  • Bath & Body
  • Party Ideas
  • Candle Making
  • DIY Weddings
  • Not Craft
  • Free Craft Projects

Copyright © 2026 · CraftGossip | Start Here | Contact Us | Link to Us | Your Editors | Privacy and affiliate policy