• Home
  • Suggest A Craft
  • DIY Newsletter

Craft Gossip

The largest independent craft review site since 2007

  • About CraftGossip
  • Our Network
    • Bath & Body Crafts
    • Candle Making Ideas
    • Crochet Ideas
    • Cross Stitch
    • Edible Crafts
    • Felting Patterns
    • Glass Art
    • Home & Garden Ideas
    • Indie Crafts
    • Jewelry Making
    • Kids Crafts
    • Knitting Patterns
    • Lesson Plans
    • Needlework
    • Party Ideas
    • Polymer Clay
    • Quilting Ideas
    • Recycled Crafts
    • Scrapbooking
    • Sewing Patterns
    • Card Making
    • DIY Weddings
    • Not Craft Ideas
  • Giveaways
  • Roundups
  • Store
  • Search

How to Make Ice Candles

December 28, 2011 by SandraW


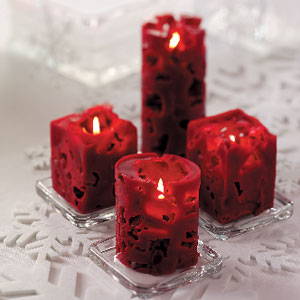
Winter is a magical time of year, with its glistening snow and frost-covered landscapes. It’s the perfect time to cozy up by the fire and enjoy the warmth of candles. If you’re looking for a unique candle-making project to try this winter, why not make ice candles?

Ice candles are made by pouring hot wax over ice, creating a beautiful and delicate lacy effect. The ice melts as the wax hardens, leaving behind a unique and stunning candle. Here’s how to make your own ice candles. See How to Make Candles at Taste of Home for full instructions.

Materials:

Candle wax (paraffin, soy, or beeswax)
Candle wicks
Ice (in various sizes and shapes)
Double boiler
Thermometer
Fragrance oil (optional)
Candle dye (optional)
Instructions:

Melt the wax
Begin by melting your candle wax in a double boiler. Use a thermometer to monitor the temperature of the wax, and keep it between 170-180 degrees Fahrenheit. You can use paraffin wax, soy wax, or beeswax, depending on your preference.

Prepare the ice
While the wax is melting, prepare your ice. You can use ice cubes, crushed ice, or larger ice blocks, depending on the size and shape of the candle you want to make. Place the ice in a container or mold, leaving a space in the center for the wick.

Add fragrance and color (optional)
If you want to add fragrance or color to your candle, you can do so now. Add a few drops of fragrance oil to the melted wax and stir well. You can also add candle dye to achieve the desired color.

Insert the wick
Once the wax has reached the desired temperature and consistency, insert the wick into the center of the ice mold. Make sure the wick is straight and centered.

Pour the wax
Carefully pour the melted wax over the ice, making sure to cover it completely. The hot wax will melt the ice, creating a beautiful and unique lace effect. Make sure to pour slowly and evenly to avoid creating air bubbles.

Let the candle cool and harden
Once you have poured the wax, let the candle cool and harden completely. This may take several hours, depending on the size and shape of the candle. You can speed up the process by placing the candle in the refrigerator or freezer.

Remove the candle from the mold
Once the candle has hardened, you can remove it from the mold. Gently break away the ice, being careful not to damage the delicate lace effect. Trim the wick to the desired length.

Enjoy your new ice candle!


Read These Next

  • 13 Ways to Embellish Boring Candles
  • 12 DIY Candles You Can Make At Home Using Ice
«
»

Have you read?

How to Make a Hooded Cape for Kids and Adults – Easy Sewing Tutorial

Looking for the perfect DIY hooded cape for costumes, cosplay, or just staying cozy? This beginner-friendly sewing tutorial will show you how to create a versatile hooded cape that works for kids and adults alike! Whether you’re making a magical cloak for Halloween, a fairy tale-inspired cape for dress-up, or a stylish winter layer, this project is simple yet stunning.

The tutorial includes clear step-by-step instructions with helpful tips on choosing the right fabric and adjusting the pattern for different sizes. Plus, with minimal sewing skills required, this is a great project for both beginners and experienced sewists.

Get ready to stitch up your own custom hooded cape—perfect for wizards, princesses, or just staying warm in style!

Check out the full tutorial here!

Check out these other patterns and tutorials we wrote about

13 Awesome Halloween Cape Free Sewing Patterns

How to sew a custom kids play cape

Sewing pattern: Easy Halloween cape

RSS More Articles

  • How to Make a Hooded Cape for Kids and Adults – Easy Sewing Tutorial
  • Designer Spotlight: Murder Puffin
  • DMC Striker Embroidery Pattern – A Free Football-Themed Stitch for Sports Fans
  • Knits to Make for Your Labubu
  • Little Birds: 26 Handmade Projects to Sew, Stitch, Quilt and Love
  • Stenciling Like a Pro? You NEED These Must-Have Supplies
  • 15 Highland Cows You Can Crochet
  • Etsy Spotlight – The Thomas Boys Shirt Sewing Pattern
  • 7 FREE Back to School SVG Cut Files
  • How to Make a Sticks and Stones Quilt – Free Quilting Tutorial

Pick Your Blog

  • Sewing
  • Knitting
  • Quilting
  • Crochet
  • Home & Garden
  • Recycled Crafts
  • Scrapbooking
  • Card Making
  • Polymer Clay
  • Cross-Stitch
  • Edible Crafts
  • Felting
  • Glass Art
  • Indie Crafts
  • Kids Crafts
  • Jewelry Making
  • Lesson Plans
  • Needlework
  • Bath & Body
  • Party Ideas
  • Candle Making
  • DIY Weddings
  • Not Craft
  • Free Craft Projects

Copyright © 2025 · CraftGossip | Start Here | Contact Us | Link to Us | Your Editors | Privacy and affiliate policy