• Home
  • Suggest A DIY
  • DIY Newsletter

Craft Gossip

Independent craft blog since 2007

  • About CraftGossip
  • Our Network
    • Bath & Body Crafts
    • Candle Making Ideas
    • Crochet Ideas
    • Cross Stitch
    • Edible Crafts
    • Felting Patterns
    • Glass Art
    • Home & Garden Ideas
    • Indie Crafts
    • Jewelry Making
    • Kids Crafts
    • Knitting Patterns
    • Lesson Plans
    • Needlework
    • Party Ideas
    • Polymer Clay
    • Quilting Ideas
    • Recycled Crafts
    • Scrapbooking
    • Sewing Patterns
    • Card Making
    • DIY Weddings
    • Not Craft Ideas
  • Giveaways
  • Roundups
  • Store
  • Search

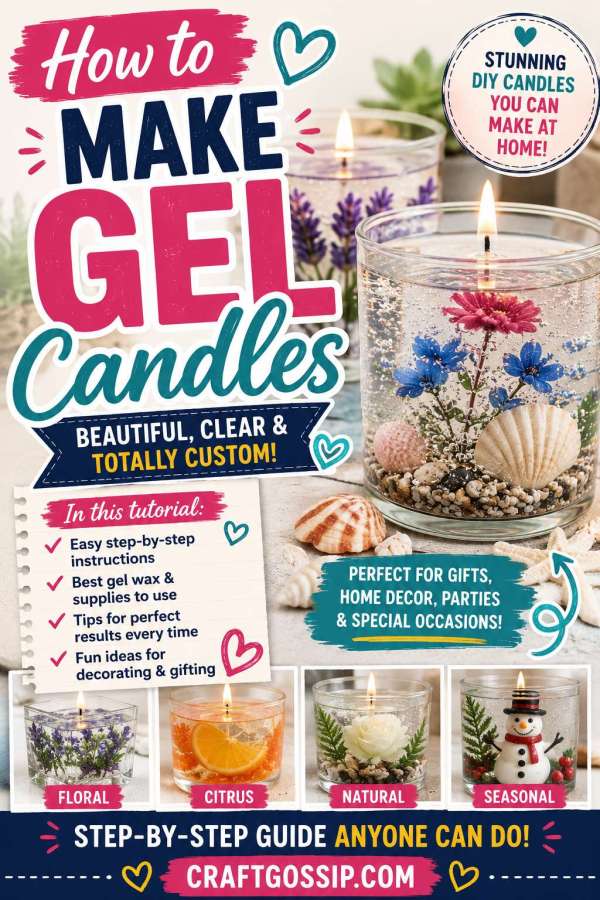
How To Make Gel Candles

June 28, 2018 by Shellie Wilson

Gel candles are a unique and beautiful way to create stunning, long-lasting candles that can add a touch of elegance and ambiance to any room. Gel candles differ from traditional wax candles in that they are made from a special gel that is created by mixing mineral oil and polymer resin. The result is a more solid yet transparent finish that allows for a variety of creative possibilities.

If you’ve never made gel candles before, don’t worry! This project will cover the basics of gel candle making and help you get started on your own creations. The process is relatively simple, and with a few basic supplies and a little bit of creativity, you can create your own beautiful gel candles.

To make gel candles, you will need some basic supplies such as gel wax, a wick, fragrance oils, colorants, and any decorative items you want to add. You can purchase a gel wax kit that includes everything you need or buy the supplies individually.

The first step in making gel candles is to prepare your container. You can use any heat-resistant glass or plastic container, as long as it is clean and dry. Then, attach the wick to the bottom of the container using a wick sticker or a drop of hot glue.

Next, melt the gel wax in a double boiler or microwave. Gel wax should be melted at a low temperature to avoid burning the oil. After the gel wax has melted, add your desired fragrance oils and colorants. Stir well to ensure that the color and fragrance are evenly distributed throughout the wax.

Once the wax has cooled slightly, pour it into the prepared container, taking care not to disturb the wick. You can also add decorative elements such as dried flowers, glitter, or other small items at this point. Allow the candle to cool and solidify completely before trimming the wick and lighting the candle.

One of the great things about gel candles is their transparency, which allows for endless creative possibilities. You can layer different colors of gel wax to create a unique effect, or add decorative items that will float within the wax, giving a unique and beautiful appearance.

In conclusion, gel candles are a unique and fun way to create beautiful candles that will bring a touch of elegance and ambiance to any room. With a little bit of creativity and some basic supplies, you can create your own stunning gel candles that will be the envy of all your friends and family. So why not give it a try and see what you can create?
basics of Gel Candle Making.


«
»

Have you read?

Hubcap Creatures: Transforming Roadside Finds into Sculptural Wildlife

Hubcap Creatures is the creative project of British sculptor Ptolemy Elrington, who has transformed discarded hubcaps into captivating sculptures of wildlife. Operating from Brighton, Elrington has been crafting these unique pieces since the late 1990s, turning everyday automotive debris into stunning representations of animals from the natural world.

The artistic process behind Elrington’s sculptures is centered around recycling and upcycling. The hubcaps he uses are typically found on the side of the road and often show signs of wear, including scratches and dents. Elrington believes that these imperfections add character and depth to his creatures, making each piece truly one of a kind.

His work spans a wide range of animals, including foxes, fish, and birds, with each sculpture thoughtfully crafted to showcase the unique features of the materials. The brand logos, grooves, and markings found on the hubcaps often contribute to the creature’s expression and structure, giving them a distinct, textured look.

Elrington’s Hubcap Creatures have been showcased in various exhibitions, both in the UK and internationally. His innovative approach has gained recognition for its creativity and environmental awareness, demonstrating how discarded materials can be transformed into meaningful art.

For art enthusiasts or collectors, Elrington offers a mix of available sculptures and custom commissions, allowing individuals to bring home a piece of this upcycled art. Hubcap Creatures stands as a brilliant example of how creativity can breathe new life into the most unlikely of materials, all while promoting sustainability.

RSS More Articles

  • Learning about Georgia for Kids
  • How to Make a Moth Birthday Card
  • DIY Giant Eyeball Lanterns – Creepy Halloween Decoration
  • Designer Spotlight: Artmishka Cross Stitch
  • Freebie Friday – Grungy Pumpkins and Fall Tags Junk Journal Printables
  • Free Paisley Flowers Embroidery Design Review
  • Knit a Log Cabin Blanket with All Your Scraps
  • 16 Big Halloween Crochet Projects You Need to Start Now
  • How to Make Tropical Summer Mini Interactive Album
  • Book Review: Fine Whitework by Jenny Adin-Christie

Pick Your Blog

  • Sewing
  • Knitting
  • Quilting
  • Crochet
  • Home & Garden
  • Recycled Crafts
  • Scrapbooking
  • Card Making
  • Polymer Clay
  • Cross-Stitch
  • Edible Crafts
  • Felting
  • Glass Art
  • Indie Crafts
  • Kids Crafts
  • Jewelry Making
  • Lesson Plans
  • Needlework
  • Bath & Body
  • Party Ideas
  • Candle Making
  • DIY Weddings
  • Not Craft
  • Free Craft Projects

Copyright © 2026 · CraftGossip | Start Here | Contact Us | Link to Us | Your Editors | Privacy and affiliate policy