• Home
  • Suggest A DIY
  • DIY Newsletter

Craft Gossip

Independent craft blog since 2007

  • About CraftGossip
  • Our Network
    • Bath & Body Crafts
    • Candle Making Ideas
    • Crochet Ideas
    • Cross Stitch
    • Edible Crafts
    • Felting Patterns
    • Glass Art
    • Home & Garden Ideas
    • Indie Crafts
    • Jewelry Making
    • Kids Crafts
    • Knitting Patterns
    • Lesson Plans
    • Needlework
    • Party Ideas
    • Polymer Clay
    • Quilting Ideas
    • Recycled Crafts
    • Scrapbooking
    • Sewing Patterns
    • Card Making
    • DIY Weddings
    • Not Craft Ideas
  • Giveaways
  • Roundups
  • Store
  • Search

How to Make a Gift Card Bouquet for Teachers

November 1, 2025 by Shellie Wilson

If you’re looking for a creative and thoughtful gift for teachers, consider making a Gift Card Bouquet. As the school year comes to a close, it’s a perfect way to express appreciation for all their hard work and dedication.

In this DIY craft tutorial, Glitter On A Dime shares a heartwarming account of celebrating the end of preschool with excitement and nostalgia. The Gift Card Bouquet is a bittersweet tribute to the wonderful teachers who have made a difference in their lives.

A Gift Card Bouquet is not just for teachers; it’s a versatile gift suitable for any occasion, including birthdays, graduations, and holidays. It’s a fun and personalized way to present gift cards to your favorite stores.

This craft project requires minimal supplies, many of which can be found affordably at Dollar Tree. Glitter On A Dime provides a list of materials needed to create your own beautiful Gift Card Bouquet, making it accessible and budget-friendly for everyone.

Express gratitude and celebrate special moments with a handmade Gift Card Bouquet, a thoughtful gesture that will surely bring joy to any recipient.

Spring Pocket Fold Gift Card Holder

Easy Fabric Gift Card Holder Sewing Tutorial
How to Make Gift Card Holders from Wrapping Paper

Paper Mitten Gift Card Holders

«
»

Have you read?

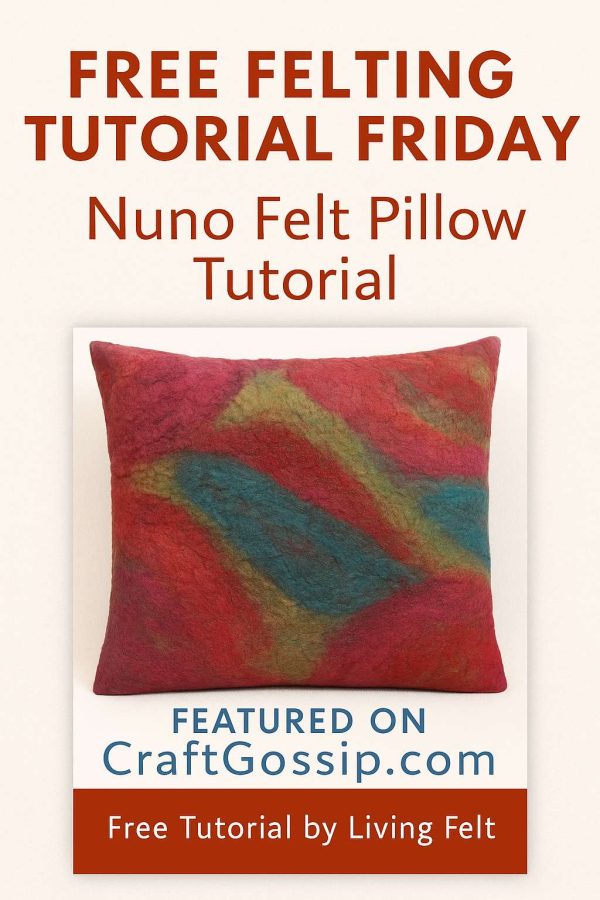
Free Felting Tutorial Friday: Nuno Felt Pillow

If you’ve ever wanted to try nuno felting — that dreamy blend of wool and fabric — this week’s Free Felting Tutorial Friday is your perfect introduction. The Nuno Felt Pillow tutorial from Living Felt is a gentle, hands-on project that combines texture, colour, and creativity into something truly beautiful (and functional).

Nuno felting might sound fancy, but it’s simply the process of bonding wool fibres onto a lightweight fabric such as silk or cotton. The result? A rich, textured fabric that’s soft, durable, and full of character. This free tutorial walks you through every step, from laying out your materials to creating that signature ripple effect that makes nuno felt so unique.

Wool, Fabric, and a Little Bit of Magic

In this tutorial, you’ll learn how to layer fibres and fabric, how to wet felt evenly, and how to shape and shrink your work to create a soft but structured piece. It’s one of those projects that feels a little like alchemy — watching the wool merge beautifully with the fabric under your hands.

The finished pillow cover has a lovely organic look, with a mix of colour and texture that no store-bought piece could ever replicate. Once you’ve mastered the technique, you can use it for scarves, wall art, or even clothing embellishments.

Why You’ll Love This Tutorial

  • It’s a wonderful introduction to nuno felting techniques. 
  • You’ll learn how to combine wool and fabric for rich, tactile texture. 
  • The project is both decorative and practical. 
  • Every piece turns out completely unique. 

Whether you’re making a single pillow as a statement piece or creating a matching set for your home, this project feels both relaxing and rewarding. It’s messy in the best possible way — warm water, soap, and soft fibres coming together to create something truly handmade.

My Felting Tip

When working on larger flat surfaces like pillows, make sure your wool layout is even. Use fine layers, and gently lift the fabric between stages to prevent sticking. I also like to use a mix of silk and merino for a soft but slightly crinkled texture — it gives that perfectly “lived-in” artisan look.

You can find the full free tutorial here: Nuno Felt Pillow – Free Tutorial by Living Felt

So grab your felting mat, a favourite piece of silk, and some soft merino tops — it’s time to roll, rub, and transform fabric into art. I’ll meet you back here next week for another Free Felting Tutorial Friday, where we’ll dive into another project to inspire your creative weekend.

A Nuno Felting Tutorial! [Felting]

Fabric and Fiber Tips and Tutorials


RSS feed: More Articles More Articles

  • Free Christmas Berry Branch Table Runner Embroidery Pattern Review
  • Freebie Friday – Gothic Christmas Borders and Tags Printable Set
  • Free Felting Tutorial Friday: Nuno Felt Pillow
  • Free Christmas Tree Bauble Knitting Pattern: An Easy Ornament Knitted Flat
  • 8 No-Cook Keto Lunches for Days When the Stove Can Wait
  • Scandinavian Christmas Winter Lantern Review – A Beautiful Dollar Tree Craft with Cozy Nordic Charm
  • 15 Christmas Gifts You Can Sew in an Afternoon
  • Giant Coloring Pages for Kids and Adults: Free Printables, Posters and Classroom Ideas
  • Cozy Crochet Bauble – A Scrap-Busting Holiday Ornament
  • DIY Gift Tags Using Scrapbooking Supplies You Already Have

Pick Your Blog

  • Sewing
  • Knitting
  • Quilting
  • Crochet
  • Home & Garden
  • Recycled Crafts
  • Scrapbooking
  • Card Making
  • Polymer Clay
  • Cross-Stitch
  • Edible Crafts
  • Felting
  • Glass Art
  • Indie Crafts
  • Kids Crafts
  • Jewelry Making
  • Lesson Plans
  • Needlework
  • Bath & Body
  • Party Ideas
  • Candle Making
  • DIY Weddings
  • Not Craft
  • Free Craft Projects

Copyright © 2026 · CraftGossip | Start Here | Contact Us | Link to Us | Your Editors | Privacy and affiliate policy