• Home
  • Suggest A DIY
  • DIY Newsletter

Craft Gossip

Independent craft blog since 2007

  • About CraftGossip
  • Our Network
    • Bath & Body Crafts
    • Candle Making Ideas
    • Crochet Ideas
    • Cross Stitch
    • Edible Crafts
    • Felting Patterns
    • Glass Art
    • Home & Garden Ideas
    • Indie Crafts
    • Jewelry Making
    • Kids Crafts
    • Knitting Patterns
    • Lesson Plans
    • Needlework
    • Party Ideas
    • Polymer Clay
    • Quilting Ideas
    • Recycled Crafts
    • Scrapbooking
    • Sewing Patterns
    • Card Making
    • DIY Weddings
    • Not Craft Ideas
  • Giveaways
  • Roundups
  • Store
  • Search

How to Make a Fall Pop Up Mini Album

September 21, 2025 by Heather Holbrook

How to Make a Fall Pop Up Mini Album

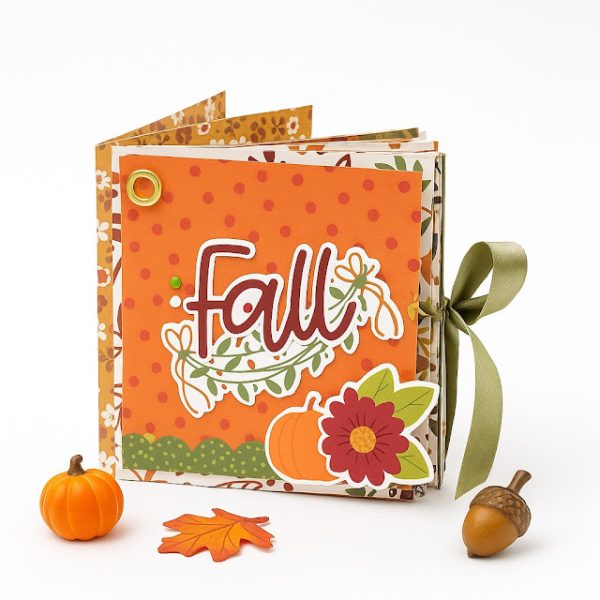
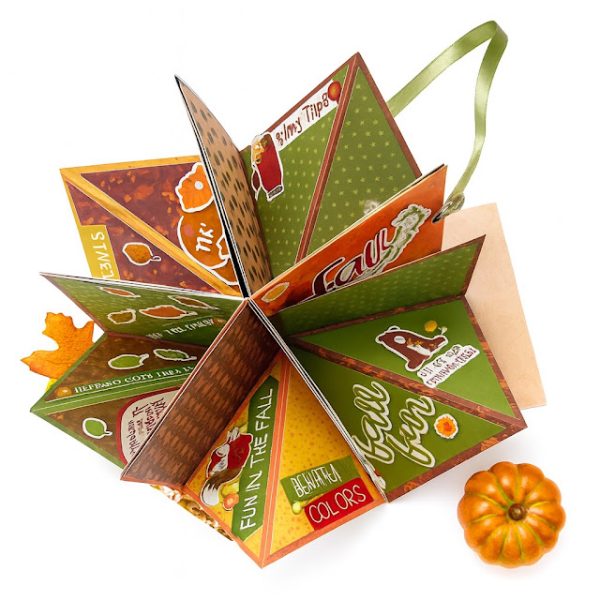
How adorable is this little Fall mini album!? The style of this design is called a circular album, not because the cover is round but because it pops up and folds out to form a round circle of pages when you look down on it. Created with digital dies from Lori Whitlock (that can be cut with electronic die cutting machines like a Cricut or Silhouette) this album is fill with Autumn pattern papers, cute animal stickers, leaves, pumpkins and lots of sentiments and ties closed with ribbon.
How to Make a Fall Pop Up Mini Album

You can find step by step and video tutorials on how to put this album together over at the Lori Whitlock blog.

-Heather

Looking for scrapbook supplies, we recommend A Cherry on Top.com
 

«
»

Have you read?

DIY Milk Jug Halloween Skulls – Recycled Porch Decor

If you’re anything like me, the Halloween decorating bug bites as soon as the first leaves start to turn. I love pulling out the pumpkins, stringing up lights, and adding a little spook factor to the front porch. But here’s the thing—Halloween decorations can get expensive, especially if you want a whole collection of them.

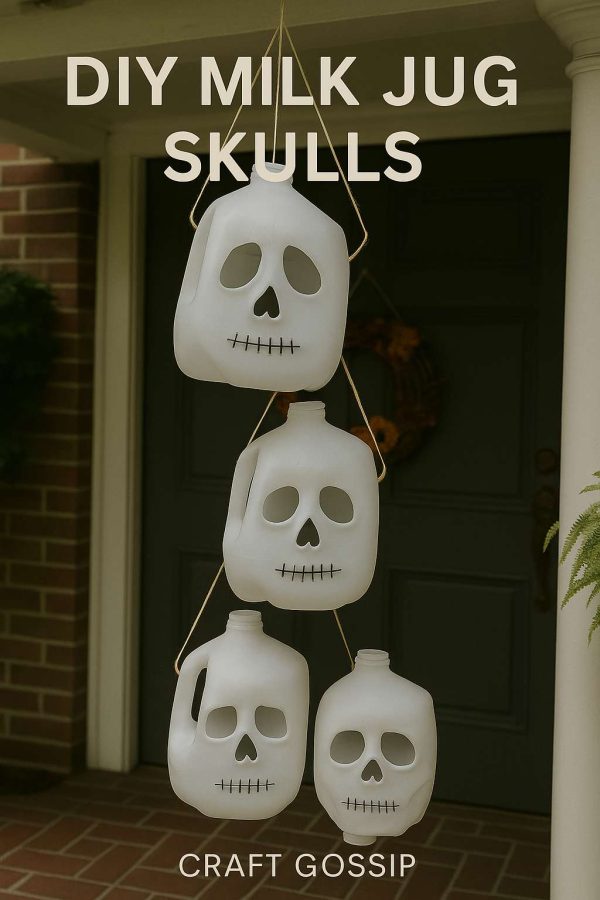
That’s where this thrifty little craft comes in. With nothing more than a few empty milk jugs, a marker, and some string, you can create a row of DIY milk jug skulls that look fantastic hanging from the porch or glowing in the yard. It’s simple, it’s cheap, and it’s a wonderful way to give those plastic jugs a second life before tossing them into the recycling bin.

This is one of those crafts that proves you don’t need a big budget for big impact. Even better—it’s family-friendly. Kids can help draw the faces, while the grown-ups handle the cutting. Before you know it, you’ll have a creepy crew of skulls ready to scare (or charm) the neighbors.

What Makes These Milk Jug Skulls So Fun?

  • Eco-Friendly: They’re made from recyclables, which means less waste. 
  • Budget-Friendly: The only thing you may need to buy is a pack of battery tea lights. 
  • Customizable: Keep them classic and spooky, or jazz them up with paint or glitter. 
  • Porch-Ready: They’re lightweight and easy to hang in clusters for maximum effect. 

Supplies You’ll Need

  • Empty plastic milk jugs (1 gallon size works best, but you can use any size) 
  • Permanent black marker (Sharpie is perfect for clean, bold lines) 
  • Scissors or craft knife (adults only—this is the only tricky part) 
  • Hole punch (optional, for stringing) 
  • Twine, string, or fishing line (for hanging) 
  • Battery-operated tea lights (optional, for glowing skull lanterns) 

Step-By-Step Instructions

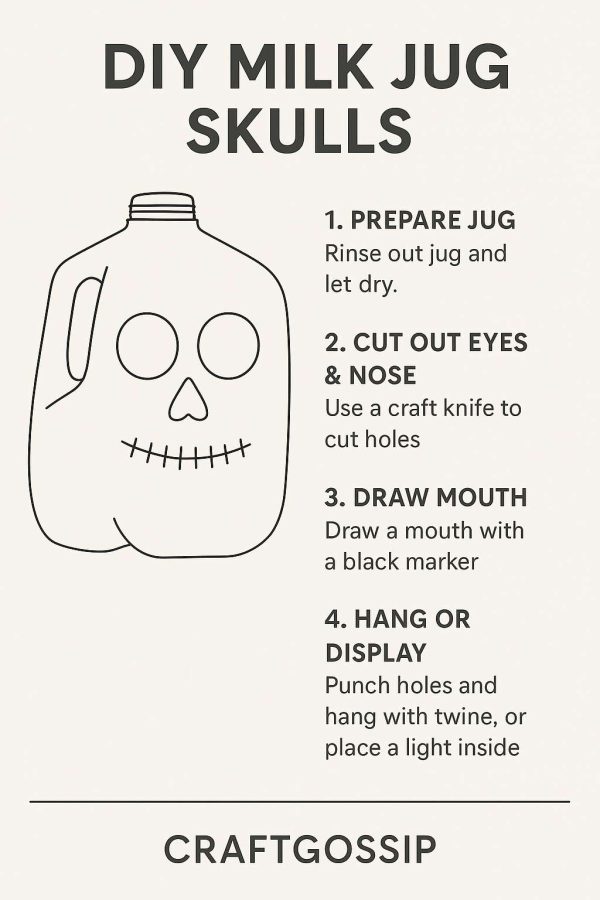
Step 1: Rinse & Prep the Jugs

Give your jugs a good rinse with hot soapy water to remove any leftover milk residue (nobody wants a stinky skull). Peel off any labels—you might need to scrub a little with warm water or rubbing alcohol if the glue is stubborn. Let the jugs dry completely before you start.

Step 2: Cut Out the Skull Features

Using scissors or a craft knife, carefully cut out:

  • Eye sockets: Two large ovals or circles near the upper front of the jug. 
  • Nose: A small upside-down triangle below the eyes. 

Tip: Don’t stress if they’re not perfect. In fact, slightly uneven shapes look creepier and give the skulls more personality.

Step 3: Add the Mouth

Now grab your permanent marker and draw a long horizontal line across the lower part of the jug (just above the spout). Then add short vertical lines through it to create a “stitched” effect.

Want them extra spooky? Make the mouth jagged, curved, or crooked—each one can have its own little “expression.”

Step 4: String Them Up or Place Them Out

  • To Hang: Punch two small holes at the top of the jug, thread through twine, and knot it. Hang them in clusters from the porch or tree branches for maximum impact. 
  • To Display on the Ground: Pop a battery-operated tea light or glow stick inside. At night, the cut-out features glow eerily, making them perfect for lining a walkway or lighting up your porch steps. 

Extra Decoration Ideas

Want to take it up a notch? Here are a few twists you can try:

  • Paint the whole jug black or silver before cutting for a bolder look. 
  • Use glow-in-the-dark paint around the eyes and mouth so they stand out at night. 
  • Add fake spider webs or plastic spiders inside for extra creep factor. 
  • Mix them with sugar skull versions (painted in bright colors) for a Day of the Dead meets Halloween vibe. 

Where to Display Your Milk Jug Skulls

  • Hanging in a cluster by the front door to greet trick-or-treaters. 
  • Along the garden fence, glowing with tea lights inside. 
  • Dangling from tree branches for a haunted yard look. 
  • As a budget-friendly centerpiece for a Halloween party. 

This is hands-down one of my favorite DIY Halloween porch decorations because it’s so simple yet so effective. The best part? Every jug can look slightly different, so you end up with a collection of skulls that each has its own “personality.” It’s spooky, it’s thrifty, and it’s a great way to get the kids involved in holiday crafting.

So don’t recycle those milk jugs just yet—give them a creepy new life as part of your Halloween décor. You’ll be surprised at how quickly they become a porch staple you bring out year after year.


RSS feed: More Articles More Articles

  • Crocheting Christmas Gifts? Make This Supply Checklist Before You Buy More Yarn
  • DIY Faux Candy Apples: Easy Glossy Fall Decorations
  • 12 Fall Decorations You Can Make from Thrift Store Finds
  • How to Make a Cozy Coffee Gift Card Holder
  • Free Animal Person Embroidery Design Review
  • DIY Halloween Sock Pumpkins: Easy Fuzzy Pumpkins With Ghosts, Stripes and Witch Hats
  • Free Felting Tutorial Friday: Felt Into Autumn with Heidi Feathers
  • Knit a Classic Aran Cardigan with this Free Knitting Pattern
  • Printable Letter Books for Preschoolers
  • How to Make an Interactive Halloween Mini Scrapbook Album

Pick Your Blog

  • Sewing
  • Knitting
  • Quilting
  • Crochet
  • Home & Garden
  • Recycled Crafts
  • Scrapbooking
  • Card Making
  • Polymer Clay
  • Cross-Stitch
  • Edible Crafts
  • Felting
  • Glass Art
  • Indie Crafts
  • Kids Crafts
  • Jewelry Making
  • Lesson Plans
  • Needlework
  • Bath & Body
  • Party Ideas
  • Candle Making
  • DIY Weddings
  • Not Craft
  • Free Craft Projects

Copyright © 2026 · CraftGossip | Start Here | Contact Us | Link to Us | Your Editors | Privacy and affiliate policy