• Home
  • Suggest A DIY
  • DIY Newsletter

Craft Gossip

Independent craft blog since 2007

  • About CraftGossip
  • Our Network
    • Bath & Body Crafts
    • Candle Making Ideas
    • Crochet Ideas
    • Cross Stitch
    • Edible Crafts
    • Felting Patterns
    • Glass Art
    • Home & Garden Ideas
    • Indie Crafts
    • Jewelry Making
    • Kids Crafts
    • Knitting Patterns
    • Lesson Plans
    • Needlework
    • Party Ideas
    • Polymer Clay
    • Quilting Ideas
    • Recycled Crafts
    • Scrapbooking
    • Sewing Patterns
    • Card Making
    • DIY Weddings
    • Not Craft Ideas
  • Giveaways
  • Roundups
  • Store
  • Search

How To Make A Basic Gel Candle

August 5, 2013 by Vikram Goyal

gel-candles

Candle gel is a unique medium for making candles that offers a different aesthetic compared to traditional wax candles. The transparency of the gel allows for the addition of various objects and decorative elements to be suspended within the candle, creating an eye-catching visual effect. However, many people are unaware of the ingredients that make up this medium. Gel candles are made with a combination of mineral oil and polymer resin, which when mixed together, create a gel-like substance that is perfect for candle making.

The polymer resin is the key ingredient that sets gel candles apart from other types of candles. It is a synthetic material that is added to the mineral oil to create a more solid consistency, enabling the gel to hold its shape when poured into a container. This also allows the gel to burn slower than traditional wax candles, resulting in a longer-lasting candle that will continue to emit a pleasant scent for hours on end.

If you’re interested in trying your hand at making gel candles, there are plenty of resources available online to help you get started. One great resource is Craftbits.com, which provides a comprehensive guide to Gel Candle Making. This guide covers everything you need to know about the materials and tools required for the process, as well as step-by-step instructions for creating your own beautiful and unique gel candles.

Gel candles are a fun and creative way to add some personality and style to your home decor. You can add anything from shells to colorful marbles to the gel to create a beautiful and unique centerpiece for any occasion. Additionally, gel candles are also a great option for those who want to experiment with different scents and essential oils to create a custom fragrance that suits their taste.

However, one of the challenges of making gel candles is the need to find the right containers that are compatible with the medium. The glass jars used for traditional wax candles may not be suitable for gel candles, as they can crack or shatter due to the heat generated by the burning gel. Therefore, it’s important to choose containers that are specifically designed for gel candles, which are typically made of heat-resistant materials such as tempered glass.

In summary, gel candle making is a fascinating and rewarding hobby that offers a unique creative outlet. With a little bit of practice and experimentation, you can create your own stunning gel candles that will impress your friends and family. So why not give it a try and see where your creativity takes you?

Craftbits.com has all the details and you can learn the basics of Gel Candle Making here.
 

«
»

Have you read?

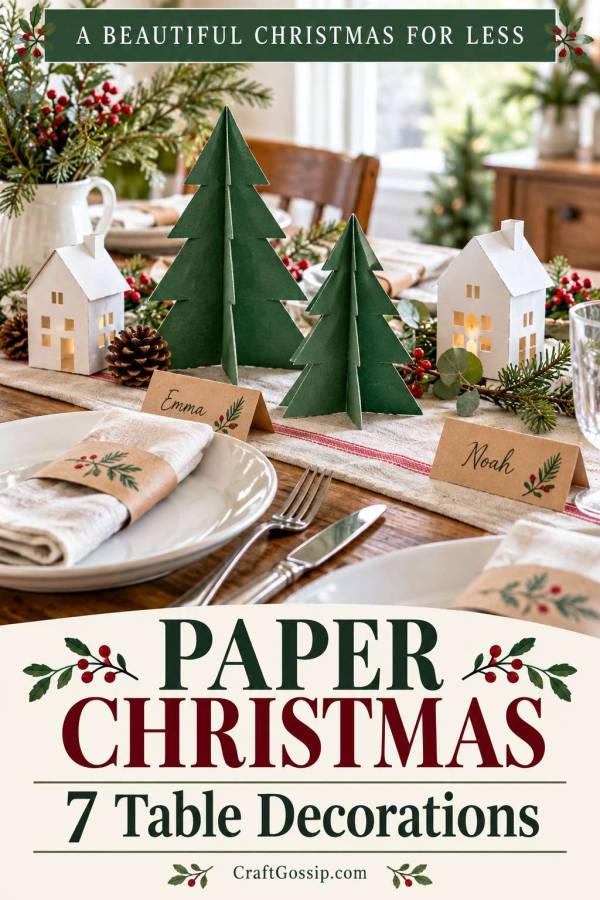
Christmas on a Budget – 7 Christmas Table Decorations You Can Make from Paper to Save Money

Before buying Christmas table decorations, open the paper drawer.

Leftover gift wrap, scrapbook offcuts and plain cardstock can become name cards, little trees and festive table details.

You do not need a cutting machine or a coordinated craft kit. A pair of scissors, a ruler and a little patience will cover most of these projects.

Paper is particularly useful when you want a colour-pop Christmas table on a small budget. Repeat one or two colours across a few simple decorations and the setting starts to feel coordinated.

Pick two or three projects rather than trying to make all seven.

Gather your supplies first

Look for:

  • Cardstock or clean, suitable packaging card.
  • Wrapping-paper scraps.
  • Plain paper.
  • Scissors and a ruler.
  • A pencil and a writing pen.
  • Existing paper glue or double-sided tape.

Card works best for standing decorations. Thin wrapping paper is better for covering a card base.

Make a sample before cutting enough pieces for every guest.

1. Folded name cards

Cut cardstock into rectangles measuring approximately 10 × 8 cm.

Mark the halfway point along the 8 cm sides, then fold to create a standing card with a face approximately 10 × 4 cm.

Write the name before adding embellishments.

A small drawn star or a narrow paper strip is plenty. Check that the name is readable from the guest’s seat.

Saving tip: use the plain side of suitable card and cover unwanted printing only where necessary.

2. Paper napkin bands

Cut paper strips approximately 4 cm wide.

Wrap one around a folded napkin to find the required length, including a small overlap. Secure the ends with tape or glue.

Make the bands loose enough to slide off without tearing.

Use one paper across all settings or repeat a shared colour through different patterns.

Saving tip: gift-wrap offcuts are useful here because the napkin supports the paper.

3. Slot-together paper trees

Draw a symmetrical tree shape with a flat bottom and cut two identical pieces from sturdy cardstock.

On the first tree, cut a slit from the top to the midpoint. On the second, cut from the bottom to the midpoint.

Slide the shapes together at right angles. Adjust the slit width gradually to suit the card thickness.

Test that the tree stands before cutting the rest.

Saving tip: two or three trees can be enough for a small display.

4. A miniature Christmas village

Our paper Christmas town tutorial provides a more detailed project with houses and trees.

Use one colour for a simple village or limit yourself to two coordinating shades.

Allow the glue to dry thoroughly before moving the buildings.

Saving tip: display the village on a sideboard if your dining table needs every centimetre for lunch.

5. Paper angel napkin holders

These paper angel napkin holders make a traditional Christmas detail.

Test the template size with one napkin before preparing a full set. Decorate the card with suitable fabric or paper scraps.

Saving tip: use the same base colour while allowing small differences in the paper covering.

6. Flat paper stars

Draw or trace a simple star onto card.

Cut it out, cover it with paper if needed and add a guest’s name. Place it beside the plate or attach it to a napkin band.

Keep decorative paper away from uncovered food and damp dishes.

Saving tip: a few larger stars are easier to tidy and store than dozens of tiny pieces of confetti.

7. A paper-star wreath

Our paper-star wreath tutorial uses covered card shapes arranged on a ring.

Hang it near the table using a suitable fixing. This gives the dining area a focal point without taking serving space.

Saving tip: use the same paper on the wreath and name cards to connect the room.

Keep all paper decorations away from flames, heat and wet surfaces. Pack dry pieces flat where possible and label the box for next year.

The paper scraps you nearly discarded might be all the Christmas colour your table needs.

RSS feed: More Articles More Articles

  • 12 Christmas Cross Stitch Patterns for Cat Lovers
  • Easy Christmas Fabric Gift Basket Sewing Pattern (Perfect for Beginners)
  • 10 Easy Margarita Recipes for Taco Nights, BBQs and Summer Gatherings
  • IKEA KALLAX Room Divider DIY: Create a Cosy Corner With Storage and Style
  • 5 Christmas Sweater Knitting Patterns Worth Casting On
  • Wet Felting with a Hand-Held Sander – My Honest Experience (and Safety Tips You’ll Actually Use)
  • How to Make Cross Stitch Christmas Gift Tags With Small Fabric Scraps
  • Thanksgiving Turkey Scrapbook Layouts to Gobble Up
  • 10 DIY Angel Jewelry Tutorials For Christmas
  • Crochet Christmas Dove Ornaments With a Printable Gift Poem

Pick Your Blog

  • Sewing
  • Knitting
  • Quilting
  • Crochet
  • Home & Garden
  • Recycled Crafts
  • Scrapbooking
  • Card Making
  • Polymer Clay
  • Cross-Stitch
  • Edible Crafts
  • Felting
  • Glass Art
  • Indie Crafts
  • Kids Crafts
  • Jewelry Making
  • Lesson Plans
  • Needlework
  • Bath & Body
  • Party Ideas
  • Candle Making
  • DIY Weddings
  • Not Craft
  • Free Craft Projects

Copyright © 2026 · CraftGossip | Start Here | Contact Us | Link to Us | Your Editors | Privacy and affiliate policy