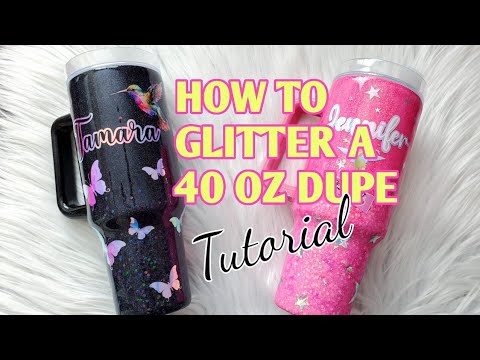
Check out this video guide on adding glitter and epoxy to personalize your own tumbler!
Whether you’re looking to create a stunning custom drinkware piece for yourself or a thoughtful gift for a loved one, this tutorial will walk you through the process step-by-step.
With the rise of DIY culture and the TikTok craze surrounding Stanley tumblers and cups, now is the perfect time to unleash your creativity and join the fun. Get ready to learn how to transform an ordinary tumbler into a sparkling masterpiece that’s uniquely yours!
For a visual demonstration of the process, check out this helpful tutorial on YouTube: [YouTube Link]
Here is our written tutorial
Prep Your Tumbler:
Begin by thoroughly cleaning and drying your tumbler to ensure a smooth surface for the glitter and epoxy application.
Use masking tape or painter’s tape to mask off any areas of the tumbler that you do not want to cover with glitter or epoxy.
Apply Glitter, make sure it is a fine-grade glitter.
Apply a thin layer of adhesive (such as Mod Podge or spray adhesive) to the portion of the tumbler where you want to add glitter.
Sprinkle glitter evenly onto the adhesive-covered area, ensuring full coverage and pressing the glitter gently into the adhesive to adhere.
Mix and Apply Epoxy:
Follow the instructions on your epoxy resin kit to mix the resin and hardener in a disposable cup. Wear gloves to protect your hands during this process.
Once mixed, pour the epoxy over the glitter-covered area of the tumbler, using a disposable brush or foam brush to spread it evenly and smooth out any bubbles or excess epoxy.
Rotate the tumbler slowly to ensure the epoxy coats the entire surface evenly.
Cure the Epoxy:
Depending on the type of epoxy used, you may need to let the tumbler cure for 24-72 hours in a dust-free environment at room temperature.
Optionally, use a heat gun or torch to remove any air bubbles that may have formed in the epoxy, being careful not to overheat or scorch the surface.
Final Touches:
Once the epoxy has fully cured, carefully remove the masking tape from the tumbler.
If desired, apply a clear spray sealant over the glitter and epoxy to protect the finish and enhance its durability.
Personal Tips:
Experiment with different glitter colors, sizes, and patterns to create unique designs and effects on your tumbler.
Take your time and work in a well-ventilated area to ensure a smooth and successful application of glitter and epoxy.
Practice proper safety precautions when working with epoxy resin, including wearing gloves and avoiding contact with skin or eyes.
Join the TikTok craze by sharing your glitter and epoxy tumbler creations with the hashtag #DIYTumbler and #StanleyTumblerChallenge to connect with fellow DIY enthusiasts and showcase your talent!
Get ready to unleash your creativity and personalize your own glitter and epoxy tumbler! Join the TikTok craze and show off your stunning creations while enjoying your favorite beverages in style.