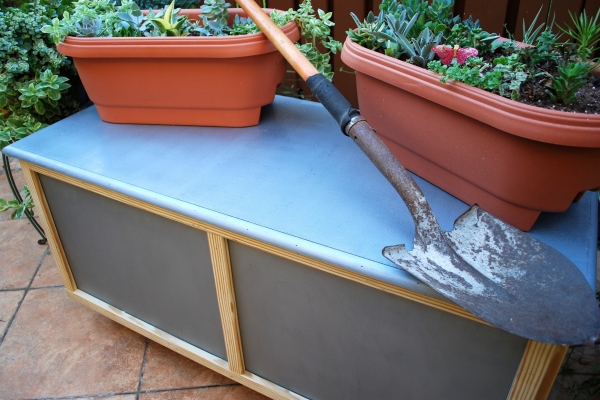
DIY: Rolling Gardening Chest: Hide all of your gardening supplies in this rustic rolling storage cart. Cut, sanded, and nailed together, the wood creates a sturdy outer exterior keeping the contents safe from the weather. This rolling chest is large enough to store potting soil, shovels, pots, and watering cans, but attractive enough to be left on your patio year-round.
Mateo Londono is a longtime contributor to the Krrb blog, focusing on the construction principles of clothing, furniture and architecture. His most popular contributions include DIY crafts that combine art and reuse of discarded materials. He also writes about projects like this one, which uses sanders and other power tools, for The Home Depot.
By Mateo Londono 
With summer temperatures rising, gardeners know firsthand how essential it is to have their tools within arm’s reach. The problem with most gardening storage options is that they are too expensive, non-moveable or just plain ugly. But with some exterior-grade plywood, molding and a few tools, you can easily make one of your own! This DIY industrial rolling gardening storage is large and sturdy, making it the ideal place to stash your potting soil, shovels, pots and watering cans— yet it’s attractive enough to be left on your patio year-round.
Materials
1 – 23/32” X 4’ X 8’ WeatherShield plywood sheet
6 – 1” X 2’ X 8’ WeatherShield board
1 – 11/16” X 8’ quarter round molding
4 – 3” industrial galvanized steel wheels
2 – 3.5” galvanized steel utility hinge
1 quart hammered silver exterior latex paint
Clear top coat spray
1” pneumatic nails
Natural wood filler
Clear outdoor sealant
Wood glue/outdoor adhesive
Coarse and fine sanding sheets
Paint roller & tray
Tools
Orbital sander
Table/circular saw
Miter saw
Pneumatic nail gun
Safety First: When using a power saw or any other power tools, make sure that you always use proper safety equipment and operate the tool following the manufacturer’s specifications.

Break out your pencil, because the first step in this project is deciding the dimensions and overall look of your gardening chest. You can build a sizable storage chest using only one sheet of 4’ x 8’ plywood, leaving very little leftover wood. Once you settle on your design, it’s time to pick out the wood. Choose only the plywood sheets that are relatively flat with no knots and minimal cracks.
Use your tape measure and straight edge to mark out the bottom, side and top pieces onto the plywood sheet. A table saw or circular saw will make quick work of ripping the sheets down. The trim you’ll add later on will cover any mistakes made in this stage.

Give all the pieces a quick sanding with a good-quality orbital sander before filling in any cracks or gouges with wood filler. Apply liberally, scrape off excess and let dry overnight. Then, do another quick pass with the sander, leaving some coarseness as it will help the latex paint to adhere. This extra step in preparing the wood surface will help convey the look of industrial metal at a fraction of the cost!

Wipe off any loose sawdust and paint the outer sides of all the pieces with the hammered silver exterior latex paint. You’ll want to do at least three coats to build up the hammered texture and bright shiny look. Let the wood dry for about 30 minutes between each coat.

It’s finally time to assemble! Use a pneumatic nail gun and wood glue to attach the pieces into a basic box frame, shooting 1-inch nails into the edge every couple of inches. Once you have your frame constructed, start adding on the molding piece-by-piece using a miter saw to cut them to an exact fit. If you want to paint or stain the molding, I recommend doing so prior to assembly to avoid a time-consuming tape job. Start by adding the molding on the front and back faces before framing out the sides of the chest. Remember: measure twice, cut once!
When it comes to the lid, you’ll want to cut two long pieces from the last of your 1” x 2” x 8’ plywood boards and nail them to the back of the lid. Not only will this add some bracing and stability, it will also come in handy as handles when you need to grab something from inside. The quarter-round molding cut to a 45-degree miter fits along the lid’s outer edges and corners; just add nails to secure it.
The next step is to add the galvanized wheels and hinges. The galvanized coating will protect the hardware from rusting and emphasize the industrial style. At this point, the storage chest is almost done! You’ll want to apply a clear sealant along the inside edges to keep bugs and moisture away from your gardening supplies and a clear top coat to protect the natural and painted finish.

Save yourself from hauling your gardening tools back and forth from the garage all summer by investing a weekend into this DIY project. The industrial rolling storage has the look of rugged metal accents and untreated wood, but without the price tag or maintenance. Happy gardening!