 Cathe Holden of The Right at Home blog has a whole “menu” of ideas for recycling and up-cycling recipe cards into fun home decor projects including framing them in geometric checked patterns, boarders, and transferring them to fabric. Pop on over to read all about her tasty ideas!
Have you read?
DIY Thrifted Glass Christmas Platter With Vintage Santa Fabric
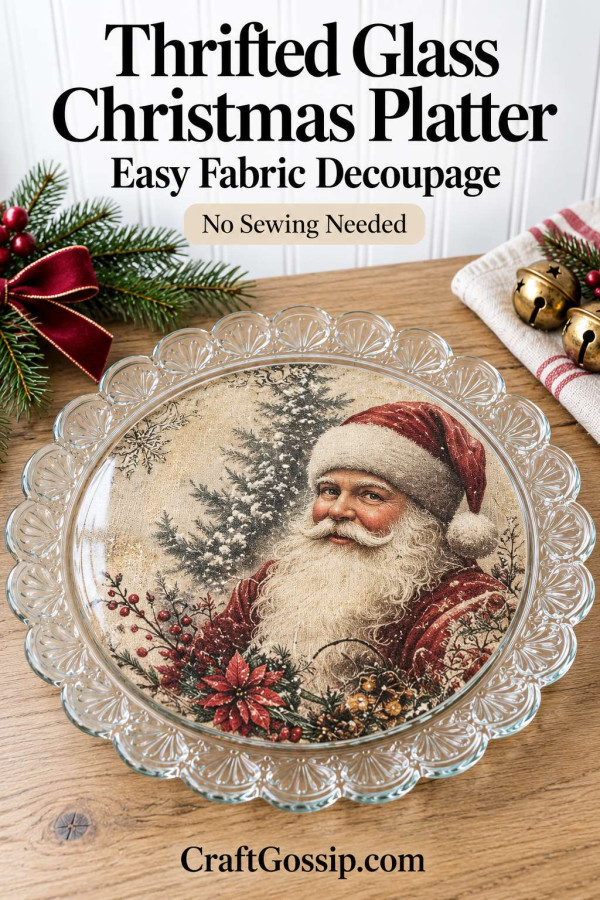
There’s nearly always a glass serving plate hiding on a thrift-store shelf. Sometimes it has a scalloped edge, sometimes a pretty pressed-glass border, and quite often it looks like something your grandmother would have brought out for Christmas afternoon tea.
This project gives one of those secondhand finds a festive makeover using vintage-style Christmas fabric. We’re attaching the fabric to the underside of the platter, allowing the Santa design to show through the glass while leaving the upper surface uncovered.
For the version pictured here, I’ve chosen the vintage Santa panel from the Christmas fabric bundle shown with this tutorial. His burgundy hat, snowy beard and surrounding greenery look lovely framed by the clear scalloped border.
I love that the original glass detail remains part of the decoration. Rather than covering the whole plate, we’re adding a circular fabric panel beneath the smooth centre and leaving the decorative rim visible. It’s a simple combination, but it has that nostalgic Christmas look that suits an old-fashioned sideboard or farmhouse kitchen.
You don’t need to sew anything, and you don’t need an expensive platter. Start with an ordinary clear glass plate in good condition and a fabric piece large enough to cover its centre.
Skill level: Beginner
Hands-on time: Approximately 45–60 minutes, plus drying and curing
Technique: Reverse fabric decoupage
What You’ll Need
- A thrifted clear glass platter or large plate with a smooth central underside
- A lightweight vintage-style Christmas fabric panel
- Clear-drying decoupage medium suitable for glass and fabric
- Soft flat paintbrush
- Sharp fabric scissors
- Scrap paper for making a template
- Pencil and washable fabric marker
- Dishwashing liquid
- Clean lint-free cloth
- Rubbing alcohol, if recommended by your decoupage product
- Folded towel to support the platter
- Protective covering for your work surface
The pictured design uses the Santa portrait panel from the supplied fabric bundle. Other panels, such as the Christmas tree, snowman or wreath, would also make lovely variations.
Check the actual fabric-panel dimensions before buying or cutting. Your chosen image needs to fit the smooth central area of the platter without losing its main details.
Choosing a Thrifted Glass Platter
Look for a platter with a smooth centre and a decorative border. Scalloped edges, little fan patterns and pressed-glass details frame the fabric beautifully.
Inspect the plate carefully for chips, cracks and sharp edges. Choose ordinary glass rather than valuable crystal or a collectible piece.
Run your fingers over the underside of the centre. Deep moulded patterns, raised lettering or heavy texture can prevent the fabric from sitting closely against the glass. A smooth, nearly flat area is much easier to decorate.
For your first attempt, choose a shallow plate with minimal curvature.
For serving: Use glassware known to be suitable for food contact. If you cannot establish the suitability of a vintage piece, use it for decorative display or wrapped treats.
1. Clean the Platter
Wash the platter thoroughly in warm water with dishwashing liquid. Remove price stickers and adhesive residue.
Rinse and dry completely.
If your decoupage product recommends an alcohol wipe, clean the underside as directed and let it evaporate before continuing.
Place the platter upside down on a folded towel. The towel should support it securely without making it wobble.
2. Make a Template for the Centre
Measure the smooth central area inside the decorative glass border.
Cut a circle from scrap paper and place it against the underside to check the fit. Adjust it until the circle sits within the smooth area and leaves the ornate rim uncovered.
Avoid tracing the entire outer edge of the platter. The fabric panel should finish before the pressed-glass border begins.
Keep the template for positioning your fabric.
3. Position the Santa Design
Prepare the fabric according to its care instructions. If washable, prewash without fabric softener, dry and press flat. Test a scrap for colour bleeding.
Place the paper template over the printed fabric and check which details fall inside the circle.
For the Santa version, position his face and hat comfortably within the template. Leave enough space around his beard and the surrounding Christmas greenery so the image feels balanced.
Trace around the template on the reverse of the fabric using a washable marker. Cut carefully with sharp scissors.
If the platter has a slight curve, begin with a little extra fabric around the template line and trim to the final size after fitting.
4. Check the Fit Through the Glass
Before adding glue, hold the fabric against the underside with its printed side facing the glass.
Look at the platter from the front. This shows how the finished design will appear.
Adjust the position so Santa is upright when the platter is displayed. Check that the circular fabric edge sits neatly within the smooth centre.
Once you’re happy with the arrangement, remove the fabric and return the platter to its upside-down position.
5. Apply the Decoupage Medium
Brush a thin, even layer of medium onto the underside of the smooth central area.
Cover only the area where the fabric will sit. Keep the decorative border, outer rim and upper surface free of glue.
Avoid thick puddles, which can make it harder to smooth the fabric and may take longer to dry.
Follow the working time and application directions for your chosen product.
6. Attach the Fabric Printed Side Against the Glass
Lower the fabric onto the wet medium with the printed right side against the glass.
The plain reverse side of the fabric should face you while you work. Once the platter is turned upright, the Santa design will be visible through the glass.
Start near the centre and gently smooth towards the edges. Use clean fingers and light pressure to help the cloth make contact without stretching it.
Carefully inspect the platter from the front while the adhesive is still workable. Look for trapped bubbles, folds or areas where the fabric has not made contact.
If necessary, gently lift a loose section and smooth it back into place.
7. Ease the Fabric Around Any Curves
A flat centre is the easiest surface to cover with one continuous fabric circle.
If your platter curves slightly, work around it gradually. Avoid pulling hard on the cloth, as this can distort Santa’s face or stretch the circular edge.
Small relief cuts may help around an outer margin, but keep them away from the main illustration and avoid bulky overlaps.
If the shape requires several deep cuts or folds, choose a flatter platter for this portrait-style design.
8. Allow the Fabric to Dry
Leave the platter supported upside down so the wet fabric is not touching the table.
Allow the adhesive to dry according to the product instructions.
The medium may look cloudy while wet. Wait until it has dried before judging the clarity of the design.
Once the fabric is firmly bonded, trim any surplus carefully with scissors. Keep the fabric edge within the smooth centre and away from the rim.
9. Seal the Underside
Brush a thin sealing coat over the exposed reverse side of the fabric, including its cut edge.
Allow each coat to dry before adding another, following the directions on your bottle.
Keep all sealing coats on the underside. Do not coat the upper glass surface or wrap the finish over the rim.
Support the platter so nothing touches the wet backing while it dries.
10. Let the Finish Cure
A dry surface is not necessarily fully cured. Follow the complete curing time specified for your chosen medium before regular use or cleaning.
If using Mod Podge Dishwasher-Safe, the manufacturer specifies a 28-day cure before gentle top-rack dishwashing. Other formulas have different requirements, so check your own product rather than applying that timing to every finish.
For a handmade fabric-backed platter, gentle cleaning is the preferred approach.
Using and Caring for Your Christmas Platter
Mod Podge is not food safe. The manufacturer advises keeping it on areas such as the back of a plate, away from food-contact surfaces and the rim. This project keeps the fabric and medium underneath, with the original upper glass surface uncovered.
Once cured, use suitable glassware for room-temperature treats placed on the bare upper surface, keeping food away from decorated edges. Wrapped sweets are another lovely option.
Wipe the upper glass gently with a damp cloth and mild detergent, keeping the fabric backing as dry as practical. Avoid soaking or scrubbing the underside.
Do not put the altered platter in an oven or microwave, and avoid hot cookware or sudden temperature changes.
If giving it as a gift, include a care tag:
Fabric decoration is attached underneath the glass. Clean gently, do not soak, and keep away from heat.
Styling Your Finished Platter
The vintage Santa design looks lovely beside burgundy ribbon, fir sprigs and a couple of old brass bells. Keep the surrounding decorations simple so the portrait and scalloped glass border remain the focus.
You can also display the empty platter on a sturdy plate stand, where the fabric artwork is easy to see.
If you’re making several, choose different Christmas panels and let the thrifted glass shapes vary. A Santa portrait on a scalloped plate, a wreath beneath a smaller dish and a Christmas tree on a flat tray would make a charming collection.
This is the kind of project that makes me look twice at the glassware shelf. A plate that seemed a little plain can become something worth bringing out each December, and a small piece of fabric gets to do much more than sit in the scrap basket.