• Home
  • Suggest A Craft
  • DIY Newsletter

Craft Gossip

The largest independent craft review site since 2007

  • About CraftGossip
  • Our Network
    • Bath & Body Crafts
    • Candle Making Ideas
    • Crochet Ideas
    • Cross Stitch
    • Edible Crafts
    • Felting Patterns
    • Glass Art
    • Home & Garden Ideas
    • Indie Crafts
    • Jewelry Making
    • Kids Crafts
    • Knitting Patterns
    • Lesson Plans
    • Needlework
    • Party Ideas
    • Polymer Clay
    • Quilting Ideas
    • Recycled Crafts
    • Scrapbooking
    • Sewing Patterns
    • Card Making
    • DIY Weddings
    • Not Craft Ideas
  • Giveaways
  • Roundups
  • Store
  • Search

{DIY Weddings Guest Post} DIY Button Holes

July 24, 2012 by Kimberly Jones


Welcome to the first ever guest post here at DIY Weddings, DIY Button Holes created by the talented Chloe of Adore by Chloe! In her own words Chloe is a “tea-loving editor who loves unique, handmade, and pretty things.”  With the motto “Eat, Craft, and be Married” Adore by Chloe is a wonderful resource for brides seeking creative wedding inspiration and so much more!

Chloe recently shared a round-up of ideas for non-floral button holes, or boutonnieres, and she created a tutorial for making your own especially for our readers! Be sure to visit Adore by Chloe for lots more ideas, inspiration, and even a handpicked shopping directory of UK suppliers!  And now for the button holes:

To make them you will need…

  • Thin crafting wire
  • Patterned paper (I used some sheet music)
  • Buttons
  • A small piece of lace
  • Burlap or hessian
  • String
  • Glue
  • Scissors
  • A needle and thread

How to make them…

Step 1 ~ Make three little paper and button flowers by cutting little shapes from the paper. Place a button in the centre of the flower shape then push through some thin crafting wire from underneath, over and back through another hole in the button. Twist the wire underneath to hold in place.

Step 2 ~ Make a string flower using a small felt circle and some string. Tie a knot in the end then glue this to the centre of the felt. Now twist the string round and glue as you cover the felt. Leave a good length of spare string and attach some wire, twisting together the ends.

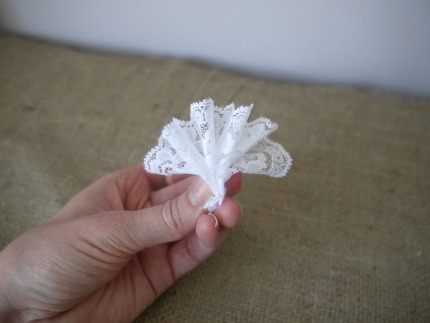
Step 3 ~ Make a lace flower by concertina folding a small piece of lace and securing with a few stitches at one end. Push through some crafting wire and twist to form the ‘stem’.

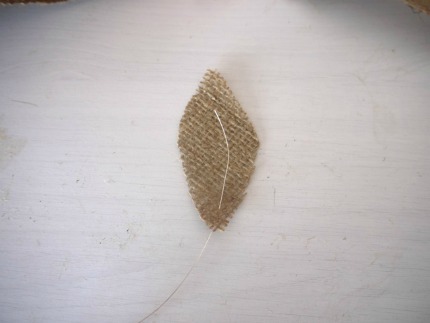
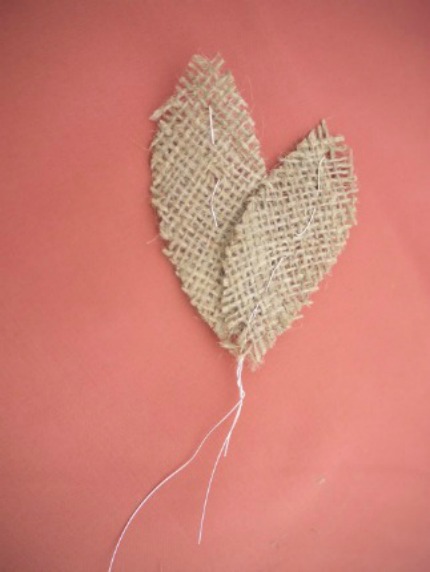
Step 4 ~ Cut two leaf shapes from the burlap material and thread the crafting wire up the centre to the tip then back down the back to keep sturdy. Twist the wire as above to secure and leave some spare wire to work with later.

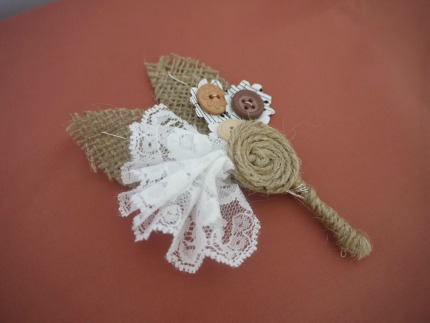
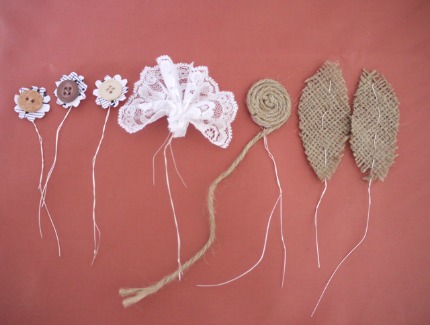
Now you should have a selection of crafty flowers to make up the buttonhole!

Step 5 ~ Position the two burlap leaves then twist the wires together.


Step 6 ~ Add on the lace flower, button flowers and string flower, twisting the wires together as you go.

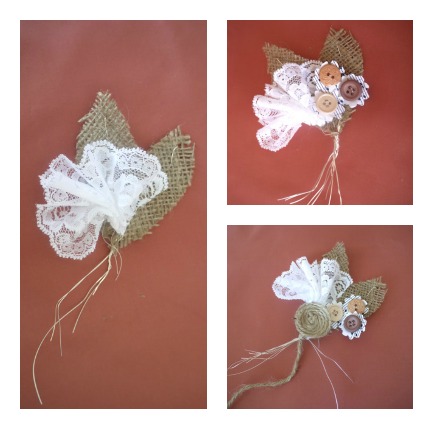
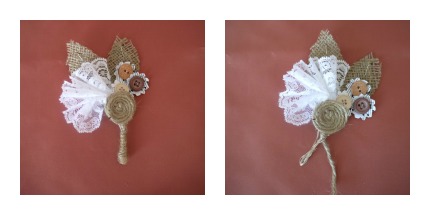
Step 7 ~ Tidy the twisted wires then wrap tightly with the spare string from your circular flower to cover all the wires. Secure at the back with a few stitches or glue.

For more crafty wedding ideas, DIY projects and yummy recipes visit my blog and say hello!

Happy crafting, Chloe x


Read These Next

  • How To Plan A Rustic Farm Wedding
  • How To Plan A Rustic Farm Wedding
«
»

Have you read?

Printable Cross Stitch Sheets Make it Easy to Cross Stitch on Clothes

Lately I have been feeling like all of my clothes are looking a little worn or feeling a little tired. I don’t want to buy new clothes, though, so there’s been a lot of mending, altering and adding special touches to things that otherwise might get overlooked or not worn at all. 

As an example, not too long ago I added a little bit of embroidery to a T-shirt, which was a lot of fun to do and made me start eyeing all my solid-colored garments and wondering how they might look with some stitching added. 

Of course you can cross stitch on garments, too, whether T-shirts or woven tops, skirts, pants and more. But it can be tricky to transfer cross stitch designs to your garment to make stitching easier. 

Much like with embroidery, it’s great to use a water soluble stabilizer to keep your fabric in place while you stitch and to transfer your design (or your cross stitch grid at least) while you’re stitching. Then you just wash away the stabilizer when you’re done and it will look like the stitching has always been there. 

Ashley General Handmade uses Sulky Stick ‘n Stitch, which is a product I use, too. It’s easy to use and washes away cleanly. 

To make it even easier, she designed some printable cross stitch grids at different counts that you can print out to draw your own cross stitch designs, but you can also print the grid right on the Sulky, so you can stitch on top of squares and then remove them when you’re done. 

Brilliant, right? 

She has pages as big as 8 count and all the way down to 20 (remember: the bigger the number the smaller the stitches will be) that you can download and print to make your own designs and also use to make stitching on clothing easier. I’m definitely going to try this the next time I want to cross stitch on fabric!

You can grab her printables over at Ashley General Handmade.

[Photo: Ashley General Handmade]

RSS More Articles

  • Printable Cross Stitch Sheets Make it Easy to Cross Stitch on Clothes
  • Layered Embroidery on Watercolor Fabric: Mixed Media Magic
  • Paf – Panda Dad Free Crochet Pattern
  • How To Use Bath Salts in the Shower Without a Bath – Relaxation, Skincare, and a DIY Salt Recipe
  • How to Make Two Labubu Greeting Cards
  • DIY Fabric Twine Plant Hanger: A Stylish Way to Display Your Plants
  • Knit a Stunning Shawl That Wears Like a Collar
  • How to Make a Summer Pocket Mini Scrapbook Album
  • Book Review: This is How a Ball Rolls
  • A Sweet Top to Show Off Colorful Yarns

Pick Your Blog

  • Sewing
  • Knitting
  • Quilting
  • Crochet
  • Home & Garden
  • Recycled Crafts
  • Scrapbooking
  • Card Making
  • Polymer Clay
  • Cross-Stitch
  • Edible Crafts
  • Felting
  • Glass Art
  • Indie Crafts
  • Kids Crafts
  • Jewelry Making
  • Lesson Plans
  • Needlework
  • Bath & Body
  • Party Ideas
  • Candle Making
  • DIY Weddings
  • Not Craft
  • Free Craft Projects

Copyright © 2025 · CraftGossip | Start Here | Contact Us | Link to Us | Your Editors | Privacy and affiliate policy