• Home
  • Suggest A Craft
  • DIY Newsletter

Craft Gossip

The largest independent craft review site since 2007

  • About CraftGossip
  • Our Network
    • Bath & Body Crafts
    • Candle Making Ideas
    • Crochet Ideas
    • Cross Stitch
    • Edible Crafts
    • Felting Patterns
    • Glass Art
    • Home & Garden Ideas
    • Indie Crafts
    • Jewelry Making
    • Kids Crafts
    • Knitting Patterns
    • Lesson Plans
    • Needlework
    • Party Ideas
    • Polymer Clay
    • Quilting Ideas
    • Recycled Crafts
    • Scrapbooking
    • Sewing Patterns
    • Card Making
    • DIY Weddings
    • Not Craft Ideas
  • Giveaways
  • Roundups
  • Store
  • Search

Gabi Fventes Fiber Artist’s 100 Dolls and More

June 26, 2009 by Linda Lanese

              arkflhcikmm1i6gekiovwun5o1_50010mmzqs3354866844_8f6b472759_m_56682363367054502_f441e32dd0_ml_2b1b27cde9ad4a9a93b154c17cb80ad2

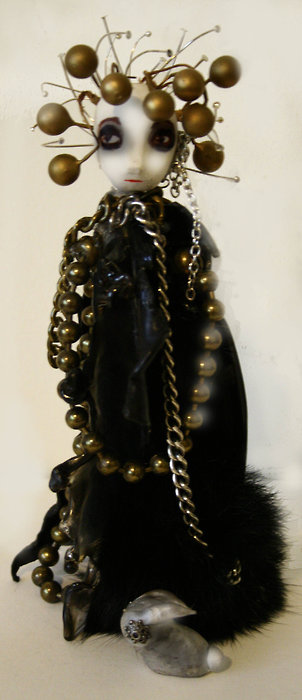
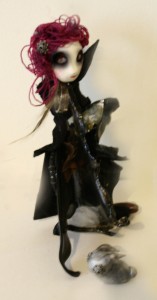
Gabi lives in monterrey, mexico where she created her stunning 100 dolls series which is her final thesis for her major in art.  I discovered Gabi on Flickr CarftGossip.com Crafty Reviews.  I instantly fell in love with all her fascinating dolls and all her art.  We became friends on Facebook and she is a charming young lady.  The expressions on her dolls faces are captivating.  Gabi creates her doll’s faces from polymer clay and all the clothing is created from recycled fabrics and odds and ends of vintage jewelry.  She not only makes her dolls but does amazing paintings and drawings, t-shirts, photography and creates fabulous purses out of old vinyl records.   She has a clothes brand, mostly t-shirts and handmade toys she  calls them Botargas and the brands name is Sintantosmodales.  Let’s all welcome Gab art to the US and go to Flickr and leave some comments or join her on Facebook.  She also has a MySpace blog if you would like to visit and see her art.

Read These Next

  • 12 Grown Up Crafts For Kmart Air Dry Clay
  • 25 Primitive Folk Art Style Sewing Patterns
«
»

Have you read?

Making Popsicle Stick Playing Cards – Surprisingly Fun and Totally Charming!

Okay, I’ll be honest — when I first saw the Popsicle Stick Playing Cards project floating around on Instructables, I wasn’t entirely sold. Popsicle sticks and playing cards? Sounds like a summer camp throwback, right? But curiosity got the best of me (as it usually does with anything slightly crafty and slightly quirky), and I decided to give it a whirl.

And let me just say: I loved this project way more than I expected to.

At its core, this DIY is super simple. You’re basically fusing old playing cards with humble craft sticks to create chunky, tactile “cards” that are durable enough for little hands — or just to enjoy as a cool novelty set. The end result? A full deck that feels a little bit rustic, a little bit retro, and totally unique.

What I really appreciated about this project was how accessible it was. You don’t need anything fancy to get started — just some basic glue, scissors, popsicle sticks (standard size worked fine for me), and of course, a deck of cards that’s either past its prime or missing a few members. We all have one of those lying around somewhere, right?

I ended up using an old UNO deck that was looking pretty rough around the edges, and it turned out great. The cards stick well to the wood, and once everything’s dry, you get these sturdy, chunky pieces that have such a fun hand-feel. It almost reminds me of vintage tile games or big wooden dominoes.

This would be such a great project for kids — whether it’s as a rainy-day craft, a classroom activity, or even as part of a DIY learning game (think memory matching or number recognition). I can see this also being a hit with older adults or people who need cards with a little more grip or visual clarity.

Plus, if you’re a DIY gift-giver like I am, imagine pairing these with a handmade fabric pouch or wooden box for a personalized twist. It would make a really thoughtful and low-cost present for a game lover or nostalgic friend.

Now, one tiny tip: make sure to let everything dry completely before stacking or using them. I rushed a bit on my first batch and ended up with a few cards stuck together. A bit of sanding or sealing would probably help prevent that too, especially if you want them to last.

Overall, this craft hit all the right notes — easy, upcycled, fun, and surprisingly satisfying to hold in your hands when they’re done. It’s a fantastic way to breathe new life into something old, and I honestly can’t wait to make a few themed sets as gifts.

So if you’re on the fence, give it a try. It’s playful, it’s practical, and hey, it might just be your new favorite weekend project.

RSS More Articles

  • Making Popsicle Stick Playing Cards – Surprisingly Fun and Totally Charming!
  • Book Review: Sewing Made Simple: Craft Your Own Clothes with Confidence
  • 12 Scrapbook Layouts with Lots of Layers
  • Cat Themed Learning Activities
  • The Panel Quilting Workshop: 12 Quick-and-Easy Quilting Ideas
  • DIY Beaded Garden Stakes
  • Free Jelly Fish Crochet Pattern
  • Strawberry Cross Stitch Patterns
  • Eco-Craft Fun: 25+ Sustainable Activities to Teach Kids About Going Green
  • Stack and Whack Four Patch Quilt Tutorial – A Beginner-Friendly Quilting Method You’ll Love

Pick Your Blog

  • Sewing
  • Knitting
  • Quilting
  • Crochet
  • Home & Garden
  • Recycled Crafts
  • Scrapbooking
  • Card Making
  • Polymer Clay
  • Cross-Stitch
  • Edible Crafts
  • Felting
  • Glass Art
  • Indie Crafts
  • Kids Crafts
  • Jewelry Making
  • Lesson Plans
  • Needlework
  • Bath & Body
  • Party Ideas
  • Candle Making
  • DIY Weddings
  • Not Craft
  • Free Craft Projects

Copyright © 2025 · CraftGossip | Start Here | Contact Us | Link to Us | Your Editors | Privacy and affiliate policy