• Home
  • Suggest A DIY
  • DIY Newsletter

Craft Gossip

Independent craft blog since 2007

  • About CraftGossip
  • Our Network
    • Bath & Body Crafts
    • Candle Making Ideas
    • Crochet Ideas
    • Cross Stitch
    • Edible Crafts
    • Felting Patterns
    • Glass Art
    • Home & Garden Ideas
    • Indie Crafts
    • Jewelry Making
    • Kids Crafts
    • Knitting Patterns
    • Lesson Plans
    • Needlework
    • Party Ideas
    • Polymer Clay
    • Quilting Ideas
    • Recycled Crafts
    • Scrapbooking
    • Sewing Patterns
    • Card Making
    • DIY Weddings
    • Not Craft Ideas
  • Giveaways
  • Roundups
  • Store
  • Search

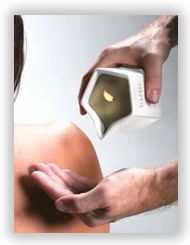
How to Make your own Massage Candles

February 14, 2011 by SandraW

Body massage candle


Massage candles are a unique and romantic way to indulge in a sensual massage with your partner. Not only do they create a romantic atmosphere with their soft and warm glow, but they also serve as a massage oil once melted. It’s a perfect way to unwind after a long day or to add some spice to a romantic evening.

There are many types of massage candles available in the market that come with various scents and ingredients. Scandle, Skinny Dip Candles, and Lux Vivens are just a few examples. These candles usually have scents that range from the romantic such as chocolate-dipped strawberries, to playful scents like sex on the beach.

However, if you are feeling adventurous and want to add a personal touch to your massage candle, you can easily make them at home. Soy wax is perfect for making massage candles as it has a low melting point and is generally skin safe. Make sure to check that the soy wax you use is skin safe, and some brands like Nature Wax are specifically made for use in candles.

To create a skin-nourishing massage candle, you can add an ounce of almond oil, vitamin E, shea butter, or cocoa butter to your melted wax. Once melted, add your preferred essential oils and wick before pouring the mixture into a container. Small jars or decorated tins work well as containers.

One thing to keep in mind is that upcycling mason jars or other containers can be a great way to make use of old containers, but it’s important to remove the labels and clean them properly before using them for massage candles. To remove the labels, soak the jars in hot water with a bit of dish soap and vinegar for about 30 minutes. Then use a scrubber to remove any residue. Rinse well and allow the jars to dry completely before using them for your massage candles.

Making your own massage candles is not only cost-effective, but it also allows you to customize the scent and ingredients to your liking. It’s a fun and easy DIY project that you can enjoy with your partner or as a solo indulgence. Check out Soap Queen TV – Massage Candles video for a full tutorial on making your own skin-safe soy massage candles.

Massage candles are perfect for Valentine’s Day because they double as both candles and massage oil.

After a romantic candlelit dinner, you can use the candle for pouring onto your sweetheart’s body for a soothing massage! The soy wax melts at a lower temperature, so it shouldn’t be too hot.


«
»

Have you read?

Mini Pumpkins and Jack o’Lanterns to Cross Stitch

I just can’t resist sharing a few more Halloween cross stitch patterns when they are as cute and quick to stitch as these!

This boo cross stitch from Luzatolye was the first little Halloween cross stitch pattern to catch my eye. I love the pumpkin Os! At just 23 by 8 stitches and using four colors, you can stitch it up in no time. On 14 count fabric it measures 1.6 by.5 inches, or about 4 by 1.27 cm. 

Another cutie from the same designer is this jack o’lantern with a witch hat. Another four-color project, this one is 14 by 18 stitches, which is an inch by just a little more than an inch, or around 3 cm square, worked on 14 count fabric. 

If you like your minis a little bit bigger, this jack o’lantern with leaves is from White Protea Art and measures 47 by 28 stitches. That comes out to 3.4 by 2 inches, or 8.5 by 5.1 cm, when stitches on 14 count fabric. It uses nine colors. 

Or there’s also this little cutie from that same designer. I love the little leaf on top of the pumpkin. At 33 by 36 stitches, it comes out to 2.4 by 2.6 inches, or 6 by 6.5 cm, when stitched on 14 count fabric. I think it uses around eight colors. 

Template Love Create also has two mini jack o’lantern cross stitch patterns that I like (I swear I didn’t plan to do two from each of the same designers, it’s just the whimsy of an Etsy search!). There’s one that is more round and one that’s oblong, which I like because it’s different from most of the pumpkin patterns you see. The pattern listings say both are six colors (though they look like four to me) and 28 by 28 stitches, but I don’t think that can be true. Either way they both fit in a 3 inch hoop and would be a super cute little addition to your Halloween decor. 

RSS feed: More Articles More Articles

  • Mini Pumpkins and Jack o’Lanterns to Cross Stitch
  • Beaded Halloween Skeleton Craft – A Spooky-Cute Bead Project For Halloween Decorating
  • Sweet Mini Halloween Knitting Patterns
  • Lightweight Lacy Crochet Tee Pattern That’s Perfect for Layering
  • 3 FREE Comfy Cozy Coloring Pages
  • DIY Halloween Bath Bombs – Spooky-Fun Self-Care for Ghouls of All Ages
  • Designer Spotlight: Threadbound Art
  • A Simple Knit Blanket to Keep You Cozy
  • 12 Fall Scrapbook Layouts for Going to the Pumpkin Patch
  • Fabric Yardage Conversion Chart for Quilters and Sewers

Pick Your Blog

  • Sewing
  • Knitting
  • Quilting
  • Crochet
  • Home & Garden
  • Recycled Crafts
  • Scrapbooking
  • Card Making
  • Polymer Clay
  • Cross-Stitch
  • Edible Crafts
  • Felting
  • Glass Art
  • Indie Crafts
  • Kids Crafts
  • Jewelry Making
  • Lesson Plans
  • Needlework
  • Bath & Body
  • Party Ideas
  • Candle Making
  • DIY Weddings
  • Not Craft
  • Free Craft Projects

Copyright © 2026 · CraftGossip | Start Here | Contact Us | Link to Us | Your Editors | Privacy and affiliate policy