• Home
  • Suggest A Craft
  • DIY Newsletter

Craft Gossip

Independent craft blog since 2007

  • About CraftGossip
  • Our Network
    • Bath & Body Crafts
    • Candle Making Ideas
    • Crochet Ideas
    • Cross Stitch
    • Edible Crafts
    • Felting Patterns
    • Glass Art
    • Home & Garden Ideas
    • Indie Crafts
    • Jewelry Making
    • Kids Crafts
    • Knitting Patterns
    • Lesson Plans
    • Needlework
    • Party Ideas
    • Polymer Clay
    • Quilting Ideas
    • Recycled Crafts
    • Scrapbooking
    • Sewing Patterns
    • Card Making
    • DIY Weddings
    • Not Craft Ideas
  • Giveaways
  • Roundups
  • Store
  • Search

Drizzly Rain Vs Muddlarks Rain Suits

November 3, 2012 by Shellie Wilson

This is another one of our travel product reviews from our recent trip across Europe. We first mentioned Muddlarks Rain suits in our original travel post.

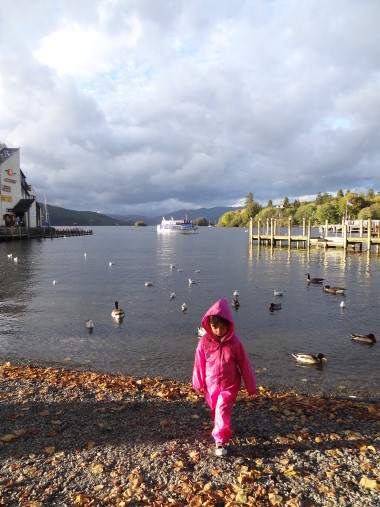
When I first came across Muddlarks Rain suits I thought they looked great and would suit my needs but I was a little apprehensive as to if they would be comfortable enough for the kids to wear but more importantly enjoy wearing them. As you can see from the photos below this was NEVER an issue.  (We reviewed the All In One Lightweight Rain Suits for my 5 and 2 year olds)

The kids never once said they wouldn’t put them on and they were so easy to get on and off that we could take them off  every time we went inside whilst walking around drizzly England streets.

They took up minimal room in our suitcase and I could easily fit both of them under our small stroller pram with room to spare for other stuff.

I would definitely recommend these suits as the perfect alternative to a raincoat as the legs are protected and the kids felt more freedom being able to jump around and not have mummy saying “mind the puddles”


For travelling purposes it would have been great to have a slip on shoe cover or something small (we couldn’t spare room for rain boots) next time I would consider taking a pair or swim shoes for everyday wear that they could use for rainy days too.

Check out their other versions too like the Bib N brace  and rain jacket.

Read These Next

  • 15 DIY Rain Barrels You Can Make Yourself
  • 14 Handy Travel Accessories You Can Sew
«
»

Have you read?

DIY Clay Egg Tray – Handmade Farmhouse Charm for Your Kitchen

There’s something about eggs that feels timeless—whether it’s a basket of freshly laid ones from the farmer’s market or the dozen you picked up on your weekly grocery run. But let’s be honest, those cardboard cartons aren’t exactly pretty to look at. That’s where this little project comes in: a handmade ceramic pottery egg holder that looks beautiful sitting out on the counter, ready for breakfast or brunch.

This DIY egg holder is both practical and stylish, giving you a sturdy place to store or display your eggs. It’s also a fun way to experiment with clay, even if you’re brand new to pottery. By using a recycled egg carton as a mold, you can easily create those classic rounded shapes without complicated tools.

I love projects like this because they blend utility with charm—you’ll end up with a piece that feels rustic, modern, and completely one-of-a-kind. Plus, they make thoughtful gifts for foodies, farmhouse kitchen lovers, or anyone who appreciates a touch of handmade in their home.

In this tutorial, I’ll walk you through step by step how to transform a lump of clay into a farmhouse-chic ceramic egg holder. Whether you use air-dry clay for a simple weekend project or pottery clay for a kiln-fired piece, you’ll be amazed at how quickly it comes together.

Materials You’ll Need:

  • Air-dry clay or pottery clay (depending on whether you’ll kiln-fire it or not) 
  • A recycled egg carton (cardboard type works best) 
  • Rolling pin or bottle 
  • Craft knife or clay cutting tool 
  • Water and a small sponge for smoothing 
  • Optional: white paint or glaze if firing 

Step 1: Prep Your Carton

Grab a standard cardboard egg carton and trim it down so you only have the section you’ll use for your holder (six-egg size is perfect). If the cone peaks inside the carton are too tall, snip them shorter so the clay will form neatly over the top.

(Refer to image: cut-out carton with holes in the peaks)

Step 2: Roll Out the Clay

Take a ball of clay and roll it out flat to about ½ cm thickness. Keep it even but not paper-thin—this is what gives the egg holder strength.

(Refer to image: hands pressing clay flat)

Step 3: Mold the Clay

Drape your rolled clay over the inside of the egg carton. Gently press it down into the cups so it takes the familiar egg-carton shape. Smooth the edges with your fingers or trim them neatly with a craft knife for a clean finish.

(Refer to image: hand pressing clay into the egg carton mold)

Step 4: Refine the Shape

Carefully peel the clay from the carton. At this point, you’ll have the wavy outline and little pockets where your eggs will sit. Use damp fingers or a sponge to smooth away cracks and rough edges.

(Refer to image: formed clay holder on table)

Step 5: Dry and Harden

  • Air-dry clay: Leave it out for 24–48 hours until fully hardened. 
  • Pottery clay: Let it dry leather-hard before bisque firing in the kiln. Once bisque-fired, apply glaze (a glossy white looks so modern!) and fire again. 

Step 6: Style and Use

Once dry (or fired and glazed), your egg holder is ready to use! It looks beautiful styled on a breakfast table, in the fridge for farm-fresh eggs, or even as a quirky jewelry holder for rings and beads.

(Refer to hero image: finished ceramic egg holder with eggs inside)

Tips for Success:

  • Don’t roll your clay too thin—it will warp or crack when drying. 
  • For a rustic look, leave the edges organic and wavy. 
  • If you’re painting air-dry clay, a matte chalk paint works best for that ceramic-like finish. 

This little DIY egg holder is proof that something so simple can become a handmade treasure. Plus, it makes a brilliant handmade gift for foodies and farmhouse lovers.


Which Clay Should You Choose for Your Egg Holder?

One of the most common questions I get asked is: what kind of clay works best for a project like this? The truth is, there’s no single right answer—it depends on the look and finish you want. To give you a little side-by-side comparison, here are four variations of the same egg holder, each made with a different type of clay.

  • Polymer Clay – Perfect for beginners or small projects, polymer clay is easy to handle and cures in a standard oven. It gives a smooth, lightweight finish, but keep in mind it’s not food-safe unless properly sealed. Best for decorative use. 
  • White Air Dry Clay – This is the simplest choice if you don’t have access to a kiln. Air dry clay dries naturally at room temperature, leaving a matte, chalky ceramic look. It’s beautiful painted or left natural, though it’s not as strong as fired pottery. 
  • Glazed Pottery Clay (Pink) – For that authentic, long-lasting ceramic finish, pottery clay is the way to go. After firing and glazing, you’ll get a glossy, durable, food-safe piece. The blush pink glaze here adds a touch of softness and farmhouse charm. 
  • Terracotta Air Dry Clay – This clay has a warm, earthy tone that brings out a rustic, Mediterranean feel. Like white air-dry clay, it doesn’t require firing, but it’s more porous. It’s best for decorative displays rather than functional use. 

Each version has its own charm, so the choice really depends on your tools, skills, and whether you want a purely decorative piece or something durable enough for daily kitchen use.


RSS More Articles

  • DIY Clay Egg Tray – Handmade Farmhouse Charm for Your Kitchen
  • Textured Hat Knitting Patterns
  • Free Crochet Skull and Bones Granny Square Pattern
  • Easy Fall Crafts To Decorate Your Home
  • Copycat Sizzler Cheese Toast Recipe – Bring Back the Family Favorite
  • Floppy Disk Crafts: Clever Ways to Upcycle Retro Tech
  • Etsy Spotlight: Goose Baby Lovey PDF Pattern
  • Summer Accordion Mini Album
  • How to Make 3 NEW Pinwheel Quilts – Free Quilting Tutorial
  • Spray Paint Makeover Magic: How a Wicker Table (and My Chairs!) Got a New Life

Pick Your Blog

  • Sewing
  • Knitting
  • Quilting
  • Crochet
  • Home & Garden
  • Recycled Crafts
  • Scrapbooking
  • Card Making
  • Polymer Clay
  • Cross-Stitch
  • Edible Crafts
  • Felting
  • Glass Art
  • Indie Crafts
  • Kids Crafts
  • Jewelry Making
  • Lesson Plans
  • Needlework
  • Bath & Body
  • Party Ideas
  • Candle Making
  • DIY Weddings
  • Not Craft
  • Free Craft Projects

Copyright © 2025 · CraftGossip | Start Here | Contact Us | Link to Us | Your Editors | Privacy and affiliate policy