• Home
  • Suggest A DIY
  • DIY Newsletter

Craft Gossip

Independent craft blog since 2007

  • About CraftGossip
  • Our Network
    • Bath & Body Crafts
    • Candle Making Ideas
    • Crochet Ideas
    • Cross Stitch
    • Edible Crafts
    • Felting Patterns
    • Glass Art
    • Home & Garden Ideas
    • Indie Crafts
    • Jewelry Making
    • Kids Crafts
    • Knitting Patterns
    • Lesson Plans
    • Needlework
    • Party Ideas
    • Polymer Clay
    • Quilting Ideas
    • Recycled Crafts
    • Scrapbooking
    • Sewing Patterns
    • Card Making
    • DIY Weddings
    • Not Craft Ideas
  • Giveaways
  • Roundups
  • Store
  • Search

DIY Unicorn Dreamcatcher

May 26, 2018 by Shellie Wilson

This dreamcatcher can be a great gift for a Unicorn fan! It requires only a few supplies, which you might already have at home. Spare a few minutes to make this adorable unicorn theme dreamcatcher!

Materials

  1. Yarn – 5 to 6 Different Colors
  2. Felt fabric – 3 to 4 Different Colors
  3. Scissors
  4. Craft Wire – 16 Gauge
  5. Hotglue Gun
  6. Faux Pearl Beads

Step-1: Determine the size for the dreamcatcher and create the loop accordingly. Wrap the loop using white yarn or fabric; make sure to cover the loop entirely. Use white yarn to create the dreamcatcher web pattern inside the loop.

We love our Unicorn parties around here so much that we decided to create our own DIY Unicorn Party  Pinterest board. Which means we have literally 100’s of our favorite Unicorn ideas, party decorations, Unicorn cakes and other Unicorn tutorials and crafts all in one spot. You can check them all out here DIY Party Ideas – Unicorn.

Or check out these Unicorn Crafts


Step-2: Cut out long strands from different colored yarns. Take 4 yarn strands to make a group and make 8-10 groups of yarns strands. Attach the yarn strand groups at the bottom intact side of the loop. You can trim the open bottom edges of the yarns if you want to.


Step-3: Use felt fabrics, cardstock papers to create flowers. Keep a nice and balanced color combination of the flowers. Make as many flowers as you’ll need. Cut out the unicorn horn pattern from a foam piece. Cut out a slightly curvy piece from foam piece, see picture of this step. This curvy piece will be the base for attaching the flowers, horns and ears.


Step-4:  Cover the top of the horn pattern using golden fabric or paper or paint, which ever supply is available. Attach the flowers on the front side of the base one by one. Attach the ears and then the horn at the back side of the base. And finally attach the curvy piece on the top side of the dreamcatcher loop.


Attach hanging mechanism and done! You can add more details if you want to.

Enjoy!

«
»

Have you read?

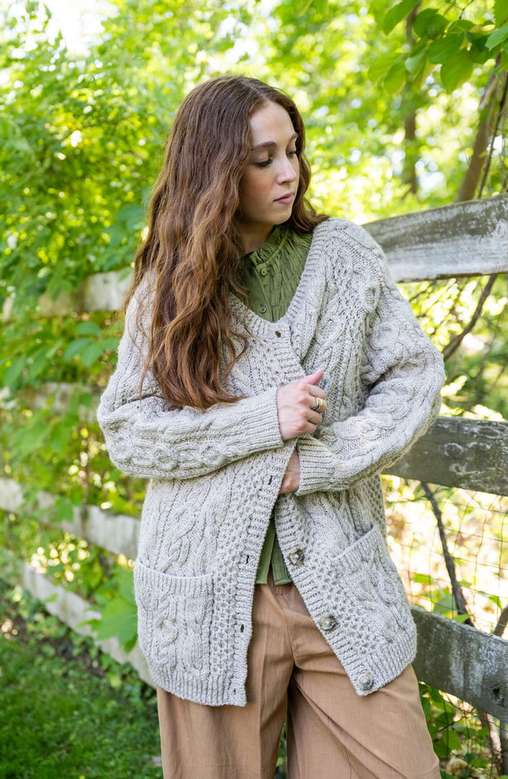
Knit a Classic Aran Cardigan with this Free Knitting Pattern

Not too long ago I did a test knit for another designer that was for a cabled cardigan. It’s really cozy and nice but it just about broke me in a ton of different ways. I couldn’t get gauge, which I suppose is my own problem, but mainly I was somehow both bored and forced to pay attention at the same time. 

Because it used the same cable all over, I always had to know what row I was on, but nine out of ten of those rows, nothing in particular was going on. So I couldn’t stop paying attention, but what I needed to attend to was boring. 

It may have ruined me for knitting cabled sweaters, but maybe I just need something that’s more engaging. Like this Modern Aran Cardigan pattern from Lion Brand Yarn. 

This is a reworking of an old pattern from their archives, and you can tell that form the classic look of the cables and the oversized feel (nothing cropped about this one!). It has allover cables, but like a classic Aran sweater it’s not the same cable, so you’ll have to pay attention to what row you’re on and what cable turns happen for which cables on that row. 

Because of this, it’s considered an intermediate knitting pattern, but if you’re comfortable working from multiple charts at once it shouldn’t be a problem for you. There are three different charts and seven different cable moves. 

Also because the pattern is so big and boxy there are only two sizes available, with a finished chest measurement of either 49 or 63 inches (that’s 124.5 or 160 cm). It’s up to you to decide how much ease you would like and whether that will work for your body. 

The pattern uses worsted weight yarn (and calls for another classic, Lion Brand Fisherman’s Wool). It calls for six buttons and includes pockets to make it extra cozy. 

This one looks like a great winter project to make and to wear if you’re up for a bit of a challenge. You can grab the free pattern or buy a kit with the yarn needed direct from Lion Brand Yarn. 

[Photo: Lion Brand Yarn]

RSS feed: More Articles More Articles

  • 10 Ice Cubes That Instantly Elevate Champagne
  • Setting Up a Beginner Craft Space? A Practical Shopping List
  • Thrift Store Upcycling: Rustic Pumpkin Decorations From Glass Bowls
  • Mini Pumpkins and Jack o’Lanterns to Cross Stitch
  • Beaded Halloween Skeleton Craft – A Spooky-Cute Bead Project For Halloween Decorating
  • Sweet Mini Halloween Knitting Patterns
  • Lightweight Lacy Crochet Tee Pattern That’s Perfect for Layering
  • 3 FREE Comfy Cozy Coloring Pages
  • DIY Halloween Bath Bombs – Spooky-Fun Self-Care for Ghouls of All Ages
  • Designer Spotlight: Threadbound Art

Pick Your Blog

  • Sewing
  • Knitting
  • Quilting
  • Crochet
  • Home & Garden
  • Recycled Crafts
  • Scrapbooking
  • Card Making
  • Polymer Clay
  • Cross-Stitch
  • Edible Crafts
  • Felting
  • Glass Art
  • Indie Crafts
  • Kids Crafts
  • Jewelry Making
  • Lesson Plans
  • Needlework
  • Bath & Body
  • Party Ideas
  • Candle Making
  • DIY Weddings
  • Not Craft
  • Free Craft Projects

Copyright © 2026 · CraftGossip | Start Here | Contact Us | Link to Us | Your Editors | Privacy and affiliate policy