• Home
  • Suggest A Craft
  • DIY Newsletter

Craft Gossip

The largest independent craft review site since 2007

  • About CraftGossip
  • Our Network
    • Bath & Body Crafts
    • Candle Making Ideas
    • Crochet Ideas
    • Cross Stitch
    • Edible Crafts
    • Felting Patterns
    • Glass Art
    • Home & Garden Ideas
    • Indie Crafts
    • Jewelry Making
    • Kids Crafts
    • Knitting Patterns
    • Lesson Plans
    • Needlework
    • Party Ideas
    • Polymer Clay
    • Quilting Ideas
    • Recycled Crafts
    • Scrapbooking
    • Sewing Patterns
    • Card Making
    • DIY Weddings
    • Not Craft Ideas
  • Giveaways
  • Roundups
  • Store
  • Search

DIY Unicorn Crayons

November 10, 2018 by Shellie Wilson

  • Broken Crayons
  • Silicone Unicorn Mold ~ can be purchased at Williams Sonoma

Instructions

Lay your Unicorn Mold out. I suggest placing it on a baking sheet so you can easily move the mold in and out of the oven with zero spills.

Now take your broken crayons and remove all the paper labels.

Then sort the crayons by color.


Now for the fun part. Take your broken crayons and start placing them in the mold. You can place the crayons in the mold by color or just toss them in the mold randomly for rainbow Unicorn Crayons.

Once your Unicorn Mold is filled with crayons, turn the oven on 250 degrees. Then place the mold in the oven for about 10 minutes or until the crayons have fully melted.

After your Unicorn Crayons are nice and melted, take them out of the oven and let them cool and return to a solid state.

Once your Unicorn Crayons are solid, pop your Unicorn Crayons out of the mold.

Color away!!! Enjoy 🙂

We love our Unicorn parties around here so much that we decided to create our own DIY Unicorn Party  Pinterest board. This means we have literally 100’s of our favorite Unicorn ideas, party decorations, Unicorn cakes, and other Unicorn tutorials and crafts all in one spot. You can check them all out here DIY Party Ideas – Unicorn.  Or check out these Unicorn Crafts and these fun Unicorn Party decorations.
Read These Next

  • Eco-Craft Fun: 25+ Sustainable Activities to Teach…
  • 15 DIY Quilted Oven Mitt Patterns
«
»

Have you read?

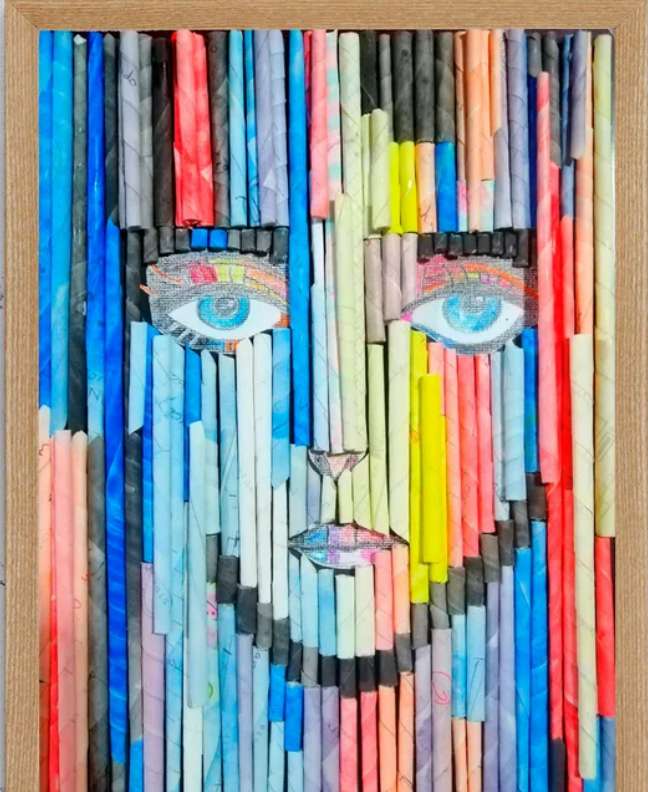
Recycled Paper Cylinder Face Art – A Colorful Win for All Ages

I recently stumbled across this super creative project on Instructables – “Face With Recycled Paper Cylinders” – and I had to share it with you all because it’s just the kind of craft that checks all my favorite boxes: recycled materials, hands-on creativity, and fun for literally any age.

The idea is simple but genius—roll strips of recycled paper (think junk mail, old magazines, leftover printer paper) into cylinders, then arrange and glue them to form a unique abstract face. You can make it funky, realistic, Picasso-inspired—whatever your mood or style dictates!

What I really love is the blend of eco-conscious crafting with true artistic expression. This isn’t just another kids’ project—it’s something you could easily do with a group of little ones, a classroom full of teens, or even as an adult art therapy or weekend wind-down activity. It’s super relaxing and surprisingly satisfying seeing all those paper rolls come together to form something new and expressive.

The tutorial itself is easy to follow, with plenty of visuals to guide you along the way. You don’t need any fancy materials—just glue, paper, scissors, and a board or piece of cardboard to serve as your canvas.

I also appreciate how this project leaves so much room for personalization. Want to make it into a full face? Go for it. Prefer to focus on a single eye or mouth? Totally works. You can even play with color schemes by choosing papers with a certain palette, or painting over them once they’re rolled.

In short: this is a total keeper for anyone who loves crafting with purpose. It’s the kind of project that sparks creativity while gently reinforcing the idea that beautiful things can come from what we usually throw away.

Highly recommend giving it a go—solo or with a group. And if you try it, tag me or drop a pic—I’d love to see your recycled masterpiece!

RSS More Articles

  • Cozy Up Your Holidays with This Stunning Christmas Blanket!
  • 5 Must-Know Secrets to Turning Your Suburban Home into a Profitable, Sustainable Homestead
  • Recycled Paper Cylinder Face Art – A Colorful Win for All Ages
  • 12 FREE Summer Digital Stamps to Download
  • Today Only: 50% Off When You Spend $50 at Crochet.com!
  • Today only 50% OFF When You Spend $50 at KnitPicks.com
  • Kids and Adults Will Love this Paper Version of Tetris
  • Knit a Hat with a Flock of Chickens
  • That Time a Thrift Store Employee Shamed Me – And Your Honest Responses
  • DMC American Camping Embroidery Pattern – A Nostalgic Outdoor Stitch for Summer Lovers

Pick Your Blog

  • Sewing
  • Knitting
  • Quilting
  • Crochet
  • Home & Garden
  • Recycled Crafts
  • Scrapbooking
  • Card Making
  • Polymer Clay
  • Cross-Stitch
  • Edible Crafts
  • Felting
  • Glass Art
  • Indie Crafts
  • Kids Crafts
  • Jewelry Making
  • Lesson Plans
  • Needlework
  • Bath & Body
  • Party Ideas
  • Candle Making
  • DIY Weddings
  • Not Craft
  • Free Craft Projects

Copyright © 2025 · CraftGossip | Start Here | Contact Us | Link to Us | Your Editors | Privacy and affiliate policy